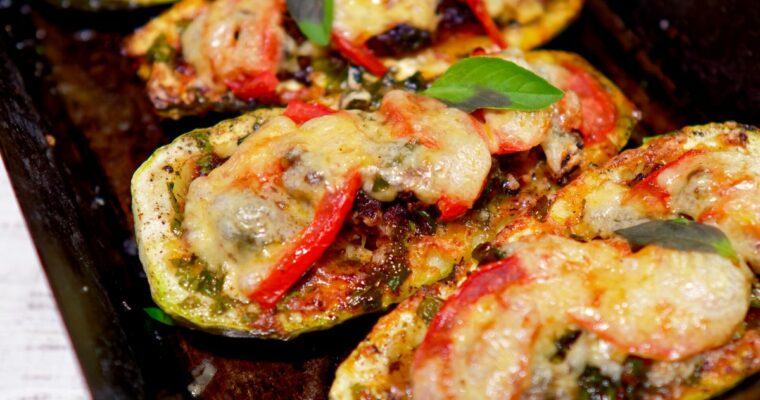
Easy and Delicious Recipes

Author: Sarah Berthold

Sweet & Sticky Honey Chicken Recipe

Sweet & Sticky Honey Chicken Recipe

Who doesn’t love a sticky honey chicken dish that is easy to make, tastes great, and the whole family eats up? Imagine chunks of juicy chicken covered in a sweet and spicy honey glaze with the perfect amount of crispiness to make your taste buds Read More

Italian Pizzelle Cookies Recipe (The Oldest Known Cookie)

Italian Pizzelle Cookies Recipe (The Oldest Known Cookie)

Imagine taking a stroll through the lovely streets of an Italian village while inhaling the smell of freshly brewed espresso and warm cookies. Yes, we’re referring to the authentic Italian Pizzelle recipe, a sweet treat that has won people’s hearts and taste buds worldwide. In Read More

Homemade Canestrelli Recipe (Italian Egg Yolk Cookies)

Homemade Canestrelli Recipe (Italian Egg Yolk Cookies)

On a sunny morning in Tuscany, a soft breeze rustled through the rolling hills, carrying the sweet aroma of Nonna’s seductive Canestrelli. Oh, these little golden jewels! Just the name “Italian Egg Yolk Cookies” makes your taste buds dance to the tarantella in anticipation. Canestrelli is like getting a warm hug from your favorite Italian grandmother while she whispers “Mangia!” in your ear.

Get ready to be taken on a magical journey through the art of baking these melt-in-your-mouth treats, and let the spirit of La Dolce Vita fill your kitchen with love and laughter. So put on your apron, and let’s go on a magical adventure to make these heavenly, sunshine-filled Canestrelli!

Canestrelli (Italian Egg Yolk Cookies)

Gather around, my fellow cookie lovers, because I will tell you the secret behind these delicious Italian treats. Canestrelli are traditional Italian cookies from sunny areas like Liguria and Piedmont. They are also called “the golden crescents of love.” When you take a bite, the soft crumb and silky egg yolks make you feel like you’re in a quaint little Italian village.

These heavenly cookies have a long and interesting history that goes back hundreds of years. The stories about how they came to be are as intertwined as the arms of two lovers lost in each other’s embrace. Canestrelli is more than just cookies.

They are a love story, just like Sicilian Cassata cakeSicilian Cannoli, or Italian Gelato, a celebration of Italian culinary fine art, and a testament to the magic that happens when simple ingredients like flour, sugar, and butter come together in a passionate dance.

One can’t help but be hypnotized by the magical dusting of powdered sugar on these cookies, which looks like a light snowfall on the beautiful Italian mountains. When you bite into the crumbly, buttery goodness, it’s like the heavens have opened up and is serenading your taste buds with heavenly flavors.

So, my dear friends, let’s pay tribute to the charming Canestrelli, these Italian Egg Yolk Cookies that have won the hearts of cookie lovers all over the world. As we start this fun baking adventure, may our kitchens be filled with the sounds of laughter, the smell of love, and, of course, the irresistible smell of freshly baked Canestrelli. As they say in Italy, Buon appetito!

Homemade Canestrelli Recipe (Italian Egg Yolk Cookies)

Ingredients you’ll need

Hard-boiled egg yolks: These golden orbs are the stars of the show. They give our Canestrelli a rich, velvety texture that makes them crumble and melt on your tongue like an Italian sunset.

All-purpose flour: All-purpose flour is the stage on which our other ingredients do their dance, giving delicate turns of flavor structure and stability.

Cornstarch: Cornstarch is the whispering wind that gives these cookies a feather-light touch and keeps them as soft as the wings of a flying butterfly.

Cold butter: Cold butter is the maestro of this symphony of aromas. It weaves through the other ingredients with ease, giving our Canestrelli a creamy, melt-in-your-mouth texture.

Confectioners’ sugar: Confectioners’ sugar is like a magical snowfall that gently kisses our cookies, adding just the right amount of sweetness to balance the rich, buttery flavors of the Canestrelli.

Lemon zest: Like children’s laughter echoing through the cobbled streets, lemon zest gives our cookies a bright, zesty zing that gives them depth and a touch of fun, just like in this Italian lemon ricotta cake

Vanilla extract: Like the soft, loving arms of Nonna, the smell of vanilla extract wraps around your heart and stays there long after you’ve eaten the last crumb.

Homemade Canestrelli Recipe (Italian Egg Yolk Cookies)

How to Store Canestrelli?

Once your Canestrelli has cooled, carefully place them in an airtight container or a cookie tin. This will keep them as fresh as the air in Tuscany. Layer the cookies with thin sheets of parchment paper to keep them from breaking or losing their pretty sugar coating.

Can I Prepare Canestrelli in Advance?

Yes, you can make the Canestrelli dough ahead of time.  Make your dough by following the instructions, and when you’re done, wrap it in plastic wrap.

Refrigerate for 1–2 days: Give your dough the gift of time by putting it in the cool sanctuary of your refrigerator for 1–2 days to rest and develop its flavors.

Temper at room temperature: Before you shape your cookies, give the dough about 1 to 2 hours to get used to room temperature. This important step makes the dough more flexible and easier to roll, which makes it possible to make Canestrelli with beautiful shapes.

Homemade Canestrelli Recipe (Italian Egg Yolk Cookies)

Canestrelli Recipe (Italian Egg Yolk Cookies)

With this yummy Canestrelli recipe, you’ll be taken on a trip to Italy through your taste buds. You’ll sing “Mamma Mia!” as soon as you try one of these delicious cookies. So put on your favorite Italian music, put on your apron, and let’s get ready to bake a storm with these delicious treats.

Ingredients

  • 4 hard-boiled egg yolks
  • 7 oz of all-purpose flour (200 g)
  • 1 cup of cornstarch + 1 tsp (125 g)
  • 1 cup of cold butter (200 g)
  • ⅔ cup of confectioners sugar (230 g)
  • 1 zest for a whole lemon
  • 1 tsp of vanilla extract

Instructions

  • First, let’s cook the egg. Put the eggs in a pot with cold water and boil it for 8 to 10 minutes. Once it’s done, run it under cold water to cool it down. Peel the egg yolks and set them aside. You can do this step ahead of time so that when it’s time to bake, you’re ready to go.
  • Sift flour, cornstarch, and confectioners sugar together in a large bowl. Add lemon zest and vanilla. Add cold, cubed butter and chop everything together using a dough blender or a food processor.
  • Now add the grated egg yolks and work the dough with your hands until it forms a smooth ball. Wrap it in plastic wrap and let it sit for 30 to 60 minutes. If you want to make the dough ahead of time, you can even put it in the fridge overnight. Just remember to take it out at least 1–2 hours before you start making the cookies.
  • Turn your oven up to 335 F. Cut off a big piece of the dough and roll it out to about 1/3 inch thick on a lightly floured work surface.
  • Use a cookie-shaped cutter to cut out your cookies, and use a medium-sized piping nozzle or other small round hollow device to press out the middle of each cookie.
  • Put your cookies on a baking sheet lined with parchment paper, and bake them in a preheated oven for 10-15 minutes. You want your Canestrelli to stay pale and not get too brown.
  • Lastly, let your cookies cool completely on a wire rack and sprinkle them generously with confectioners sugar. And voila! You’ve made some delicious Canestrelli cookies that will definitely impress everyone.

Enjoyed this Italian Canestrelli recipe? 🇮🇹🍪 Add some flavor to your Pinterest board by pinning the image below. Let’s share some cookie love with everyone, one pin at a time. 😋

Homemade Canestrelli Recipe (Italian Egg Yolk Cookies)

Authentic Filipino Beef Caldereta Recipe

Authentic Filipino Beef Caldereta Recipe

Beef Caldereta is a must-try dish if you want a meal with strong flavors and hearty ingredients. This tasty beef stew is a popular staple in Filipino cuisine and has earned a reputation for its rich taste and colorful ingredients. Beef Caldereta is different from Read More

Easy Buko Pandan Recipe (Filipino Coconut Dessert)

Easy Buko Pandan Recipe (Filipino Coconut Dessert)

Listen up, dessert fans! Summer will be here sooner than you think, and we have a treat that will blow your mind and make your taste buds dance with delight. It’s Buko Pandan, the best cold dessert in the Philippines. This delicious dessert is a Read More

Starbucks Cake Pops Recipe (Birthday & Chocolate)

Starbucks Cake Pops Recipe (Birthday & Chocolate)

Whoever thought of putting the cake on a stick deserves an award, and Starbucks Cake Pops are the crown jewel of this brilliant idea. These tiny treats never fail to improve my day; my kids love them just as much. It’s the perfect way to satisfy my sweet tooth while sipping our favorite coffee blend.

But now we’ve taken this treat from Starbucks menu to the next level by making our own Cake Pops at home! It’s become our family’s little hobby, and we love trying different flavors and designs. From pink birthday cake pop to chocolate cake pop, we have you covered.

The best part is that we can enjoy our homemade treats without spending money or leaving the house. It’s like having our own cake pop shop!! My kitchen is now a mini bakery, and I’m loving every minute of it.

Starbucks Cake Pops Copycat

Have you ever gotten a sudden craving for a cake pop from Starbucks and dropped everything to get one? The way these little cake balls melt in your mouth is really hard to resist. I don’t know about you, but I’d choose a cake pop over any of their fancy drinks any day!

So why wait in a long drive-thru line when you can make these delicious treats at home? Here is how to make cake pops like the ones at Starbucks. You don’t have to leave your house to satisfy your sweet tooth. All you need are a few simple ingredients and a few easy steps.

Now, I’ll let you in on a little secret: these homemade cake pops might be even better than the ones you can buy at Starbucks. Why? Because they are made with just the right amount of cake crumbs and powdered sugar to make a moist, delicious cake ball. And that’s not all—they’re then dipped in a rich, creamy white chocolate coating that takes their deliciousness to a whole new level.

Starbucks Cake Pops Recipe (Birthday & Chocolate)

Ingredients you’ll need

Classic cake mix box: You are free to use any brand or flavor of cake mix, but for the real Starbucks taste, try using a classic yellow cake mix.

Vanilla frosting: You can use frosting from the store if you want to save time, but making your own frosting gives you more control over how it tastes and feels. The best frosting for the Starbucks version is a simple vanilla frosting.

Cake pop sticks: Cake pop sticks are a must-have if you want to make cute, portable treats out of cake mix and frosting. You can find them online or in most craft stores. If you can’t find cake pop sticks, you can also use lollipop sticks.

Pink candy melts: Pink candy melts are small candy wafers in the shape of discs. They come in different colors and flavors. Pink candy melts are used to cover the outside of Starbucks’ cake pops. You can find them online or in stores that specialize in baking. There’s no need to worry if you can’t find pink candy melts. You can easily change your white chocolate chips to pink by adding food coloring to the mix. This way, you can get the same lovely color without much trouble.

White sprinkles: White sprinkles are small, lovely sugar crystals that give your cake pops a different texture and look. Starbucks’ sprinkles are white, but you can use any color or shape you want. Most grocery stores that sell baking supplies have them.

For Starbucks chocolate cake pops:

Chocolate candy melts: Instead of using pink candy melts to cover your cake pops, you’ll need chocolate candy melts. You can also get these in different flavors and colors, so pick your favorite.

Devil’s Food chocolate cake mix: You won’t be able to make the chocolate cake base for your cake pops with yellow cake mix. Instead, you’ll need Devil’s Food chocolate cake mix. The chocolate candy melts go well with the rich chocolate flavor of this cake mix.

Cake frosting: You’ll still need frosting to mix with the cake mix, but for the Devil’s Food chocolate cake mix, you’ll want to use chocolate frosting.

With these added ingredients, you can turn Starbucks cake pops into a delicious chocolate version that will satisfy any chocolate craving.

How to make Starbucks Cake Pops

Step 1: First, warm your oven according to the cake mix box instructions. Next, mix up the cake batter in a big bowl and bake it in the oven. Let the cake cool to room temperature when it’s done.

Step 2: Take it out of the pan and peel off the brown outer layer. Crumble the rest of the cake and crumbs into a large mixing bowl.

Step 3: Mix the crumbled cake with frosting and stir until everything is well-mixed.

Step 4: Make 25-35 cake balls, depending on how big you want them, and put them on a baking sheet that has been lined. Make sure each cookie is about the same size by using a cookie scoop.

Step 5: Melt the pink candy melts (or chocolate candy melts) for 30 seconds in a small bowl in the microwave, then stir. Keep heating it for 30 seconds at a time until it melts.

Step 6: Dip each of your cake pop sticks in the melted candy and then halfway into the cake balls. Place them in the freezer for around 10 to 12 minutes.

Step 7: After the cake pops have been in the freezer for at least 10-12 minutes, dip each one into the melted candy melts and make sure it is completely covered. Let the extra candy melt back into the bowl as it drips.

Step 8: Once the cake pops have been dipped, put them on a block of Styrofoam to hold them while the candy hardens. Add white sprinkles (or any other you like) to the candy immediately before it dries.

Step 9: The last step is to cover the cake pops with candy melts and let them dry completely. Then they are ready to eat and serve once they are completely dry.

Starbucks Cake Pops Recipe (Birthday & Chocolate)

Starbucks Cake Pops Tips

  • Instead of using candy melts for the outside coating, try using white almond bark. Want a bit of color? Add some food coloring to the mix and start dipping!
  • Make sure to break up the cake into small pieces to ensure your cake pops are smooth and tasty. No chunky parts allowed!
  • To make uniform cake pop balls, use a cookie scoop to save time and trouble. We’re sure your guests will appreciate the aesthetics.
  • Don’t be tempted to use the dry outer surface of the cake because it will make your cake pops fall apart. For best results, simply throw it and use the moist center.
  • Don’t swirl your cake pops in the melted candy. Instead, go straight down for better coverage. Using a tall glass will make dipping even easier.
  • Want the sprinkles to stay? Make sure to add them before the coating hardens. No one wants a sad cake pop that’s missing sprinkles.
  • If you put your cake pops in the freezer to harden them, don’t leave them there for more than 15 minutes. Otherwise, your coating will harden too fast and your sprinkles will fall off.
  • Want to make your presentation look even fancier? Instead of using Styrofoam, get a cake pop stand from your local craft store. The display will amaze your guests.

Can I Make Cake Pops Ahead of Time?

You can absolutely make cake pops ahead of time. The key is to make the cake and roll it into balls, then put them in the fridge for up to a month. When you’re ready to decorate, just remove them from the refrigerator and start working. That’s all there is to it.

These cake pops can be made ahead of time and are a hit with kids. In fact, the Starbucks Birthday Cake Pops and Chocolate Cake Pops are two of my kids’ favorites. So the next time you have a birthday (or really any event), you can relax knowing you already have some delicious cake pops ready to go.

Starbucks Cake Pops Copycat Recipe

Get ready to satisfy your sweet tooth with the Copycat recipe for Starbucks Cake Pops, the best dessert on a stick. These little bites of heaven are easy to make and can be modified to fit your tastes. There is a flavor for everyone, from classic vanilla to rich chocolate and everything in between.

Ingredients

  • 1 box of classic yellow cake mix (for chocolate cake pops, use Devil’s Food chocolate cake mix)
  • 3 Tbsp of pre-made Vanilla Frosting (for chocolate cake pops, use chocolate frosting)
  • 25-35 Cake Pop Sticks or Lollipop Sticks
  • 12 oz of Pink Candy Melts (for chocolate cake pops, use Chocolate candy melts)
  • White Sprinkles

Instructions

Bake and Cool:

  • Start by making a tasty cake by following the directions on the box.
  • Let the cake cool at room temperature when it’s done.

Crumble and Mix:

  • Take the cake out of the pan and peel off the brown layer on the outside. It’s not needed, so get rid of it and move on to the good stuff!
  • Crumble the rest of the cake into a large bowl, and add the frosting. Mix everything together until it’s well mixed and oh-so-yummy.

Shape and Cool:

  • Next, make small balls out of your cake mix. You can make anywhere from 25 to 35 cake balls, which are great for sharing.
  • Put your cake balls on a lined cookie sheet and place them in the freezer for 10-12 minutes. This will allow them to maintain their shape when you dip them into the candy.

Dip and Decorate:

  • Melt the pink candy melts in a microwave-safe bowl, stirring every 30 seconds until they’re all melted and creamy.
  • Take your cake balls out of the freezer and dip each cake pop stick halfway into the melted candy. Then put them back in the freezer for 10-12 minutes.
  • After the cake pops have been in the freezer for a while, dip each one into the melted candy melts and make sure it is completely covered. Let the extra candy fall back into the bowl.
  • Place each cake pop stick in a block of Styrofoam to let the candy dry and harden. Add sprinkles right away before the candy dries.
  • Once all the cake pops are covered in candy and sprinkles, they are ready to serve.

Listen up, cake lovers! If you’ve nailed this Starbucks Copycat cake pop,  don’t keep it to yourself. Share the image below on your Pinterest board and invite your friends to join in the fun. Sharing is caring, and in this case, it’s also delicious! 🙂

Starbucks Cake Pops Recipe (Birthday & Chocolate)

Authentic Greek Gyro Recipe

Authentic Greek Gyro Recipe

Have you ever tried the wonder that is a gyro? It’s easily one of my top choices regarding Greek food. Imagine juicy, flavorful meat that is baked, thinly sliced, and pan-fried until it is perfectly crisp. And the best part is? It’s all wrapped up Read More

Mango Habanero Wingstop Copycat Recipe

Mango Habanero Wingstop Copycat Recipe

We have another chicken wings recipe for you that will knock your socks off! It’s time to enjoy the best copycat recipe for Mango Habanero Wingstop chicken wings. This recipe has just the right amount of sweetness and heat to make your mouth water. Deep-frying Read More

The Best Burrito Sauce Recipe in No Time

The Best Burrito Sauce Recipe in No Time

Have you ever been disappointed by a burrito sauce you bought at the store? If so, you need to step up your burrito game with a homemade sauce that will surpass your expectations. This burrito sauce is the real deal. It has authentic Mexican flavors that will make you feel like you’re eating at a street taco stand in Mexico City.

Once you try this sauce, you’ll never return to bland store-bought options again. So why settle for average when this amazing homemade sauce can add a burst of flavor to your burritos?

I am crazy about Mexican food, and burritos are one of the best street foods I’ve ever eaten. 

Whether it’s filled with rice, beans, juicy pork, beef, tender chicken, or veggies, the fun starts when that fluffy flour tortilla is smothered in creamy, smoky chipotle burrito sauce. And for this wet burrito, it’s like a party in your mouth, with each bite taking you on a fiesta of flavors!

The Best Burrito Sauce Recipe

This burrito sauce is the best because it has the right amount of spicy, smoky, tangy, and earthy flavors that work together to make a sauce that takes any burrito to the next level. Whether you like spicy food or not, this sauce will impress you with its bold and complex flavors that no other burrito sauce can match.

If you like burritos, you know that the sauce brings everything together. And when it comes to making the best burrito sauce, you can’t match the combination of sour cream, chipotle peppers in adobo sauce, garlic, cumin powder, lime, dried oregano, salt, and pepper.

The Best Burrito Sauce Recipe in No Time

Burrito Sauce Ingredients

Sour cream: First, the sour cream makes a perfect base for the sauce. Its tangy and creamy texture is a great contrast to the bold and spicy flavors that come later.

Chipotle peppers in adobo sauce: Next, the show’s star is the chipotle peppers in adobo sauce. These peppers’ smoky and spicy flavor makes the sauce richer and more interesting. It has a mix of spices and vinegar that makes the sauce taste better.

Garlic: Garlic is a key ingredient that gives the dish a strong, savory flavor that goes perfectly with the smokey chipotle peppers.

Lime juice: The lime juice gives it a refreshing citrus punch that balances the abundance of the sour cream as well as the smokiness of the peppers. Its acidity also brightens up the different flavors in the sauce.

Cumin powder and dried oregano: Cumin powder and dried oregano are both spices that create a warm, earthy flavor when used together. They make the sauce thicker and richer and add a subtle but distinct flavor that ties together everything.

Salt and pepper: Lastly, the salt and pepper are the final touches that bring out the flavors. They balance out and enhance the flavors of the other ingredients, making a well-balanced sauce.

The Best Burrito Sauce Recipe in No Time

How to Store Burrito Sauce?

First of all, it’s essential to store the burrito sauce in an airtight container. This will help keep any air or moisture from getting in and ruining the sauce. Glass jars or plastic containers with tight-fitting lids are perfect for this.

Second, keep your burrito sauce in the refrigerator to keep it fresh. You can keep it in the fridge for up to 4 days, but after that, the quality and flavor may begin to deteriorate. Label your container with the date you made the sauce, so you know how long it’s been in the fridge.

Lastly, it’s essential to know that burrito sauce with sour cream shouldn’t be frozen. When you freeze sour cream, it can separate and become watery, which can change the texture and flavor of your sauce.

Burrito Sauce Recipe

This burrito sauce will take your burrito to the next level. But if you want to step up your burrito game and show off your cooking skills to your friends and family, then gear up and let’s get cooking!

Ingredients

  • 1 cup of sour cream
  • 2 ½ Tbsp chipotle peppers in adobo sauce
  • 1 tsp of garlic, minced
  • 1 lime, juiced and zested
  • 1 tsp of cumin powder
  • ½ tsp of dried oregano
  • salt and pepper to your liking

Instructions

  • Prepare your ingredients: Sour cream, chipotle peppers in adobo sauce, lime, garlic, cumin powder, dried oregano, salt, and pepper.
  • Place all of your ingredients in a blender or food processor. Make sure everything is there and ready to go.
  • Blend away! Cover your blender or food processor and pulse it until everything is mixed and smooth. You don’t want any big chunks inside it, so keep blending until the mixture is completely smooth.
  • Taste and adjust. Try a little bit of your sauce to see if it needs more salt, pepper, or lime juice.
  • Move your sauce to a bowl or an airtight container. You can either use it immediately or put it in the fridge for later.
  • Drizzle your delicious sauce over your burrito and enjoy the bold, smoky flavor of the chipotle peppers, the tang of the lime, and the savory spices. This sauce is sure to bring your burrito to a whole new level.

If this burrito sauce recipe made you do a victory dance, share the love by posting the image below on your Pinterest board. Believe me, your foodie friends will appreciate it. Don’t keep the deliciousness to yourself; tell everyone the secret sauce. Click that “Pin it” button and let the flavor party begin!

The Best Burrito Sauce Recipe in No Time

Crispy Air Fryer Cauliflower Recipe with Seasoning Mix

Crispy Air Fryer Cauliflower Recipe with Seasoning Mix

With this air fryer cauliflower recipe, you’re in for a ride full of flavor. In just 15 minutes, this crispy, charred, and delicious cauliflower will make your taste buds dance with joy. We’ve added a lively mix of spices to this dish that will tingle Read More