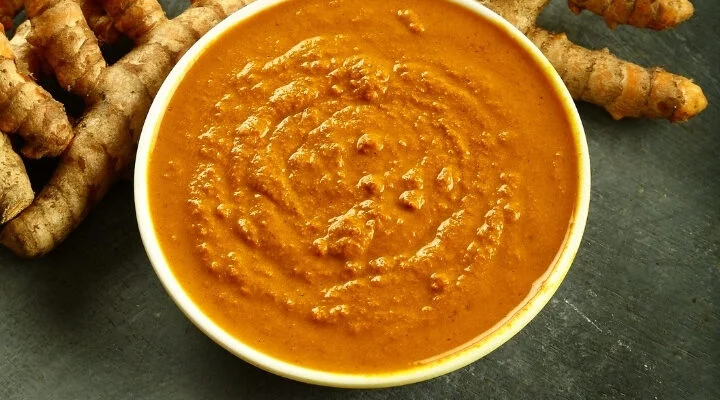
Easy and Delicious Recipes

Recent Posts

Crispy Corn Fritters

Crispy Corn Fritters

These crispy corn fritters are golden on the outside, soft in the middle, and packed with sweet corn, green onion, garlic, and warm spices. The batter is simple, but the texture matters: it should be thick enough to hold the corn together when spooned into Read More

Cabbage Steaks with Creamy Mushroom Sauce

Cabbage Steaks with Creamy Mushroom Sauce

These cabbage steaks are seared until golden on both sides, then finished in a creamy mushroom sauce with onions, garlic, Parmesan, and a little chili crisp. The cabbage turns tender in the middle but still holds its shape, while the sauce brings a rich, savory Read More

Creamy Lemon Pasta

Creamy Lemon Pasta

This Creamy Lemon Pasta is simple, bright, and creamy without using heavy cream. The sauce is made with butter, olive oil, fresh lemon, Parmesan, basil, and starchy pasta water, so it coats the spaghetti in a light, glossy finish.

For extra lemon flavor, a few whole lemon wedges are gently warmed in the butter and olive oil, then removed before the cheese goes in. This gives the sauce a fresh lemon aroma without making the pasta bitter.

Ingredients

  • 1 lb spaghetti (or your prefered pasta)
  • 5 tbsp butter, divided
  • 1/4 cup olive oil
  • 1 large lemon, zested and juiced
  • 2–3 small lemon wedges, seeds removed
  • 1/3 cup grated Parmesan cheese, plus more for serving
  • 1/2 cup hot pasta cooking water, plus more if needed
  • 1/4 tsp salt, plus more for the pasta water
  • Black pepper, to taste
  • Handful of fresh basil leaves, torn
  • Extra lemon zest, basil, and Parmesan, for serving

Instructions

1. Cook the pasta

Bring a large pot of water to a boil. Salt the water well, then add the spaghetti and cook until just al dente.

Before draining, scoop out at least 1/2 cup of the hot pasta cooking water. This water helps bring the sauce together and makes it cling to the pasta.

2. Warm the butter, oil, and lemon wedges

While the spaghetti cooks, place a heatproof metal bowl over the pot of boiling pasta water. Make sure the bottom of the bowl does not touch the water.

Add 4 tablespoons of butter, the olive oil, and the lemon wedges. Let the steam gently warm everything for 2–3 minutes, stirring now and then, until the butter is melted and the lemon has lightly flavored the oil.

If you do not have a heatproof bowl, make the sauce in a small pan over low heat.

3. Remove the lemon wedges

Take out the lemon wedges before adding the Parmesan. Do not leave them in too long, because the peel and white pith can turn the sauce bitter.

4. Make the lemon butter sauce

Stir the lemon juice and lemon zest into the warm butter mixture. Add the Parmesan and mix until it starts to melt into the sauce.

Slowly pour in the hot pasta water while stirring. The sauce should turn smooth, glossy, and lightly creamy. Season with salt and black pepper.

5. Toss the pasta

Drain the spaghetti and add it to a large mixing bowl with the remaining 1 tablespoon of butter and the torn basil.

Pour most of the lemon butter sauce over the pasta and toss well until every strand is coated. If the pasta looks dry, add another small splash of hot pasta water and toss again.

6. Serve

Serve right away with the remaining sauce spooned over the top. Finish with extra Parmesan, fresh basil, more lemon zest, and black pepper.

Loved this Creamy Lemon Pasta? Save the image below to your Pinterest board so you can come back to it whenever you need a quick, fresh pasta dinner.

Creamy Lemon Pasta in a plate

Tips for the Best Creamy Lemon Pasta

Use fresh lemon juice, not bottled lemon juice. The flavor is cleaner and brighter.

Do not overheat the sauce after adding Parmesan. Gentle heat keeps it smooth instead of grainy.

Add the pasta water slowly. You may not need all of it, but it is what makes the sauce silky instead of oily.

Serve the pasta immediately. Lemon butter sauce tastes best while it is warm, glossy, and freshly tossed.

Crispy Pan Fried Baby Potatoes

Crispy Pan Fried Baby Potatoes

These crispy pan fried baby potatoes are cooked in one pan until the centers are soft and creamy and the outside turns golden and crisp. They’re finished with butter, smoked paprika, fresh herbs, chili oil, and a cool garlic sour cream sauce. This recipe is Read More

Creamy Street Corn Cucumber Salad

Creamy Street Corn Cucumber Salad

This Creamy Street Corn Cucumber Salad is cold, crunchy, smoky, and a little tangy, with smashed cucumbers, charred corn, onion, dill, garlic, and a creamy chili-seasoned dressing. The cucumbers are lightly smashed instead of neatly sliced, so the dressing catches in all the rough edges, Read More

Crispy Bruschetta Potato Cups

Crispy Bruschetta Potato Cups

These crispy potato cups are a fun little appetizer with golden smashed potato edges, a creamy roasted garlic pesto filling, and a fresh tomato bruschetta topping. They look fancy, but the method is simple: boil the potatoes until tender, press them into a muffin tin, bake until crisp, then fill them while they’re still warm.

The mix of crunchy potato, garlicky cream cheese, basil pesto, and juicy tomatoes makes them perfect for parties, holidays, brunch, or a quick savory snack.

Crispy Bruschetta Potato Cups

Ingredients

For the Potato Cups

12 potatoes 
3 tablespoons olive oil, plus more for greasing the muffin tin
1 teaspoon salt
1/2 teaspoon black pepper

For the Roasted Garlic

3 whole garlic heads
1 tablespoon olive oil

For the Pesto Cream Cheese Filling

7 oz cream cheese, softened
2 tablespoons basil pesto
Roasted garlic cloves, from above
Salt and black pepper, to taste

For the Tomato Bruschetta Topping

1 1/2 cups cherry tomatoes, quartered
2 tablespoons fresh basil, chopped
1 tablespoon extra virgin olive oil
1 teaspoon balsamic vinegar
1/2 teaspoon dried oregano
Pinch of flaky salt
Pinch of red pepper flakes

Instructions

1. Boil the potatoes

Place the potatoes in a large pot and cover them with cold water. Add a good pinch of salt, then bring to a boil. Cook for 15–20 minutes, or until the potatoes are fork-tender but still holding their shape. You want them soft enough to press, not so soft that they split apart completely.

Drain the potatoes and let them sit for a few minutes so the steam can escape. This helps them crisp better in the oven.

2. Roast the garlic

While the potatoes are boiling, preheat the oven to 400°F.

Slice just enough off the top of each garlic head to expose the cloves. Place the garlic in a small baking dish or on a piece of foil, drizzle with olive oil, then cover tightly with foil. Roast for 35–40 minutes, until the cloves are soft, golden, and easy to squeeze out.

Let the garlic cool slightly, then squeeze the cloves into a small bowl.

3. Shape the potato cups

Lightly grease a 12-cup muffin tin with olive oil. Place one boiled potato in each muffin cup.

Use the bottom of a shot glass, small jar, or spice bottle to press each potato down into the muffin cup. Press firmly in the center so the potato spreads up the sides and forms a little cup. If a potato cracks a little, just press it back together with your fingers.

Drizzle the cups with olive oil, then season with salt and black pepper.

4. Bake until crispy

Bake the potato cups at 400°F for 25–30 minutes, or until the edges are deeply golden and crisp. Don’t pull them too early; the darker edges are what give these cups their best texture.

Let them cool in the tin for 3–5 minutes before filling so they firm up slightly.

5. Make the roasted garlic pesto cream cheese

In a bowl, mix the softened cream cheese, basil pesto, and roasted garlic cloves. Stir until smooth and creamy. Taste and adjust with salt and black pepper if needed.

For a smoother filling, mash the roasted garlic first before mixing it into the cream cheese.

6. Make the tomato bruschetta

In a separate bowl, gently toss the cherry tomatoes with fresh basil, extra virgin olive oil, balsamic vinegar, oregano, flaky salt, and red pepper flakes.

Let the mixture sit for 5–10 minutes while the potato cups finish baking. This gives the tomatoes time to release a little juice and pick up more flavor.

7. Fill and serve

Spoon the roasted garlic pesto cream cheese into each crispy potato cup. Top with the tomato bruschetta mixture.

Serve right away while the potato cups are still crisp and the filling is creamy.

Pin these Crispy Bruschetta Potato Cups before you forget them — they’re exactly the kind of little bite you’ll want when you need something easy, crispy, and good-looking for the table.

Crispy Bruschetta Potato Cups

Tips for the Best Potato Cups

Use small baby potatoes that are similar in size so they cook evenly. If some are much bigger, cut them in half after boiling and place the cut side down in the muffin tin before pressing.

Let the potatoes steam-dry after boiling. Wet potatoes do not crisp as well.

Press the potatoes while they are warm, not cold. Warm potatoes shape more easily and are less likely to break apart.

Don’t overfill the cups before serving. Add the cream cheese and tomatoes just before serving so the potato edges stay crisp.

Storage and Reheating

The potato cups are best served fresh, but you can prepare the parts ahead. Bake the potato cups and store them separately from the filling and tomato topping.

Reheat the empty potato cups in the oven or air fryer at 375°F until crisp again. Then add the cream cheese filling and tomato topping right before serving.

Store leftovers in an airtight container in the fridge for up to 2 days, but keep in mind the potatoes will soften once filled.

Korean Popcorn Chicken

Korean Popcorn Chicken

Korean popcorn chicken is the kind of crispy, saucy chicken that disappears fast. The pieces are small enough to stay crunchy, but juicy inside, and the sauce gives you that sticky sweet, spicy, garlicky finish without making the recipe feel complicated. This version can be Read More

Creamy One-Pot Mushroom Pasta

Creamy One-Pot Mushroom Pasta

This creamy one-pot mushroom pasta is the kind of pasta recipe that feels cozy without turning into a big kitchen project. Everything cooks in one pan, including the pasta, so the tagliatelle absorbs flavor from the mushrooms, garlic, onion, sun-dried tomatoes, cream, and stock as Read More

Roasted Garlic Butter Eggplant

Roasted Garlic Butter Eggplant

These roasted garlic butter eggplants are soft, rich, and deeply savory, with golden roasted garlic tucked into every scored groove. The eggplant bakes until it turns tender and almost creamy inside, while the top gets coated with a buttery garlic-parmesan spread, a little tomato paste for depth, fresh parsley, and just enough red pepper flakes to wake everything up.

You do not need rice or lentils to make the plate look complete. Serve the eggplant with a spoonful of garlicky yogurt sauce, fresh herbs, lemon, a few cherry tomatoes, or a simple cucumber salad on the side. It still looks colorful, finished, and restaurant-style without adding anything heavy.

Ingredients

For the Roasted Garlic Butter

  • 2 to 3 heads garlic, peeled, about 25 to 30 cloves
  • 1/2 cup extra virgin olive oil
  • 3 tablespoons butter, softened
  • 1 tablespoon tomato paste
  • 1/4 cup finely grated Parmesan cheese
  • 1/4 cup fresh parsley, finely chopped
  • 1 to 2 teaspoons red pepper flakes
  • Salt and black pepper, to taste

For the Eggplants

  • 3 medium eggplants, halved lengthwise
  • 1 to 2 tablespoons olive oil, for brushing
  • Salt and black pepper, to taste

For Serving

  • Fresh parsley, chopped
  • Lemon wedges
  • Extra Parmesan, optional
  • Red pepper flakes, optional
  • Greek yogurt sauce, optional
  • Cherry tomatoes, cucumber salad, or fresh greens, optional

Instructions

1. Roast the Garlic

Preheat the oven to 350°F.

Add the peeled garlic cloves to a small baking dish or oven-safe pot. Pour the olive oil over the garlic so the cloves are mostly covered. Cover the dish with foil or a lid and roast for about 30 minutes, or until the garlic is soft, lightly golden, and easy to mash with a fork.

Do not let the garlic get too dark. You want it sweet and mellow, not bitter.

2. Make the Garlic Butter Spread

Transfer the roasted garlic cloves to a bowl. Add a few spoonfuls of the garlic-infused oil from the baking dish.

Add the softened butter, tomato paste, Parmesan, parsley, red pepper flakes, salt, and black pepper. Mash everything together with a fork until the garlic breaks down and the mixture becomes thick and spreadable.

Taste and adjust the seasoning. It should be garlicky, buttery, lightly salty, and a little spicy. Garlic Butter spread for eggplants

3. Prepare the Eggplants

Increase the oven temperature to 400°F.

Slice the eggplants in half lengthwise. Use a sharp knife to score the cut side in a deep crosshatch pattern, making sure not to cut through the skin.

Place the eggplant halves cut-side up on a parchment-lined baking sheet. Brush the cut sides lightly with olive oil, then season with salt and black pepper.

4. Add the Garlic Butter

Spoon the roasted garlic butter over the scored side of each eggplant half. Use the back of the spoon to press the mixture into the cuts so the flavor gets down into the eggplant instead of just sitting on top.

Spread any remaining garlic butter over the surface.

5. Bake Until Tender

Bake for 35 to 40 minutes, or until the eggplant is fully tender all the way through and the tops are golden.

The eggplant should collapse slightly and feel soft when pierced with a knife. If the center still feels firm, bake it for another 5 to 10 minutes.

6. Finish and Serve

Let the eggplants rest for 5 minutes before serving. Finish with fresh parsley, a squeeze of lemon, extra Parmesan, and a small pinch of red pepper flakes if you want more heat.

For a nicer plate without rice or lentils, add a spoonful of Greek yogurt sauce under or beside the eggplant, then finish with herbs, lemon, and a few cherry tomatoes or cucumber slices. The sauce gives the plate contrast and makes the roasted eggplant feel complete without needing a grain or legume base.

If this roasted garlic butter eggplant looks like something you’d make, save the image below to your Pinterest board so you can find it when eggplant season hits

Roasted Garlic Butter Eggplant on a plate with Greek yogurt and candles in the background

Simple Yogurt Sauce for Serving

Mix together:

  • 1/2 cup Greek yogurt
  • 1 small garlic clove, grated
  • 1 tablespoon lemon juice
  • 1 tablespoon olive oil
  • Salt and black pepper, to taste
  • 1 tablespoon chopped parsley or dill, optional

Spoon it onto the plate first, then place the roasted eggplant slightly over the sauce. Add lemon wedges and herbs around it for a clean, fresh finish.

Tips for the Best Roasted Garlic Eggplant

Choose medium eggplants that feel firm and heavy for their size. Very large eggplants can have more seeds and may need extra baking time.

Score the eggplant deeply enough so the garlic butter can sink in, but stop before you reach the skin. This helps the eggplant cook evenly and soak up the flavor.

Use real Parmesan and butter if your recipe is not vegan. They give the roasted garlic spread a richer, saltier flavor than vegan substitutes.

Do not rush the baking time. Eggplant needs to become fully soft in the middle, otherwise it can taste spongy instead of creamy.

A squeeze of lemon at the end is important. It cuts through the richness of the butter and garlic and makes the whole dish taste brighter.

Storage and Reheating

Store leftover roasted eggplant in an airtight container in the refrigerator for up to 3 days.

Reheat in a 350°F oven until warmed through. You can also use an air fryer for a few minutes to bring back some of the roasted texture on top. Avoid microwaving if you want the top to stay slightly golden instead of soft.

Crispy Potato Cheese Balls

Crispy Potato Cheese Balls

These crispy potato cheese balls are soft and creamy in the center, filled with melty mozzarella, and fried until golden on the outside. The base is simple mashed potato mixed with cornstarch, seasoning, and herbs, then shaped around small cubes of cheese. They work great Read More


All Time Favorites

Creamy Lemon Pasta

Creamy Lemon Pasta

This Creamy Lemon Pasta is simple, bright, and creamy without using heavy cream. The sauce is made with butter, olive oil, fresh lemon, Parmesan, basil, and starchy pasta water, so it coats the spaghetti in a light, glossy finish. For extra lemon flavor, a few Read More

Korean Popcorn Chicken

Korean Popcorn Chicken

Korean popcorn chicken is the kind of crispy, saucy chicken that disappears fast. The pieces are small enough to stay crunchy, but juicy inside, and the sauce gives you that sticky sweet, spicy, garlicky finish without making the recipe feel complicated. This version can be Read More

Creamy One-Pot Mushroom Pasta

Creamy One-Pot Mushroom Pasta

This creamy one-pot mushroom pasta is the kind of pasta recipe that feels cozy without turning into a big kitchen project. Everything cooks in one pan, including the pasta, so the tagliatelle absorbs flavor from the mushrooms, garlic, onion, sun-dried tomatoes, cream, and stock as Read More

Creamy Air Fryer Roasted Veggie Pasta

Creamy Air Fryer Roasted Veggie Pasta

This creamy air fryer roasted veggie pasta is the kind of easy dinner that feels a little richer than the effort it takes. The eggplant, tomatoes, peppers, and onion roast until soft and slightly caramelized, then get blended with cream cheese, basil, Parmesan, and broth Read More

Crispy Cottage Cheese Chicken Nuggets

Crispy Cottage Cheese Chicken Nuggets

These crispy cottage cheese chicken nuggets are golden on the outside, juicy in the center, and packed with flavor. Cottage cheese keeps them tender and moist, while Parmesan and a crunchy coating help create that crispy finish without deep frying. They’re baked in the oven, Read More