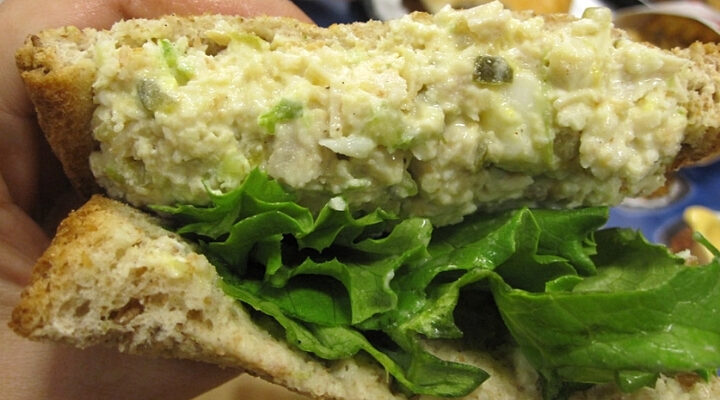
Easy and Delicious Recipes

Author: Sarah Berthold

Nando’s Spicy Rice Recipe Takeaway

Nando’s Spicy Rice Recipe Takeaway

Here’s my colorful, spicy rice recipe, a perfect clone of the famous Nando’s Spicy Rice Recipe. This rice tastes so amazing. The blend of various spices and vegetables gives your every bite a unique flavor. Nando’s Spicy Rice My love for this takeaway recipe inspired Read More

The Best Thunder Cake Recipe

The Best Thunder Cake Recipe

Without a doubt, this will be the best Thunder Cake Recipe! Not only does it have a unique name, but it also has a distinct flavor. When I first heard about this cake, I was so taken with the name that I had to make Read More

Salt and Pepper Chicken – Chinese Takeaway Recipe

Salt and Pepper Chicken – Chinese Takeaway Recipe

Simple and easy classical salt and pepper chicken- Chinese Takeaway recipe! A flavorful popular dish packed with lots of spices and fresh vegetables. With this recipe, you can cook at home better than your local Chinese takeaway.

The central aspect of this recipe is the spices, which work well with the fresh, tangy vegetables. This Chinese cuisine uses the harmonized flavors of the ingredients to pack a lot to your palate, from mixed chilies to spring onions to peppers; everything compliments each other.

Fried chicken is not only tasty but also high in proteins and vitamins, both of which are beneficial to your health.

Here I’ve presented this recipe with all successful tips and tricks so that you can enjoy restaurant-style homemade Chinese Salt and pepper chicken at home.

Tips & Tricks for Perfect Salt and Pepper Chicken

  • Our goal is to make salt and pepper chicken that is juicy on the inside while crispy on the outside. I’ve used thighs to make this recipe. The thigh cut is super-soft and moist. It gets fried in just 2 to 3 minutes. If you fry for longer, you will end up with a dry texture.
  • Fry the marinated chicken in well-heated oil on medium flame. If you add the chicken to cool oil, the coating will fall apart, hence losing its crispiness.
  • You can also carry out the frying process in one round. I recommend you fry the chicken twice to enjoy some extra crunch in your mouth.
  • Fry the chicken in small batches instead of getting it all done in one round. It will result in perfect crispy salt and pepper chicken better than any local Chinese takeaway.
  • Once you dished out the chicken with veggies, you can sprinkle some salt and pepper over the top and toss the chicken well. This step is completely optional and depends on your personal preferences.
  • Don’t forget to use fresh vegetables in this recipe, as the real beauty of your plate lies in the texture and flavor your veggies will add to the crispy chicken.

Salt and Pepper Chicken - Chinese Takeaway Recipe

Salt and Pepper Chicken Ingredients

  • Boneless Chicken thigh: 1.1 pounds
  • Potato starch: 1 cup
  • Sweet onion: ½
  • Carrot: 1
  • Red/Green pepper: 1
  • Green chili: 4
  • Garlic cloves: 3
  • Ginger slice: 3
  • Spring onion: 2/3
  • Oil for frying

Marinate for chicken

  • Sesame oil: ½ TSP
  • Salt: ½ TSP
  • Black pepper: ½ TSP
  • Ginger and garlic paste: 1 TSP

Spice Mix

  • Salt: ½ Tsp
  • Black pepper: ½ TSP
  • Chinese five-spice powder: ¼ TSP
  • Chicken powder: ½ TSP

Salt and Pepper Chicken Directions

  • Start with marinating your boneless thigh chicken. In a well-kept bowl, add chicken. To this, add sesame oil, salt, black pepper, and ginger garlic paste. Then mix thoroughly until all the spices are well merged with the chicken.
  • Set aside the marinade for 15 minutes. Keeping the marinade for an hour or two will enrich the flavor or tenderize the chicken more deeply if you are not in a hurry.
  • Meanwhile, while the chicken is marinating, cut fresh vegetables—thinly slice garlic cloves, ginger, pepper, and onions.
  • Next, make the spice mix. To a neat and clean bowl, add salt, black pepper, and Chinese five-spice. Mix it well. To make it taste like a perfect Chinese takeaway, you can also add chicken powder. But this step is optional.
  • Now coat the chicken with potato starch. You can also use cornstarch.
  • Then fry the chicken in hot oil. Once the chicken starts floating, you are done with the first fry. I’ve double-fried the chicken to make an extra crunchy salt-and-pepper chicken bite.
  • Next, stir-fry the vegetable. Take a pan on the stovetop and add some oil. First, sauté thinly sliced ginger and garlic. When you can smell that characteristic ginger-garlic aroma, add in the remaining veggies. Continue frying the veggies for 2 to 3 minutes.
  • Then add in fried salt and pepper chicken and mix thoroughly with the colorful vegetables.
  • Last but not least step, add the spice powder and mix everything well.
  • Dish out your better-than-Chinese takeaway, salt and pepper chicken, and serve it hot and lovely.

Nutrition Facts

  • Calories: 250kcal per 100g
  • Carbohydrates: 10g
  • Protein: 20g
  • Fat: 15g

Salt and Pepper Chicken - Chinese Takeaway Recipe

FAQs

Is it necessary to deep-fry the chicken?

No, it is not necessary to deep-fry the chicken. I have deep-fried the chicken because I like this version of salt and pepper chicken. You can also air-fry or bake chicken in the oven to make it healthier according to your wish.

What if I don’t want to use thighs to make Chinese salt and pepper chicken?

If you don’t like thighs, then you can use breasts, even wings, to make this delicious cuisine. Fried breasts and wings will give you an equally amazing taste and texture you will love. Mind some rules of frying the breast and wings part of the chicken. The breast part requires 8 minutes to get fried, while the wings require 5 minutes to get it done just right. You need to marinate wings for longer to get the crispy golden brown texture with deeply penetrated rich spices flavor, as spices are the real essence of the best salt and pepper chicken recipe.

What is five-spice powder?

Five-spice powder is the essential ingredient of the Chinese salt and pepper chicken recipe. It is a combo of different spices, namely whole clove, fennel seeds, star anise, peppercorns, and cinnamon stick. The ingredients of five-spice powder may vary from one region to another, but above mentioned five ingredients are compulsory to add to make it.

Conclusion

If you want to let your loved ones enjoy restaurant-style Chinese Salt and Pepper Chicken at home, then give this recipe a try. I’m sure you would never regret trying it. It’s so easy to make and far better than any Chinese takeaway.

I’m sure you will love it. If you really admire my recipe, share it with your friends and family. If you have tried any recreation, don’t forget to update us through your valuable comments.

Thanks!

Blackstone Griddle Perfect Chicken Wings

Blackstone Griddle Perfect Chicken Wings

Per your request, we’ve started making a lot of recipes for Blackstone Griddle. This one is for Perfect Chicken Wings cooked on a Blackstone griddle. You can cook almost anything on the Blackstone Griddle or any other outdoor griddle that is available in most markets, Read More

Oven-Baked Chuck Roast Easy Recipe

Oven-Baked Chuck Roast Easy Recipe

When dinner needs to be hearty, simple, and packed with real flavor, oven-baked chuck roast is always a winning choice. This dish transforms everyday pantry staples into a comforting, mouthwatering meal the whole family will love. Imagine melt-in-your-mouth beef, slow-roasted with vibrant vegetables and infused Read More

Perfect Biltong Recipe South African Beef Jerky

Perfect Biltong Recipe South African Beef Jerky

Today we’re going to make a perfect biltong recipe! South African Biltong is a Beef Jerky, a cured meat, and is a National snack. Canned beef jerky is not only delicious but is quite expensive as well.

Tender, flavorful, and deeply spiced—homemade biltong is a rewarding project and a true South African classic. Here’s how to make it the traditional way!


Ingredients

  • 8 lbs beef hump (or another fatty cut like top round or sirloin tip)

  • ⅓ cup whole coriander seeds

  • 2 Tbsp mixed peppercorns

  • ½ Tbsp finely ground coriander

  • ½ Tbsp allspice

  • ½ Tbsp powdered cloves

For the Marinade:

  • 1 cup Worcestershire sauce

  • ½ cup brown vinegar (or malt vinegar)

  • 2.5 oz sea salt (about 5 Tbsp)

  • ½ cup sugar


Instructions

  1. Prepare the Beef:

    • Slice the beef with the grain into strips about 1½ to 2 inches (4–5cm) thick.

  2. Mix the Marinade:

    • In a bowl, combine Worcestershire sauce, brown vinegar, sea salt, and sugar. Stir until salt and sugar are dissolved.

  3. Marinate:

    • Place beef strips in a large zip-top bag or shallow dish.

    • Pour the marinade over the beef, turning to coat all sides.

    • Seal and refrigerate for 24 hours, turning occasionally to marinate evenly.

  4. Toast and Prepare the Spices:

    • In a dry pan over medium heat, toast the whole coriander seeds and peppercorns until fragrant and lightly smoking, about 2–3 minutes.

    • Let cool, then coarsely grind them using a spice grinder or mortar and pestle.

    • In a bowl, combine ground coriander/peppercorns with ground coriander, allspice, and cloves.

  5. Season the Beef:

    • Remove the beef from the marinade and pat dry with paper towels.

    • Generously sprinkle the spice mix over all sides of the beef, pressing gently so the spices stick.

  6. Hang and Dry:

    • Attach a labeled paper clip or hook to the end of each strip (note the weight of each strip for accurate drying).

    • Hang the beef strips in a cool, well-ventilated area (below 68°F/20°C is best), away from direct sunlight.

    • Let dry for 4–5 days, or until the strips have lost 40–45% of their weight. (For chewier biltong, dry less; for drier, dry more.)

  7. Slice & Enjoy:

    • Slice the finished biltong thinly against the grain for best texture.

    • Enjoy as a snack, in breakfast, or as a protein-packed lunch addition.


Tips

  • Thicker strips need more drying time.

  • Use a biltong box, dehydrator, or a fan for consistent airflow if your environment is humid.

  • Adjust spice amounts to your taste—some like extra pepper or coriander!

Love homemade biltong? Save the image below to your Pinterest board so you’ll always have this authentic recipe on hand—perfect for snacking or impressing friends!

Perfect Biltong Recipe South African Beef Jerky

Tips & Tricks

  • Selection of the cut of meat is very important. My favorite cut is a top rump with a thick layer of fat. Other popular cuts include silverside and topside. If you are feeling fancy, make it with rump or striploin. Whatever you choose, pick a piece of meat with a nice fat layer to make perfect Biltong’s.
  • Don’t forget to cut the strips of meat along the grains. When you cut Biltong’s, that too will be done along the grains.
  • Make sure not to grind the spices too fine; you should be able to identify spices even after grinding them.
  • Coat the meat with your spice mix, making sure it’s fully covered.
  • Don’t skip the paper clipping and weight measuring step, as it is important to track the water loss during the curing process.
  • A lot of the spices might fall off during the handling and curing process so place a tray below to prevent wastage of the spices.
  • Hang the meat in a place with good airflow. Maintaining good hanging conditions will prevent the spoilage of meat.
  • Cut the Biltong’s as fine as you can but along the grains.

Nutrition Facts

Here is the nutrition profile of a 1 ounce of beef biltong serving.

  • Calories: 80
  • Carbohydrates: 1g
  • Proteins: 16g
  • Fats: 2g

Perfect Biltong Recipe South African Beef Jerky

FAQs

How to store beef jerky?

You can store beef jerky in any sealed airtight bag and enjoy it for one week without refrigerating it. If you want to keep it fresh for longer, then freezing it will keep your homemade beef jerky fresh for up to one or two months. A vacuum-sealed bag is the best option for storing jerky, but a zip lock bag also goes well.

How to check the freshness of beef jerky?

If you notice any change in the color or odor of the beef jerky, it strongly indicates that beef jerky is spoiled and, you need to throw it away.

How much time does it take to dry the beef jerky?

The drying time of beef jerky actually depends on the size of meat as well as the drying method you opted for. I suggest you focus on the moisture content of the meat. Once the meat has lost 45 to 50% moisture, you are done with the dehydrating process. Medium wet beef jerky having lots of fat is the best texture one can achieve through following a perfect biltong recipe.

How to protect the beef jerking from molds?

Beef jerky is susceptible to molds, so its protection requires taking the following precautions.

  • Molds can grow if the airflow is not good enough or humidity is high. Rectify these drying conditions to prevent mold from growing on the meat strips.
  • Properly dry the meat to enhance the storage life of the beef jerky.
  • Prevent the supply of oxygen by storing jerky in an airtight bag as oxygen is the biggest culprit behind the fungus growth.
  • Prefer freezing the Biltong over refrigeration.

Why is my jerky too hard?

The perfect texture of jerky depends on the drying time. You might have dried your jerky more than required. Moisture loss of more than 70% makes jerky hard and tough, so always prefer medium wet jerky with 45 to 50% moisture content.

Conclusion

I hope you’ll find this recipe super easy to make. Although making a perfect beef jerky does require time and energy, but making a nutrient-rich snack at home is far way better than buying expensive canned beef jerky.

If you liked my recipe, give it a try, share it with friends, and do let us know about your experience.

Thanks!


The Best Moist Fruit Cake Easy Recipe

The Best Moist Fruit Cake Easy Recipe

Today, I’m here with a rich, flavorful, and perfectly delicious moist fruit cake recipe. A super soft and moist fruit cake with a blend of dried fruits and nuts turns out to be a delicious treat. When served to your friends and family, the celebrations Read More

Blackstone Griddle Eggs in a Basket Easy Recipe

Blackstone Griddle Eggs in a Basket Easy Recipe

Blackstone Griddle eggs in a basket is a quick and easy breakfast recipe you can prepare for large groups. This egg is boiled inside the bread until it is just right. The egg is served with a piece of toasted bread you have left over. Read More

Blackstone Griddle Juicy Smash Burger Easy Recipe

Blackstone Griddle Juicy Smash Burger Easy Recipe

On the search for an easy-to-make, tasty recipe for your Blackstone Griddle? Your search ends now! Plunge into our Juicy Smash Burger recipe – it’s a game-changer. Straightforward to whip up and bursting with flavors, these burgers are about to become your new favorite.

We recently purchased a Blackstone Griddle in order to see if it was worth the hype. This is a matter that I am thrilled to share with you. Stay tuned for more recipes. We have so many that we want to share, so stay tuned!

It’s all about homemade cream cheeseburgers. These burgers are simple to make, delicious, and as good or even better than what you’d get at a restaurant. You can also add onions if you like to your Smash Burger recipe. 

What’s a Smash Burger?

A smash burger is a thin, crispy-edged patty that’s pressed (“smashed”) onto a hot griddle, giving it a deeply caramelized crust and loads of flavor. Instead of the thick, juicy burgers you might find at a steakhouse, smash burgers are all about that savory crust, gooey melted cheese, and a soft, toasted bun. They’re classic American diner fare—simple, fast, and seriously crave-worthy!

BLACKSTONE GRIDDLE JUICY SMASH BURGER

This is why you’ll love Blackstone Griddle Juicy Smash Burger .

  • They are easy to make!
  • Perfect for entertainment and parties.
  • They are all legitimately being engulfed.
  • These are the fastest methods I have found to make burgers.
  • You can also roast buns on the grill.
  • Blackstone Griddle makes it easy to make anything, and the food is delicious.

Ingredients

  • 1 to 2 pounds ground beef (80/20 recommended)

  • Kosher salt and freshly ground black pepper, to taste

  • Butter (for greasing the griddle)

  • Cheese slices (American, cheddar, or your favorite)

  • Burger buns

  • Toppings: sliced tomato, cucumber, onion, lettuce or salad greens

  • Optional: Homemade Smash Burger sauce


Instructions

  1. Preheat Your Blackstone:
    Heat your Blackstone griddle over medium-high heat for a few minutes.

  2. Form the Burger Balls:
    Take ¼ to ⅓ cup portions of ground beef for each burger. Loosely form into balls—don’t overwork or pack them tightly.

  3. Prep the Griddle:
    Grease the hot griddle with a thin layer of butter (or oil, if you prefer).

  4. Cook & Smash:
    Place beef balls on the hot griddle. Let them sear for 10–15 seconds, then smash each ball flat using a sturdy spatula. For best results, use a piece of parchment paper between the burger and the spatula, or spray the spatula with nonstick spray.

  5. Season:
    Immediately season the smashed patties with salt and pepper.

  6. Sear:
    Let the burgers cook undisturbed until the edges are deeply browned and crispy, about 2–3 minutes.

  7. Flip & Top:
    Use the spatula to scrape and flip each patty. Add a slice of cheese on top. Cook for another 1–2 minutes, just until the cheese melts and burgers are cooked to your liking.

  8. Toast the Buns:
    While the burgers finish, grease another area of the griddle with butter. Place split buns cut-side down and toast until golden.

  9. Build Your Smash Burgers:
    Place burgers on toasted buns, add your favorite toppings—tomato, cucumber, onion, lettuce—and a generous smear of Smash Burger sauce if desired.


Tips

  • Don’t overpack the beef or press it after flipping—smash only once for the crispiest crust!

  • Use parchment paper or a well-buttered spatula to prevent sticking.

  • Double up the patties for extra-juicy smash burgers.

Frequently asked questions about Smash Burgers Recipe

Can I use any other meats?

Yes! Ground beef is a favorite ingredient in burgers, so we reach for it often. You can also substitute minced turkey and chicken. You should remember that every ingredient you use will taste differently from traditional ground beef.

How do I add a hamburger to my sandwich?

Anything you like can be added! You can add bacon, ham, hash browns, and fried eggs, as well as lettuce, tomatoes, onions, guacamole, and other toppings. You can add any toppings you like.

What size Blackstone Griddle do I need?

We have 36 inches because we love to have fun and make lots of food. A smaller grid is better if you’re feeding several people. Blackstone grills are also available that you can easily transport and take with you to the lake.

How much meat should I use per burger?

For classic smash burgers, plan on using about ¼ pound (4 ounces) of ground beef per patty. With 1½ pounds of ground beef, you’ll get about 6 standard-size smash burgers. You can always adjust the amount up or down to make your burgers bigger or smaller, depending on your preference!


Blackstone Griddle Recipes

This is how you make a hamburger. You can also use a grill to make it more authentic. They seem furious in summer and post photos of their breakfast, lunch, and dinner onboard with a Blackstone background. While trendy right now, smaller folding grids are used for cooking outdoors.

Also, you can use Electric grill, just like your mom used to make pancakes every Sunday morning. The internal gas grille is an optional feature on stoves with high-end features. It can be heated with propane or natural gases.

Homemade Strawberry Hennessy Recipe (+10 Variation Ideas)

Homemade Strawberry Hennessy Recipe (+10 Variation Ideas)

Get ready to dive into the ultimate summer delight – the irresistible Strawberry Hennessy cocktail. The charm of Hennessy is universal, captivating everyone from the lively nightclub crowd to the sophisticated card-playing aficionados. The fusion of Strawberry and Hennessy is nothing short of a celestial Read More