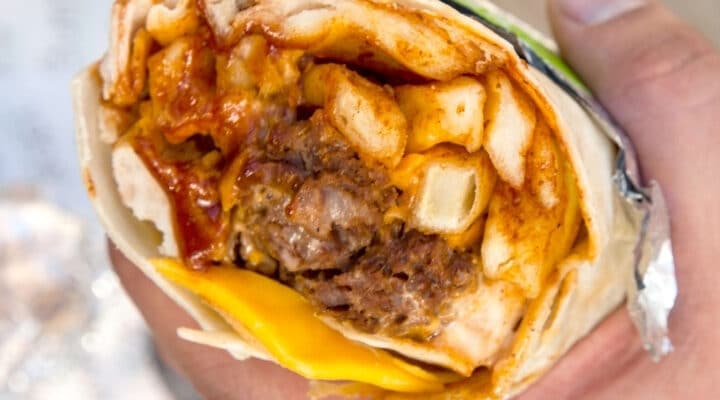
Easy and Delicious Recipes

Recent Posts

Easy Vanilla Sponge Cake Recipe

Easy Vanilla Sponge Cake Recipe

Here is the recipe for the perfect Vanilla sponge cake. This super-soft, easy-to-make vanilla sponge cake is the best delight for any occasion. Whether it’s your daughter’s birthday or you want to make your Christmas eve memorable, my easy cake recipe will let to celebrate Read More

Basque Burnt Cheesecake (Ultimate Recipe)

Basque Burnt Cheesecake (Ultimate Recipe)

Basque Burnt Cheesecake is creamy on the inside, caramelized on top and now, with this recipe it’s easy to make. The cheesecake’s distinctive dark, rich top is made by baking at high temperatures. For a foolproof recipe, follow my tips and tricks to be able Read More

How to make Nihari – Pakistani Beef Stew Recipe

How to make Nihari – Pakistani Beef Stew Recipe

Today I’m going to show you how to make Nihari, one of the most popular Pakistani Beef stews; this recipe is quick and easy to make. It takes only one pot and requires less than 30 minutes to prepare. This recipe contains instructions for making tender beef shanks (or stews) on the stovetop and slow cooker.

A few Pakistani recipes can be used as-is. These recipes don’t require a side or other accompaniments except garnishes. Biryani is one example of such a dish. But, if I’m being honest, Nihari is my favorite one-dish meal. It’s full of strong spices and tender meat. The lemon sourness is a bonus. And the bright leafy cilantro. Nihari would be my last meal request.

What is Nihari?

Nihari is a slow-cooked, rich meat stew that’s flavored with spices. It can also be thickened with atta or Pakistani and Indian-style durum whole grain flour. Nihari is typically made from beef in Pakistan but can also be made using lamb, goat, or chicken.

The root Arabic word “Nahar” is the root of “nihari,” which means “day” or morning. Because it was originally eaten in the morning, this dish is called Nihari. It is believed that the dish originated in Old Delhi. There, it was consumed by Mughal nawabs and workmen to fuel them during the day.

Is Nihari a Pakistani Dish?

Nihari is common on almost all Pakistani restaurant menus and is widely loved in Pakistan. It is an important part of home cooking for occasions like Eid or Ramadan. In this regard, Nihari is Pakistani cuisine.

What is Nalli Nihari?

The term nalli is a pipe or tube. This describes the pipes-like bones used to make Nihari. Nalli Nihari is made from beef bones, which are usually the humerus and femur. It also contains yellow bone marrow. This gives Nihari a buttery, rich flavor. Sometimes, bone marrow can be extracted and added to Nihari.

Although this recipe does not require bones, using bone-in or bone-on meat alongside the meat will enhance its flavor. This is especially important in the Instant Pot version. You would need about 1/3 lb more weight to use bones.

Which Cut of Meat Should You Use for Nihari?

Nihari is usually made from boneless beef shanks (also known as beef shins). It will be labeled Nihari cut in Halal grocery shops. Pre-cut beef stew meat is also available. This is basically boneless beef from either the rear muscle (round) or the front shoulder (chuck). I prefer shoulder stew meat if it is requested. It has a higher tenderness.

You should also look for high-quality beef. The better the beef, the more marbled it looks.

Nihari Masala

Using Pre-made Nihari Masala

This recipe originally used 1/2 a teaspoon of pre-made Nihari masala. You won’t be able to make Nihari the way your Pakistani neighbors do. They used the same powder. It will give your dish a little extra flavor and color.

Many people have asked me about using *only* the spice mixture. Although I don’t mind using pre-made spice mixtures, I do not recommend that you use them in the recommended quantities as they can be quite strong. Fresh spices make the flavors more prominent. You must adjust the amount of salt and spice depending on the brand you choose and how much masala.

How to Make Homemade Nihari Masala

As usual, I prefer to use homemade spices whenever possible. It took me some time to create a Nihari Masala powder that worked with this recipe.

Nihari Masala- Makes 1 Tbsp. All of which you will use

  • 1/2 to 1 tsp Kashmiri Red Chili Powder or Paprika for color
  • 1 small pod of black cardamom
  • 1/8 tsp caraway seeds 
  • 1 small mace blade 
  • 1/4 tsp fennel seeds
  • 1/4 tsp garam masala powder
  • 3/4 inch Peepli peppers
  • 1/4 tsp ginger powder
  • 1/4 teaspoon onion powder
  • 1/8 tsp nigella seeds 
  • pinch cane sugar

Combine all ingredients in a spice grinder until you get a fine powder.

How to make Nihari

Intentional depth of flavor is the key to great nihari. All this contributes to the renowned taste of nihari.

  • Brown the meat and onions. Deep-browned onions are essential to give Nihari flavor, depth, and body. Searing the meat in a pan until it is browning is important for all stews. However, don’t cook too long, which could result in tough meat.
  • Bloom Spices Allow spices to be added and let them cook in the hot oil. You can add water to prevent them from burning.
  • Cook. If you use a slow cooker for cooking the mixture, pour in water and stir to combine.
  • Thicken. You will get clumps if you add flour to thicken the gravy. This can be avoided by removing some of the nihari liquid. I have always found that using water dilutes its taste. Let it cool. Stir it into the atta flour. To prevent clumps, add the slurry to nihari. Let it cook until thickened.

How to get oil (Tari), on top of Nihari

After a curry has been cooked, the oil and fats naturally rise to the surface. The oil is released once the meat has been cooked and the atta has been cooked. It won’t look as oily as restaurant Niharis because I don’t use nearly as much oil in my traditional recipes.

Allow the oil to boil for five minutes on low heat. To give Nihari his distinct layer of oil, you can either reserve the oil or add a tarka (tempering oil) with spices.

Here are some more tips for making Nihari

  • The Nihari meat should not be overcooked. It should be cooked only once, and then it should be almost shredded to the touch.
  • The final result should look like thick gravy or soup. To thin it, add some boiling water. To achieve the desired consistency, continue to saute.
  • If you are using a slow cooker and the result is too thin to use, transfer the mixture to the stovetop to thicken.
  • Many restaurants will keep the pieces large (3-4 inches). Kenji Lopez-Alt explains that larger cuts make the meat tenderer. Because it is easier to eat and serve, I prefer smaller cubes.
  • Variation: Before adding the Nihari to the atta slurry, add 1-2 tablespoons of yogurt.

How to make Gluten-Free Nihari

It took me a while to get this to be gluten-free and, at the same time, not to taste any different from the original Nihari. In the end, I figured out how to make the best gluten-free version of Nihari. For atta flour, you can dry roast brown rice flour and sorghum flour for about 3-4 minutes at low heat. It gives it a richer flavor and recreates the earthy taste that atta has. Try it with my gluten-free, no-yeast naan.

What can you serve with Nihari?

Nihari is usually served as a main course or brunch meal. Nihari is usually served with sheermal or naan, a sweet flatbread.

Garnishing should always be served with nihari. You must have lemon wedges, julienned Ginger, chopped cilantro, and (tolerable) chopped green Chili peppers. These will be a great addition to your Nihari and enhance the spice, tangy, or crunchy taste.

How to make Nihari - Pakistani Beef Stew Recipe

FAQs

How to thicken Nihari

Allow the Nihari to simmer covered for a thickening effect. You can add more atta to the recipe.

Is Nihari possible to freeze?

Yes! Nihari is freezer-friendly because it’s a simple stew without vegetables or water-based components. You can heat it on the stovetop, but you may need to add more water. Make sure to stir the beef well so it doesn’t get mushy.

Can I Make Nihari with Chicken rather than beef?

I haven’t yet tried cooking with chicken, so I don’t know what adjustments it will need in terms of spices and balance. You’ll need to cook chicken for a shorter time. Bone-in pieces of chicken take around 30 minutes on low heat.

How to make the recipe twice as good:

Double the ingredients except the water to double the recipe. An approximate estimate is that you will need 2 cups of liquid per pound of beef if you use a slow cooker instead of 3 or 3 1/2. Make it on the stovetop with 7 cups instead 9 cups.

I would love to hear your feedback if you make this recipe. Let me know what you think in the comments, messages, or on Pinterest by tagging Cooking Frog.

Please show your support and share the image below on Pinterest if you like this Nihari Recipe!

Nihari - Pakistani Beef Stew Recipe

How to make Nihari Recipe

Ingredients

For the Nihari 

  • 5 TBSP of canola oil or another neutral oil
  • 1 TBSP of butter 
  • 1 large onion, thinly chopped
  • 6 garlic cloves, Crushed
  • Ginger, Crushed in 3-inch pieces
  • 1 1/3 tsp salt (I prefer sea salt). If you make your own masala, start with 1 1/2 teaspoon
  • 1/4 cup durumatta flour. 
  • 10 cups water on the stovetop, 6 TBSP in the slow cooker
  • 1 lb of boneless beef shank, 2-inch cubed or sub beef stew or 1 1/2 inches cubed

Whole Spices

  • 1/2 oz. small star anise
  • 1 to 2 small bay leaves
  • 1-inch piece of cinnamon stick

Ground Spices

  • 3 whole cloves are ground into a powder with a mortar and pestle.
  • 3 green cardamom pods, with the seeds removed and ground into powder using a mortar & pestle
  • 1/2 tsp of fennel seeds ground into a powder with a mortar and pestle
  • 1/2 tsp of paprika powder
  • 1/3 tsp of coriander powder
  • 1/2 tsp of cumin powder
  • 1/4 tsp turmeric
  • 1/4 to 1/2 tsp cayenne powder or red chili powder
  • 1/3 tsp crushed red chili flakes
  • 1/4 tsp black pepper powder
  • 1/8 teaspoon garlic powder (optional).
  • Add a pinch of nutmeg
  • 1 tbsp Homemade Nihari Masala (recipe is in the post), or 1/2 tbsp from a store-bought version

Garnishings

  • 1 tsp garam masala
  • Crispy fried onions ( You can use Onion Bhaji, see the recipe)
  • ginger, about 1 inch,  julienned
  • 1 lemon cut into wedges
  • 13 bunch of fresh cilantro, chopped
  • Chop 1-2 green chili peppers

Instructions

  • Over medium heat, heat oil and ghee together in a Dutch oven or large pot. Sauté the whole spices, onion, and garlic for about 10 minutes.
  • Deglaze the pan with two tablespoons of water if necessary. After the water has dried, add the ginger and garlic. Continue to cook for another 30 seconds. Sauté the beef for 5 minutes or until it turns a golden brown color.
  • Reduce the heat to medium and add the salt and powdered spices. Sauté for approximately 20 seconds. Mix the water with the spices and salt immediately.
  • Turn up the heat and bring it to a boil. Cover with a lid to speed things along. Reduce the heat to medium/low so that the nihari simmers gently. For beef-shank meat, cover and cook for 6 hours. Turn off the heat. You want the meat to be soft enough to break apart when you press it with a wooden spoon. If desired, you can remove the whole spices.
  • Place a cup of the Nihari liquid into a measuring cup or bowl. Add an ice cube to the liquid of the Nihari and let it cool down. In a small bowl, place the atta. Slowly whisk the Nihari liquid into atta, forming a smooth slurry. Small clumps are acceptable. Slowly return the slurry to the Nihari pot. This will prevent any clumps. To achieve the desired consistency, you can add boiling water (preferably) to thin it out.
  • Turn up the heat to high to bring it to a simmer. Reduce the heat to medium/low. Cover the pot and let it simmer for 30 to 45 minutes. It should have the consistency of a thick soup. Serve warm with garnishing, naan, or sheermal.

Slow cooker Nihari Recipe

I’ve also tried cooking Nihari using a slow cooker, and it turned out great. Just be sure to follow the steps below:

  • Over medium heat, heat a medium saucepan. Add the spices and heat the oil. Sauté onion until it is golden, approximately 10 minutes.
  • Deglaze the pan with two tablespoons of water if necessary. After the water has dried, add the ginger and garlic. Continue to cook for another 30 seconds. Sauté the beef for 5 minutes or until it turns a golden brown color.
  • Reduce the heat to medium and add salt and powdered spices. Sauté for approximately 20 seconds.
  • This beef mixture should be carefully poured into a slow cooker or Crockpot.
  • Mix the water with the flour. For shanks, cook on low for 8-10hr or high for 6-7hr or until the beef is tender. Depending on the meat and slow cooker, cooking times may vary.
  • After the cooking is done, you’ll need to take out all spices and pour a cup of the Nihari liquid into a bowl. Add an ice cube to the mixture and let it cool down. Place the atta into a separate bowl. Add the Nihari liquid slowly to the atta, forming a smooth paste. Slowly stir this slurry into the crockpot, occasionally stirring to avoid clumps. Allow it to cook for another 30-45 minutes. Serve warm with garnishing, naan, or sheermal.

Nutrition

  • Calories: 429kcal.
  • Carbohydrates 17g.
  • Protein: 27g.
  • Fat: 28g.
  • Saturated Fat 5g.
  • Cholesterol 82 mg.
  • Sodium: 855mg.
  • Potassium 545mg.
  • Fiber 3g. Sugar 2g.
  • Vitamin A: 237IU.
  • Vitamin C: 22mg.
  • Calcium: 68mg.
  • Iron 5mg.


Crispy Air Fryer Chicken Nuggets Recipe

Crispy Air Fryer Chicken Nuggets Recipe

Air Fryer Chicken Nuggets are a healthier option than cooking with other methods, and it’s way easier to prepare them this way. They cook perfectly crispy and have tender, juicy chicken inside. I will show you two versions, one with store-bought frozen chicken nuggets and Read More

Original Pakistani Chicken Tikka Recipe

Original Pakistani Chicken Tikka Recipe

This was a must! Recipes here on Cooking Frog needed to include a traditional Pakistani Chicken Tikka recipe. There are some recipes that have become so popular that there’s no right or wrong way to do them anymore. Chicken Tikka falls into that category. Even Read More

Crispy Onion Bhaji Recipe – Indian Kanda Bhaji

Crispy Onion Bhaji Recipe – Indian Kanda Bhaji

Step-by-step recipe for Crispy Onion Bhaji, Indian Kanda Bhaji Recipe. Onion Bhaji is fried onion fritters. These crispy fritters are made mainly from onion and gram flour (besan).

This street food is very popular in Maharashtra. There are many ways to prepare them. Here is my mom’s recipe, which she has been making for many decades.

Kanda Bhaji is quick and easy to prepare. It takes less than 30 minutes. Bhaji is also known for making pakoras in North India and bajji (South India).

Indians love pakoras so we see many varieties of Pakoda. This recipe only uses two ingredients to make the batter. However, you can make onion fritters from different parts of India using a variety of recipes.

Some variations of Onion Bhaji

  • North Indian Style: Classic Onion Pakoda
  • Vengaya Bajji (South Indian style)
  • Ulli Vada – Kerala style
  • South Indian Crispy Onion Bhaji Fritters 

Rice flour, curry leaves and other ingredients are added to South Indian-style onion fritters. Some places in Mumbai offer green chillies, coriander leaves, or crushed coriander seed additions to their fritters.

Kanda Bhaji usually has a crisper texture than other types of onion pakoda. This is because the ratio of gram flour and onions is lower. Kanda Bhaji also goes by the name Khekda Bhaji due to its similarity to crabs.

Kanda Bhaji is crispy, but you will still get a soft, sweet taste from the onions. These fritters taste great even though they don’t have any spices. Sometimes, simple recipes bring out the best flavor.

Kanda Bhaji can be served as a teatime snack with hot masala chai. This snack can also be made at home.

Kanda Bhaji can be served with spicy green chutney, tomato ketchup, and a few fried green chilies.

Pin the image below if you like this Onion Bhaji Recipe!

Crispy Onion Bhaji Recipe - Indian Kanda Bhaji

How to make Onion Bhaji

  1. Place 1 large onion in a bowl and slice it thinly. One cup should yield 1 cup of thinly-sliced onions.
  2. To the sliced onions, add 1/2 cup of gram flour (besan).
  3. You can add 1 teaspoon salt, or as much as you like. Although you can add less salt to these pakoras, they taste best when they are slightly salty. You can also add 2 teaspoons of coarsely ground coriander seeds to make a Mumbai-style version. In a mortar-pestle, crush the coriander seeds.
  4. This mixture can be made with 1 teaspoon oil. This oil helps make these pakoras crispy and reduces oil absorption while you fry the bhajis.
  5. Mix everything well with your hands. Allow the mixture to sit for at least 5-6 minutes to let the onion moisture evaporate. The mixture should not be too dry or moist. If the mixture appears too dry, add 1 to 2 teaspoons of flour/besan. Allow to cool for at least a few minutes.

Frying

  1. For deep-frying, heat oil in a kadai (or a deep skillet).
  2. Crispy bhaji is best fried in hot oil. A small test could be done by adding a little batter to the oil. Add a few spoonfuls of batter to the hot oil and see if it rises steadily. The bhajis should be fried on medium heat to ensure even frying.
  3. Flip the bhajis once one side has been cooked to a light golden color. Fry a few kanda-bhajis at once.
  4. Turn them a few more times and fry until they are crisp and golden.
  5. Place the kanda-bhajis on a plate and remove with a spoon. In the same manner, fry the remaining onion bhajis.
  6. Kanda Bhaji can be served hot with mint chutney, mint coriander or tomato ketchup. To fry the green chilies, cut them in half. To make sure they turn a golden brown, fry them in the same oil until they are cooked. Place them on absorbent napkins. Mix well with a pinch of salt.

Please rate this recipe if you have made it. For more inspiration on delicious cuisine, sign up for my email newsletter. You can also follow me on Pinterest.

Maharashtrian Kanda Bhaji | Onion Bhaji

Kanda Bhaji is a crisp, crunchy fritter made with onions and gram flour. Popular street food from Maharashtra.

Prep Time: 5 minutes

Cooking Time 20 minutes

Total Time: 25 minutes

Ingredients

  • 1 thinly sliced onion
  • ½ cup of flour (gram flour or chickpea flour)
  • 1 tsp of oil for bhaji batter mix
  • 1 tsp of salt
  • Oil for deep-frying

Instructions

Making Onion bhaji batter

  • Place the chopped onions in a bowl.
  • To the sliced onions, add 1/2 cup besan (gram flour).
  • Add 1 tsp of salt or as needed
  • Next, add 1 tsp of oil. Although you can add less salt to these pakoras, they taste best when they are slightly salty.
  • Mix the oil, besan and salt together with the onions using your fingers. Let the mixture rest for at least 5-6 minutes to let the onion moisture evaporate. You can add 1 to 2 teaspoons of flour to make the mixture more moist.

Frying Onion bhaji

  • For deep frying, heat oil in a pan.
  • Make sure the oil is hot for crispy bhajis.  A small test could be done by adding a little batter to the oil. If the oil rises quickly and smoothly, add a few spoonfuls of the batter. Otherwise, the kanda Bhajis won’t brown evenly.
  • Flip the bhajis while they are frying. Use a slotted spoon to flip them. Fry a few bhajis at once.
  • Toast them until they are golden brown and crisp.
  • Place the onion bhaji on a slotted spoon.
  • Continue to fry the onion bhaji in the same manner.
  • Hot with spicy green chutney, fried green chilies or tomato ketchup
  • On a medium flame, fry the kanda-bhajis. The bhajis can absorb too much oil and become soggy if the oil isn’t hot enough. They will brown quickly on the top if fried in hot oil, leaving the onions raw inside.
  • As the onions have released their juices, there is no need for you to add water to the pakora batter.

Crispy Onion Bhaji Recipe - Indian Kanda Bhaji


Smoked Chicken Breast Recipe – Glazed and Barbecued

Smoked Chicken Breast Recipe – Glazed and Barbecued

Here is a recipe for glazed and barbecued smoked chicken breast. So tender, so juicy. A nice crispy outer layer of the chicken breast and supper supple inner texture with an extraordinary amazing aroma turns out to be an amazing cuisine. Smoked chicken breast is Read More

The Best Blackstone Griddle Recipes

The Best Blackstone Griddle Recipes

Blackstone Griddle-Cook anything, Anytime, Anywhere! Blackstone griddle is just like a piece of magic equipment. It gives you endless possibilities to play with your culinary skills and make some extraordinary out of it. Here I’ve presented some of the best Blackstone griddle recipes that are Read More

Blackstone Griddle T-bone Steak Easy Recipe

Blackstone Griddle T-bone Steak Easy Recipe

The Blackstone Griddle T-Bone Steak is prepared on a griddle using propane. The versatile Blackstone griddle is an excellent choice for delicious meals, with an easy sear and crunchy crust.

Cooking a steak using Blackstone Griddle

Blackstone Griddle is a fantastic way to cook a steak perfectly. This grill has enough space for all sides and can maintain the temperature for perfect searing.

A Blackstone griddle is a great way to cook steaks

The flat-top grill steak recipe uses propane and flat-top grills to sear the steak perfectly. This locks in the moisture and prevents the meat from drying.

More surface area is available for cooking, so you don’t have to worry about maintaining an even temperature. The griddle’s flat top surface distributes heat evenly.

How do you grill steak on a Griddle?

Cooking a steak on a Blackstone griddle grill is easy. You can cook most steaks by heating the grill to 450-500 degrees. Once the grill is hot, place the well-seasoned steaks on the grill and allow them to sear in order to develop that nice crust. 

As with all meats, steak should not be cooked according to the timer. Cook your meat according to its internal temperature.

Let your steaks rest for 5 minutes after removing them from the grill to allow the moisture to redistribute. This will allow the meat to continue cooking, so be aware of cooking times.

How to tell if a T-bone steak has been cooked

A meat thermometer can be used to help you know when your steak is cooked. You can feel its cooking temperature by pressing down on a steak measuring about 3/4 inches thick. It will cook faster if it is firmer, and less moisture is released when you press.

You will soon be able to use your tongs to check the doneness of the meat with a little practice. Don’t flip steaks with a fork. Stabbing the meat with tongs can cause all the internal moisture and flavorful juices of the meat to evaporate.

Blackstone Griddle Steak


Which cuts of steak are the best for grilling?

Although this recipe is for T-bone steak, you can use it with other steak cuts. Blackstone griddle steaks can be made from any cut, but I prefer certain cuts. For a few reasons, I prefer thicker cuts.

The thicker cuts of steak, such as Cowboy Ribeyes, are 1-2 inches thick and contain a lot more margarined fat. Blackstone griddles are great for evenly cooking the steak and melting the fat into the cut of meat. The temperature can also be easily controlled so that it doesn’t cook too long.

A cut such as a T-bone steak, New York Strip, or Grilled Flaming Steak, although it’s typically thinner, has excellent marbling. These cuts will cook quicker but will still be more controlled over the temperature.

Chateaubriand, Filet Mignon, or Chateaubriand can still be cooked on a flat top griddle, but these steaks will benefit from a lower cooking temp. This allows you to enclose the surface more easily.

What steak cuts would you not cook on a grill?

There aren’t many cuts that I wouldn’t cook on a flat-top grill. However, I prefer to use the reverse sear method to cook thicker cuts on my pellet grill. This allows me to take advantage of the lower temperature and lid to let the thickest cuts reach the desired internal temp without drying them out.

Reverse searing can be done with a Blackstone griddle

Blackstone Griddles can be used to reverse-seared steaks. This method can be used to cook steaks in many different ways.

What toppings are possible for a steak?

You can top the steak with many toppings, including crab meat, peppercorn sauce, steak sauce, and grilled onions.

If you are looking for some ideas on how to top your flat-top grill steaks, I have a few suggestions.

Do I cook steaks well?

If you prefer a well-done steak, I’m not going to tell ya that it is impossible to cook it properly. Most steaks that are well-done end up being tough and leathery after they’re cooked too long.

Many chefs and cooks, both professionals and amateurs, will tell you not to cook steaks at that temperature. It’s just too easy to ruin a perfectly cooked steak.

If the steak has enough margarine fat to preserve some of its juiciness, it can be cooked and eaten. Look out for cuts with a lot of fat, such as ribeyes.

Make sure to get the ketchup ready for your well-done steak.

What side dishes can I serve with my steak?

You can add whatever you like, but my option is a steak sauce, caramelized onions, mushrooms, and more.

Prep Time5 minutes

Cook Time
10 minutes

Total Time
15 minutes

Pin the image below if you like this Blackstone Griddle Steak Recipe!

Blackstone Griddle T-bone Steak Easy Recipe

Ingredients:

  • T-Bone Steak (or another steak of your choice)
  • Salt and pepper

Instructions

Direct Sear Method

  • Preheat your Blackstone to medium heat. Season the steak with salt and pepper on both sides and rub it nicely.
  • Place the T-bone (or another steak) on the grill.
  • It will form a crust if you don’t touch it for a few minutes.
  • Turn the steak once and cook on the other side until there is a crust and the steak reaches the desired temperature.
  • You will need to sear the sides if your steak is very thick. To ensure even cooking, you will need to lower the heat to medium-low and cover the steak with a lid or dome if it is particularly thick.

Reverse Sear Method

  • Season the meat and place it on a smoker at 180-200F. The steak should sear for 1 hour, approximately, or until it reaches 120F.
  • Place the meat on a Blackstone griddle preheated at medium-high heat. Let the meat rest for 2 to 3 minutes to form a crust.
Nando’s Spicy Rice Recipe Takeaway

Nando’s Spicy Rice Recipe Takeaway

Here’s my colorful, spicy rice recipe, a perfect clone of the famous Nando’s Spicy Rice Recipe. This rice tastes so amazing. The blend of various spices and vegetables gives your every bite a unique flavor. Nando’s Spicy Rice My love for this takeaway recipe inspired Read More