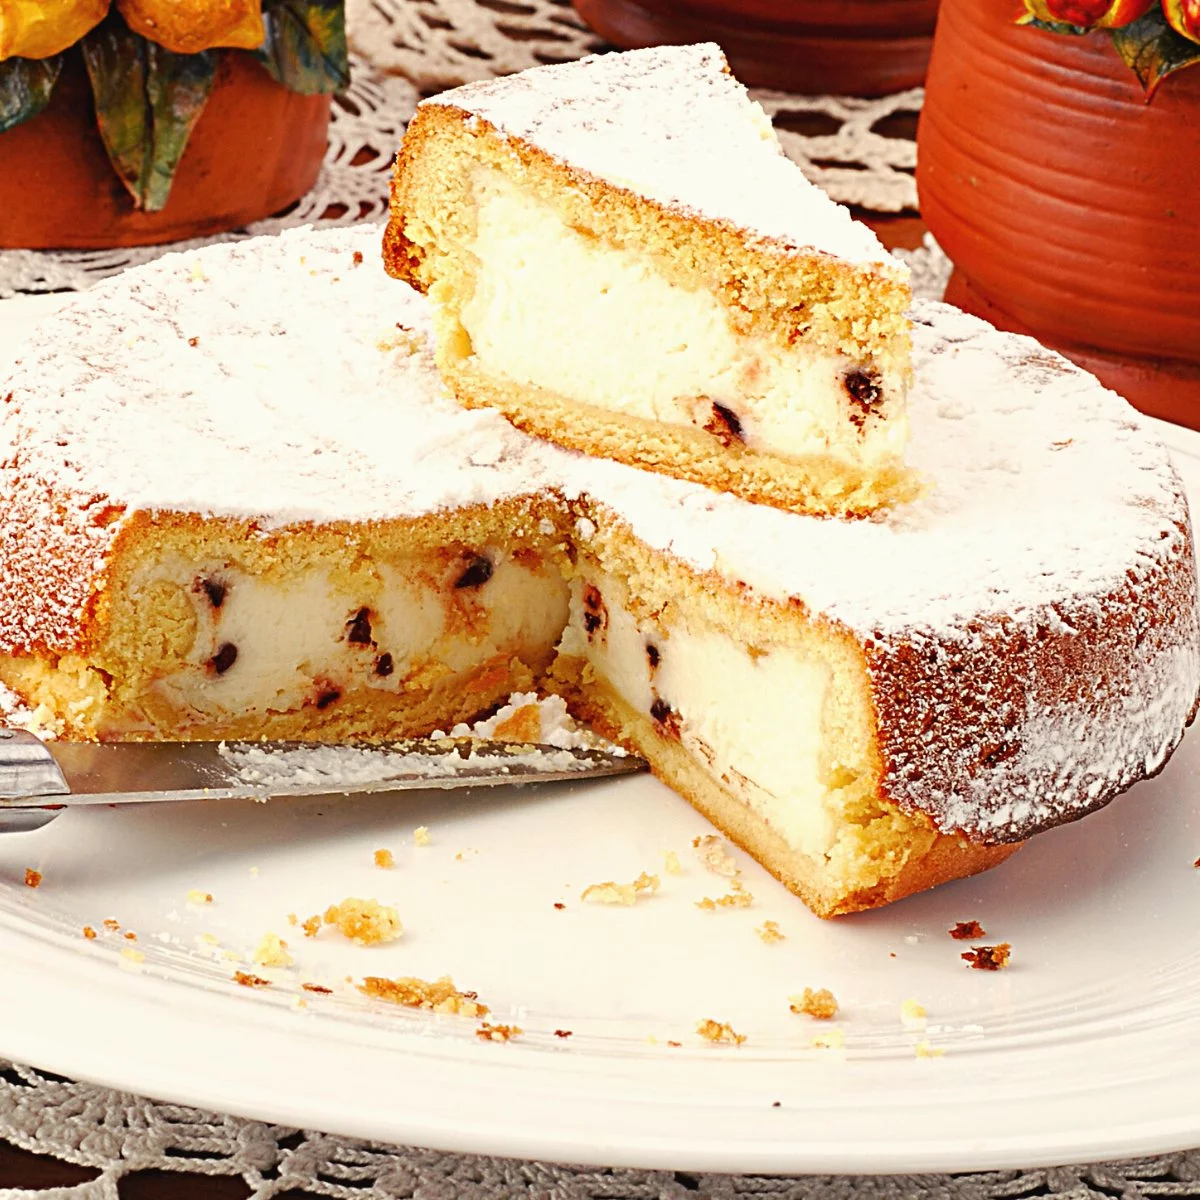
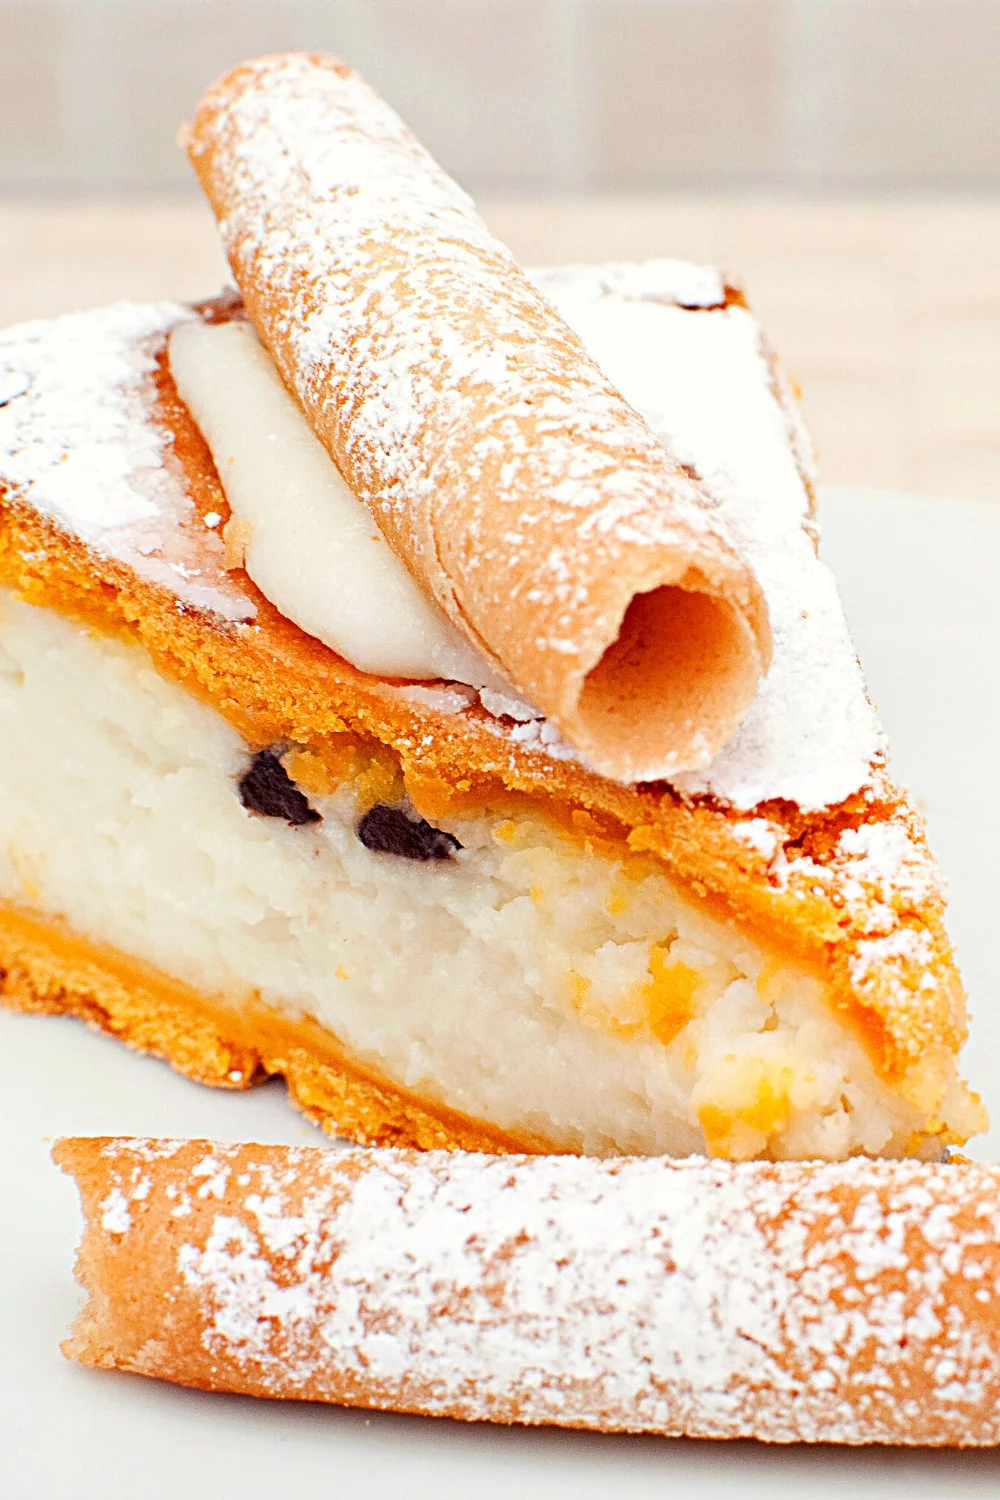
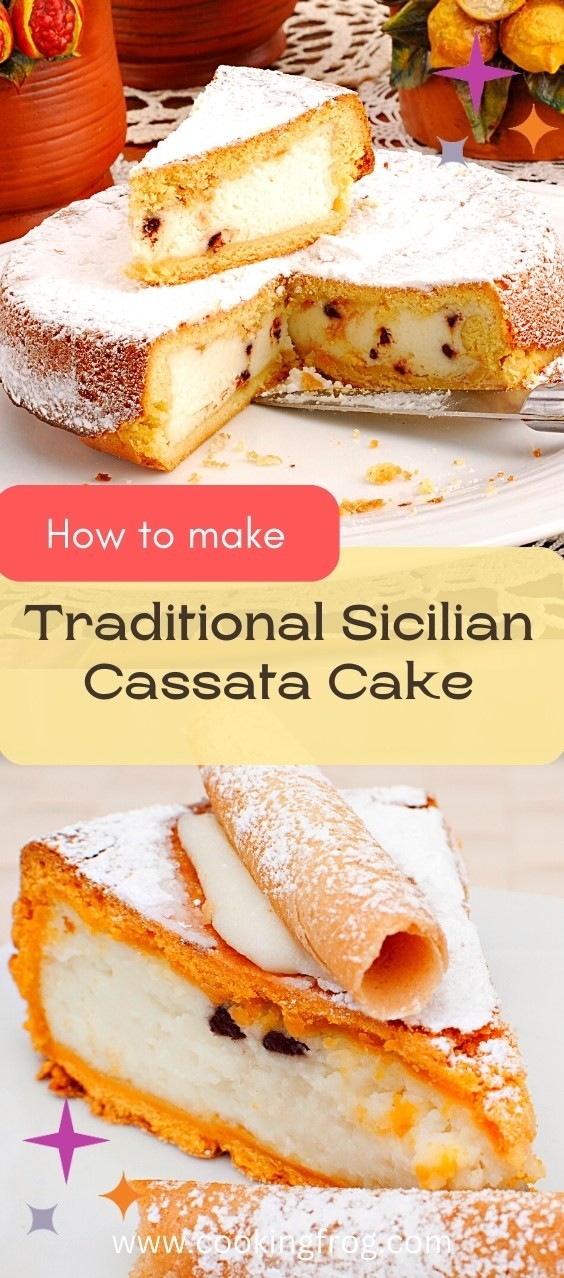
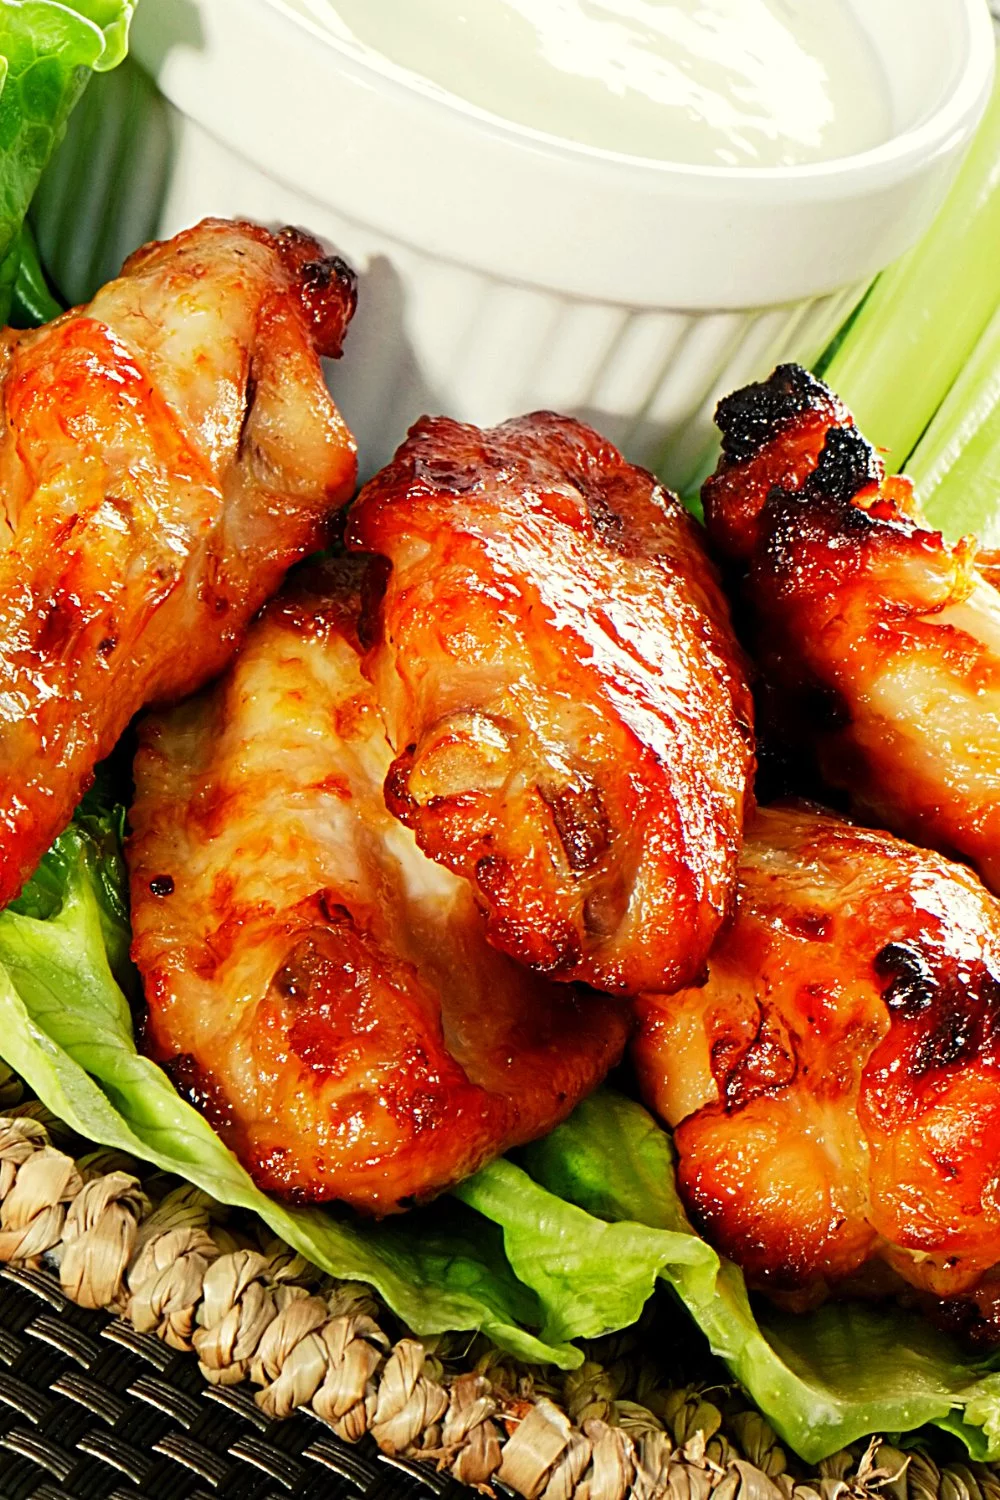
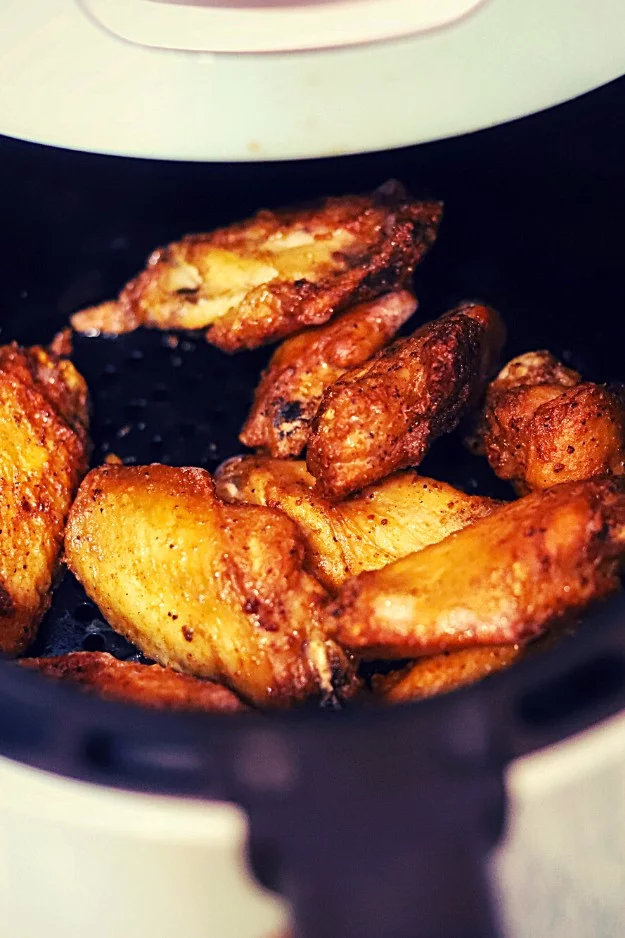
Easy and Delicious Recipes

Recent Posts

Air-Fryer Kielbasa – Polish Sausage Recipe

Air-Fryer Kielbasa – Polish Sausage Recipe

Your Air-Fryer Kielbasa can be ready to serve fast and effortlessly in less than 10 minutes of preparation and cooking! No oil is used in this fast, easy, hands-off method of cooking Polish sausage, which can be eaten as an appetizer or combined with other Read More

Traditional Homemade Mooncakes Easy Recipe

Traditional Homemade Mooncakes Easy Recipe

The flavor of homemade mooncakes is unrivaled. This recipe demonstrates how to create classic mooncakes with simple instructions and lots of expert advice. Every Chinese holiday indeed has a connection to one or more specific foods. I’m presenting a recipe for traditional mooncakes to celebrate Read More

Authentic Taiwanese Souffle Castella Cake Recipe

Authentic Taiwanese Souffle Castella Cake Recipe

The famous sponge cake known as Taiwanese castella cake often referred to as Taiwanese soufflé castella, is renowned for its soft, fluffy texture and distinctive bounce. It is wonderful on its own or when topped with whipped cream and fruits. It is delicately sweetened.

Taiwanese castella cake may be found in various bakeries and street vendors there. Watching a large pan of jiggly sponge cake being turned out and sliced into rectangles is fascinating!

Some merchants would even prepare whipped cream filling for the cakes or use cheese to produce savory ones. They all seem fantastic! We’re thrilled to offer this incredibly jiggly and pillow-soft castella cake recipe to you now that it has been through several tests.

So, What is Taiwanese Souffle Castella Cake?

A jiggly cake baked in a water bath is the basic component of Taiwanese castella cake or Taiwanese soufflé castella. It has a caramelized top, is really fluffy and soft, and when you cut or tear a piece of it, it produces that lovely “u wo” sound.

From bakeries to cafés serving street food, it gained popularity in Taiwan. In such bakeries and cafés, you would frequently see Taiwanese castella cake made on a meter-long pan and cut into sizable rectangles.

Typically, these cakes are prepared in big 1-meter slabs that are immediately cut into large rectangles and placed in boxes for the many consumers who are lined up outside the businesses to pick up. There are nearly always lineups outside the stores since these cakes are so desirable.

Authentic Taiwanese Souffle Castella Cake Recipe

Japanese castella cake vs Taiwanese castella cake 

The original castella is a cake that was invented in Japan after being brought by the Portuguese, notwithstanding souffle castella’s popularity in Taiwan. Japanese castella is a classic confection with a darker crust that is produced using eggs, bread flour,  sugar, and mizuame, a sort of sugar syrup that gives the cake a moist feel.

Japanese castella is cooked in a wooden rectangular or square mold, not on a massive scale like the Taiwanese variant, and is best eaten the day after baking since it has a moister feel.

Despite sharing the same name, each cake has its own distinctive charms. Because of its fluffy texture, I personally prefer the Taiwanese variety, but try this recipe and let me know what you think!

Castella Cake Recipe

Ok, after we’ve learned everything we need to know, it’s time to make this amazing Taiwanese castella cake. To get the best results with your cake, be sure to read the tips below the recipe card. 

Ingredients

  • Eggs: 10 large
  • Cake Flour: 4.5 oz (130 grams)
  • Unsalted Butter: ½ cup, melted (70 grams)
  • Neutral Oil: ½ cup (70 ml)
  • Whole Milk: 1 cup, room temperature (120 ml)
  • Vanilla Extract: 3 tsp
  • Granulated Sugar: 1 cup (120 grams)
  • White Vinegar: 2 tsp (alternatively, lemon juice or cream of tartar)

Equipment

  • 8 × 8 x 3-inch pan
  • Baking sheet
  • Large oven-safe tray or pan for water bath
  • Two large mixing bowls
  • Hand mixer
  • Sifter
  • Spatula
  • Parchment paper
  • Toothpick

Instructions

Step 1: Pre-heat and Prepare Tools

  1. Preheat Oven: Set your oven to 300°F (150°C).
  2. Prepare Pan: Line the 8 × 8 x 3-inch pan with parchment paper and place it on a baking sheet.
  3. Water Bath Setup: Have a larger oven-safe tray or pan ready for a water bath. Boil water in a kettle or a pot.

Step 2: Make the Batter Base

  1. Sift Flour: Sift the cake flour into a large mixing bowl to remove lumps.
  2. Combine Wet Ingredients: Gradually whisk in the neutral oil and melted butter until smooth.
  3. Add Milk: Stir in the whole milk until just incorporated.
  4. Egg Yolks & Vanilla: Separate the yolks from 10 eggs. Add the yolks and vanilla extract to the mixture, stirring gently.

Step 3: Making the Meringue

  1. Whip Egg Whites: In a second large bowl, combine egg whites and vinegar. Beat with a hand mixer at medium-high speed until foamy.
  2. Add Sugar: Gradually add granulated sugar while continuing to beat until fully incorporated.
  3. Reach Medium Peaks: Slow down the mixer, whipping until the meringue forms medium peaks (a peak with a slight curve at the tip when the beaters are lifted).

Step 4: Combine and Bake

  1. Fold in Meringue: Gently fold ⅓ of the meringue into the batter using a “J” shape motion with a spatula. Repeat twice more with the remaining meringue, ensuring even color and texture.
  2. Prepare for Baking: Pour the batter into the prepared pan. Tap the pan to release large air bubbles.
  3. Water Bath: Place the pan in the larger tray. Carefully pour boiling water into the tray, reaching halfway up the sides of the cake pan.
  4. Bake: Bake for 65-70 minutes. Check doneness with a toothpick – it should come out clean.

Step 5: Cut and Serve

  1. Cooling: Let the cake cool slightly before removing it from the pan.
  2. Serving: Cut into 8 equal slices. Serve warm for a jiggly texture or cool for a firmer, less eggy taste. Enhance with whipped cream and fruit if desired.

Enjoy your delicious Taiwanese Castella Cake!

Authentic Taiwanese Souffle Castella Cake Recipe

Taiwanese castella cake FAQs

Why does my castella cake crack?

Taiwanese castella cake surface cracks can be brought about by overly whipped meringue, a hot oven, or baking inside a pan that is too small.

Why did my castella cake shrink in size?

As with all soufflé-type cakes, Taiwanese castella cake will somewhat shrink or deflate after being taken out of the oven. Ensure the meringue is whisked to a medium peak and the cake is thoroughly cooked to avoid the castella cake losing a lot of volume.

Why does the bottom of my castella cake have a dense layer?

Your Taiwanese castella probably have a dense layer at the bottom because the meringue was likely not well-whipped. Ensure the meringue is whipped to a medium peak.

Share the image below to your Pinterest board if you like this Taiwanese Castella Cake Recipe!

Authentic Taiwanese Souffle Castella Cake Recipe

Castella Cake Tips

  • Maintain the ingredients at room temperature or warm. To avoid the butter from hardening, it is better to maintain the remaining ingredients at room temp or slightly warmer.
  • Choose a large square pan if feasible. Castella cake requires a square pan with tall edges for support while it bakes. Only when you do not have a 3-inch-deep square pan, you may support the castella cake with reusable paper.
  • If you desire the surface of the Taiwanese castella cake to be darker, broil the cake. Adjust the oven’s broiler settings to high and brown the cake’s surface to your liking. However, make sure to maintain attention! The cake can get scorched in a matter of seconds!

Taiwanese castella cake frequent issues

Castella cake’s top has cracked

The meringue was far too solid. To medium peak, whisk the meringue. The cake is liable to split if it becomes any stiffer.

  • The oven temperature was excessively high. Because each oven is unique, it is essential to use a thermometer to ascertain the temperature readings of your oven.
  • The cooking pan was too shallow. If the pan is too shallow, the can will extend outward as it breaks and separates.

Deflating cake:

Even while Taiwanese castella cake will certainly deflate somewhat as it cools, it shouldn’t deflate significantly.

  • Your meringue was probably too soft. Soft peak meringue provides a Taiwanese castella cake that is more jiggly but also encourages more pronounced shrinkage and deflation.
  • The cake was not properly cooked. The cake will deflate, collapse, and compress as it cools if it is fully cooked. Stick a toothpick into the center of the cake to determine when it is done. There should be no or very few crumbs left behind.
  • A cake with uneven crumbs and large bubbles:
  • This concern is primarily aesthetic. Equally delicious will be the castella cake.
  • The Meringue was beaten too quickly. After adding the sugar, the meringue should be beaten at a medium speed. This makes the finished batter smoother by aerating the meringue without creating big bubbles.
  • Incorrect meringue inclusion. Use a gentle “J” folding motion to incorporate the meringue into the mixture. If you fold the batter forcefully, extra air might be introduced, resulting in a coarse, uneven crumb.

Nutrition

Serving: 1 piece

  • Calories: 290kcal
  • Carbohydrates: 24g
  • Protein: 8.5g
  • Fat: 18.6g
  • Saturated Fat: 6.1g
  • Monounsaturated Fat: 7g
  • Polyunsaturated Fat: 2.9g
  • Cholesterol: 200mg
  • Potassium: 109mg
  • Sodium: 78mg
  • Sugar: 13.1g
  • Calcium: 47mg
  • Vitamin A: 469IU
  • Iron: 1mg
The Best Creamy & Spicy Chipotle Sauce Recipe

The Best Creamy & Spicy Chipotle Sauce Recipe

Chipotle sauce is a quick and simple method to give any dish a smoky taste, spiciness, and zest. It can be used as a creamy dip or poured over tacos. In either case, you only need a few ingredients from your kitchen to make this Read More

The Best Homemade Swiss Roll Cake Recipe

The Best Homemade Swiss Roll Cake Recipe

This recipe for the ultimate Swiss roll cake yields a dessert that is not overly sweet and is delicate, fluffy, and spongy. Use whipped cream, jam, or ganache to fill this chiffon-style cake, which is easy to make with the advice I’ve provided below. Childhood Read More

Homemade Cowboy Candy Recipe (Candied Jalapenos)

Homemade Cowboy Candy Recipe (Candied Jalapenos)

These candied jalapenos (also known as cowboy candy) are the ideal sweet-and-spicy condiment to spice up your favorite cuisine. They are fiery jalapeno slices in a sugary glaze. Serve with cream cheese and crackers, over sandwiches and hamburgers, or even in salads, grilled meat and baked beans!

You’re in for a treat, my buddy, if you’ve never eaten a candied jalapeño. They really strike the ideal mix between sweetness and spice.

The jalapeño is transformed into this delectable little jewel by the sugar, which softens its intense heat.

What is Cowboy Candy?

Cowboy Candy is unique in its own right. A powerful condiment is made by marinating hot jalapeño peppers in a sweet sugar glaze. Although they soften, the jalapenos keep their spiciness, which is countered by the glaze made of sugar.

Although you may easily quadruple or triple this recipe to produce huge batches of Cowboy Candy, it is considered a small-batch recipe. If you enjoy making pickling recipes, you probably already have many of the components on hand.

In essence, they are jalapenos that have been cut into slices, then cooked and sweetened in a simple seasoned syrup. They are the ideal fast sweet treats or garnishes since they are the optimum balance of sweet and spicy.

Additionally, the process of canning aids in their preservation. The phrase has been used for years, but the recipe is so well-liked that a tiny business even registered the common name as a trademark. This handmade variation is much better.

Isn’t it true that handmade is always better? Oh, and it’s cheaper to make this candied goodness than to buy it, and really simple to make!

Homemade Cowboy Candy Recipe (Candied Jalapenos)

What is Cowboy Candy Made Of?

To produce this delectable condiment, only a few basic ingredients and a few spices are required.

Jalapenos: There are around 20 jalapenos required for this dish.

Apple cider vinegar: Tenderizes the peppers and adds a tangy taste.

Sugars: A mixture of brown sugar and granulated sugar in equal amounts counteracts the spiciness and vinegar.

Garlic powder, celery seed, cayenne pepper, turmeric, and other seasonings all go well with the hot jalapeno taste.

Why is this recipe the best?

There are quite a few recipes online, but I’ve noticed that most of them are lacking in some crucial steps when making. Don’t get me wrong, making it is easy, but you must get the timing and the ingredients right for the best results.

This simple homemade recipe for candied jalapenos, often known as cowboy candy, is great for snacks or desserts since it’s sweet with just a hint of spice.

They have a nice balance of spice and sweetness. They are essentially sliced jalapenos preserved in a seasoned simple syrup and are excellent for cornbread, guacamole, and cocktail garnishes.

Homemade Cowboy Candy Recipe (Candied Jalapenos)

How to Make Candied Jalapeños (Cowboy Candy)

The toughest part of making cowboy candy is waiting to consume it; the process just takes a few minutes.

For detailed instructions with measurements, scroll to the bottom of the page. 

  1. Get the jalapenos ready. The jalapenos should be sliced into 1/4-inch thick rounds after the stems have been removed and discarded. Wearing gloves is essential when performing this. Place aside.
  2. Mixtures should be simmered. In a big saucepan, bring the remaining ingredients to a boil. After 5 minutes of simmering, add the jalapenos. Simmer for 4 minutes precisely. The peppers should be transferred to canning jars using a slotted spoon.
  3. Produce the syrup. The leftover liquid should be boiled for 6 to 7 mins on high heat to transform it into syrup. Wait three minutes for cooling. To fully cover the jalapenos, pour the syrup into the jars.
  4. Refresh the jars. For best results, cover the jars with 2-piece lids and cool in the refrigerator for at least two weeks before consuming.

Tips for Making The Candied Jalapeños (Cowboy Candy)

These are the tips for candied jalapenos that will be useful. 

Cool things down. The seeds and membrane from the jalapenos can be removed to lessen the heat a little bit if you like them to be a little less sweet and spicy. After removing the stems, twist and remove the seeds from each jalapeno by inserting a long peeler inside. After that, cut into rounds.

Avoid burning your nose or eyes. While chopping the jalapenos and moving them from the liquid to the jars, we strongly advise using gloves to protect your hands from the powerful odors.

If the peppers seem shriveled, don’t be alarmed. After boiling in the hot syrup, the peppers will shrink, but they will grow again after a few weeks of cooling in the tightly sealed jars.

How do you make use of Candied Jalapeños syrup leftovers?

You may also can syrup in half-pint or pint jars if you have any remaining, which is likely to happen. It tastes well in potato salad, as a coating over barbecued ribs, as a simple syrup in margaritas, etc.

How to store Candied Jalapeños (Cowboy Candy)

Store Candied Jalapeños in the refrigerator. When made as instructed, cowboy candy keeps for up to two months in the refrigerator.

Canning Candied Jalapeños: You may go one step further and can the cowboy candy for a longer shelf life. To do this, put the full, sealed jars in a canner with two inches of water on top of them. The water should come to a full rolling boil. Set the timer for 10 minutes for half-pints or 15 minutes for pints after it comes to a full rolling boil.

Use canning tongs to move the jars to a cooling rack once the timer goes off. Give them 24 hours to cool without being disturbed. Once completely cooled, label them and wipe them down with a clean, moist rag. They may stay fresh for up to a year in the pantry.

Share the image below to your Pinterest board if you like this Cowboy Candy Recipe!

Homemade Cowboy Candy Recipe (Candied Jalapenos)

Cowboy Candy Recipe

Ok, now that we know everything we need to know about these Candied Jalapeños, aka Cowboy Candy, let’s start making them!

Prep time: 5 minutes

Cook Time: 20 minutes

Ingredients

  • 20 jalapeños, large
  • 16 oz of apple cider vinegar
  • 2 cups of brown sugar
  • 1 tsp of turmeric
  • 1 tsp of garlic powder
  • 2 cups of sugar, granulated
  • 1/2 tsp of cayenne pepper
  • 1/4 tsp of celery seed

Instructions

  • Slice jalapeño stems off while wearing gloves, then cut peppers into 1/4-inch wide rounds and add the peppers to a bowl. Leave aside.
  • Add all the additional ingredients to a sizable pot set over high heat. After bringing to a boil, turn down the heat to a low simmer for about five minutes.
  • The jalapenos should be added now. Increase the heat to high and simmer for 4 minutes. ( Be sure not to simmer for more than 4 minutes; this is a crucial step.)
  • Spread the peppers within a 1/4-inch of the upper jar rim in a clean, sterilized canning jar using a slotted spoon.
  • Cook the liquid for around 5-7 minutes on high heat with the pot below. After that, turn off the heat and let the pot cool for about three minutes.
  • Transfer the syrup into the jars carefully using a ladle (or a pitcher that has a spout), making sure that all of the jalapenos are completely immersed. (Use a chopstick to repeatedly poke the bottom of the jars to remove any trapped air.)
  • With a fresh, moist paper towel, wipe the jar edges. Use two-piece lids to seal. Put in the refrigerator.
  • Refrigerate for at least two weeks (preferably a month.) Cowboy candy will taste better the longer they sit. Eat within two months and keep refrigerated. (Notes in the article above for information on canning.)

Nutrition

  • Calories: 170 kcal
  • Carbohydrates: 41g
  • Protein: 1g
  • Fat: 1g
  • Saturated Fat: 9g
  • Monounsaturated Fat: 1g
  • Polyunsaturated Fat: 9g
  • Sodium: 2mg
  • Potassium: 89mg
  • Fiber: 1g
  • Sugar: 42g
  • Calcium: 23mg
  • Vitamin A: 175IU
  • Vitamin C: 18mg
  • Iron: 1mg
Authentic Sacher Cake Recipe (Austrian Sacher Torte)

Authentic Sacher Cake Recipe (Austrian Sacher Torte)

With the help of my in-depth instructions, you can learn how to create the most amazing Sacher Torte. The apricot jam filling and silky chocolate icing on this decadent two-layer chocolate sponge cake are both excellent. It is customary to serve whipped cream with “Sacher Read More

Popeyes Blackened Ranch Sauce Copycat Recipe

Popeyes Blackened Ranch Sauce Copycat Recipe

This handmade version of Popeye’s blackened ranch sauce will thrill you if you like the original. It tastes fantastic when paired with vegetables, chicken tenders, or even a salad. Whenever it relates to dips or dressings, the blackened ranch is unquestionably a hit. Crispy chicken Read More

Delicious and Creamy Marry Me Chicken Easy Recipe

Delicious and Creamy Marry Me Chicken Easy Recipe

This Marry Me chicken recipe is delicious, flavorful, juicy, and covered in a rich parmesan sauce. This meal, which is seasoned with delicious herbs and sun-dried tomatoes, will dissolve in your mouth and make you wish someone would propose!

The taste of Marry Me Chicken is rich, flavorful, and creamy. It is stated that if you prepare this chicken meal for your lover, they will immediately ask to marry you.

Additionally, kid- and family-friendly, this creamy chicken is sure to satisfy! This delicious recipe requires a few simple ingredients and 30 minutes of your time to prepare.

Why the name “Marry Me Chicken”?

Although its exact origins are unclear, Marry Me Chicken lives up to its name. To put it simply, anyone you offer it to will proclaim, “Marry me!” The name marry me chicken” refers to how delicious it is and how the flavors “marry” and make the dish taste even better.

You’ll only need one mouthful before you start craving more. This delicious chicken is covered in a flavorful sauce that is rich in cream, parmesan cheese, and herbs. The delicious sun-dried tomatoes steal the stage in the Marry me chicken recipe. Pasta is a great addition to this recipe since it helps the creamy sauce absorbent. Just wait till it reaches your lips—you’ll want to propose right now!

The nicest thing about this dish is how quickly it comes together and only requires one skillet! Whenever I’m rushing the kids to all of their activities on hectic weeknights, simple one-pan meals definitely come in handy.

The sweetest part is since it’s quick and delicious and easy to clean up, is this marry me chicken! If you serve it with buns and a salad, this will undoubtedly become a crowd-pleaser in your home.

Delicious and Creamy Marry Me Chicken Easy Recipe

Marry Me Chicken Ingredients

Another reason this Mary Me chicken recipe is fantastic is you probably already have all the ingredients you need.

However, if you don’t, they are simple to obtain and may be stored in your fridge and pantry until you are ready to prepare it.

For specific ingredient amounts, see the recipe at the end of the article.

  • Chicken Breasts (Boneless and Skinless): The highlight of this recipe is succulent, tender chicken.
  • Butter: To thicken your creamy sauce, you’ll need melted butter. It also provides fantastic taste!
  • Salt and Pepper: To improve the flavor of the chicken, season it on both sides. Pepper adds some spiciness to counteract the salt.
  • Olive Oil: Chicken in olive oil is a common practice.
  • Flour: The roux, which thickens the sauce, is made using flour and butter.
  • Garlic: This meal is extremely great with the addition of garlic taste.
  • Heavy cream: A creamy element that thickens the sauce and gives the food a rich taste.
  • Sun-dried tomatoes: very flavorful, acidic, and sweet! Complements the creamy sauce so wonderfully.
  • Chicken broth: Chicken broth is the liquid you must add to your roux to make the sauce.
  • Parmesan Cheese: An essential component of taste, this salty, creamy cheese dissolves into the sauce.
  • Dried Italian seasoning: While most recipes only call for one herb, we want all of them for the fullest possible Italian taste!
  • Fresh Basil: To enhance visual appeal and taste, garnish this marry-me chicken with fresh chiffoned basil.

Marry Me Chicken Recipe

This recipe for Marry Me Chicken is one of my favorites since everything cooks together in a single skillet, making serving and cleanup a breeze. It really makes my life so much simpler to cook the sauce and brown the chicken in the same skillet!

Step 1: Prepare the Chicken

Prepare the chicken by slicing the chicken breasts more thinly so they cook more evenly. If necessary, use a mallet to pound the chicken until it is thinner. Use salt and pepper to season the chicken on both sides. 

Step 2: Cook the Chicken 

To cook the chicken, heat the olive oil to a medium-high temperature in a big pan. After adding it, grill the chicken for 5 minutes on each side. Cook it until it is mostly cooked through and has a browned exterior. Later, it will continue to finish cooking. While preparing the sauce, transfer the cooked chicken to a platter and put it aside.

Step 3: Making the Roux Sauce

To make the roux, add the butter to the same skillet once more. When the garlic is aromatic, add it and sauté for 30 seconds. To create a paste, add the flour and mix. Add the grated parmesan cheese, heavy cream, and chicken broth, stirring using a whisk.

Add the Italian seasoning and sun-dried tomatoes once they have been rinsed. If necessary, add extra salt and pepper to the dish. Simmer while allowing the sauce to thicken for a few minutes over low heat.

Step 4: Marry The Chicken with the Sauce

Layer the Chicken on Top of the Sauce. Add the chicken back to the pan. Reduce the heat to medium-low and simmer for a further 10 minutes. 11.

To garnish this marry-me chicken, add chiffoned or fresh chopped basil leaves for taste and a stunning look.

How to Store “Marry Me Chicken”?

If this “marry me chicken” happens to have any leftovers, you will be overjoyed! It stays well in the refrigerator for another lunch or dinner.

In the fridge: You may keep leftover chicken there for up to three days in a shallow, airtight container.

Freezer: It’s better not to freeze this dish. The best outcomes are served the same day or after being chilled and warmed.

To reheat “Marry me chicken, cook this in the microwave in a pan over medium heat until the chicken is well heated.

Share the image below to your Pinterest board if you like this “Marry Me Chicken” recipe!

Delicious and Creamy Marry Me Chicken Easy Recipe

Ingredients

  • 16 oz of Boneless Skinless Chicken Breasts
  • 1 TBSP of Olive Oil
  • 3 Tbsp of Butter
  • 2 tsp of Garlic (minced)
  • 3 TBSP of Flour
  • ½ tsp of Salt
  • 1/4 tsp of Pepper
  • 1 Cup of Chicken Broth
  • 3/4 Cup of Heavy Cream
  • 1/2 Cup of grated Parmesan
  • 1/2 cup of drained Sun-Dried Tomatoes
  • 1 tsp of Italian Seasoning
  • For Garnishing, Fresh Basil or Spinach (Optional)

Instructions

  • To ensure consistent cooking, cut the chicken breasts into thinner slices. If necessary, use a mallet to pound the chicken until it is thinner.
  • Season the chicken breasts with salt and pepper on both sides.
  • Heat the olive oil in a large pan over medium-high heat and cook the chicken. The chicken should be largely cooked after adding it and cooking it for 5 minutes on each side. Later, it will proceed to finish cooking.
  • While you prepare the sauce, place the cooked chicken on a platter and put it aside.
  • Add the butter to the same pan when you are done. Sauté the garlic for 20-30 seconds or until it is aromatic after it has melted. To create a paste, whisk in the flour.
  • Stir in the heavy cream, parmesan cheese, and chicken broth.
  • Combine the Italian seasoning and drain sun-dried tomatoes. If necessary, add extra salt and pepper to the dish.
  • To thicken the sauce, simmer it for a couple of minutes or until the sauce is thick enough.
  • Place the chicken in the pan and cover with sauce.
  • Reduce the temperature to medium-low and simmer for an additional 8-10 minutes.
  • Top with warm pasta or rice with freshly chopped basil leaves for garnish.
Authetic Jamaican Curry Chicken Easy Recipe

Authetic Jamaican Curry Chicken Easy Recipe

Make this Jamaican curry chicken recipe if you’re planning to experience any Jamaican cuisine. Well-seasoned and simmered in a flavorful curry sauce. This mouthwatering recipe is one for chicken foodies and is bursting with flavor. If you’ve ever eaten Jamaican food in general, you already Read More