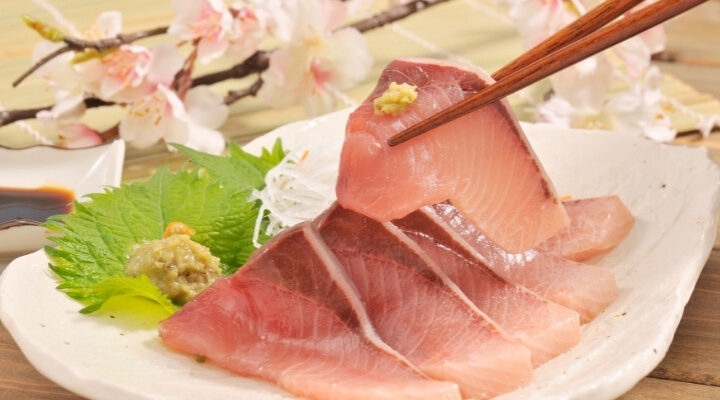
Easy and Delicious Recipes

Recent Posts

Arby’s Bronco Berry Sauce Copycat Easy Recipe

Arby’s Bronco Berry Sauce Copycat Easy Recipe

f you’ve ever dipped into Arby’s Bronco Berry Sauce, you know it’s unlike anything else — sweet, tangy, and just a little spicy. Despite the name, there are no berries in this sauce at all. Instead, the flavor comes from a clever combination of red Read More

Chick-Fil-A Chicken Salad Copycat Recipe

Chick-Fil-A Chicken Salad Copycat Recipe

This Chick-Fil-A chicken salad is tasty, creamy, and a bit sweet, just enough to make it one of the best chicken salads out there. It’s great for grabbing some toasted bread or for just eating it on its own! Copycat Chick-fil-a Chicken Salad is a Read More

Homemade Pan-Fried Walleye Recipe

Homemade Pan-Fried Walleye Recipe

Are you ready for this amazing homemade pan-fried walleye recipe? Walleye is undisputedly the champion of fish-dish in states like Minnesota or Wisconsin. It’s a good reason. It has a mild, sweet flavor, while its flesh, which is white, is firm, and flakey. Walleye is one of few fishes that can be prepared in almost any way you want, and be delicious. 

Pan-Fried Walleye is quick and easy to prepare. It has a crisp coating that makes it crispy. Only a few ingredients can be used to enhance the natural flavor of walleye fish.

Ok, let’s make this dish as it’s made originally in Minnesota.

Ingredients

  • 1 lb of 6-inch cut pieces walleye fillets
  • 2Eggs
  • 1 Cup of flour
  • 1 tsp of garlic powder
  • 1 tsp paprika
  • 1 tsp of salt
  • 1 tsp of pepper
  • 2 Cups of crushed saltine crackers
  • For frying use Neutral oil

How to make Pan-Fried Walleye Recipe

For Breading the walleye

  • Take out three bowls. Combine the flour, garlic powder and paprika in one bowl. Combine all ingredients.
  • Whisk the eggs in the second bowl. Add the crushed saltine crackers to the last bowl.
  • After mixing the flour, eggs and saltine crackers, bread each walleye piece by placing it in the flour mixture.
  • Then, dip them in the eggs mixture, and at the end, coat them with saltine crackers

Frying the walleye

  • Put the oil in a frying pan till it covers the entire bottom of the pan. Heat the pan on medium heat.
  • Place the walleye pieces in the hot oil. Let them cook on each side for about 3-4 minutes. Flip them with a pair tongs and fry the other side for 3-4 minutes. Each piece should be removed and placed on a paper towel to drain excess oil.
  • The pan-fried walleye can be served with some parsley and a squeeze of lemon. Bon appetite!

Pin the image below if you like this walleye recipe!

Homemade Pan-Fried Walleye Recipe

Walleye fish

Walleye is a fish with a habitat in freshwaters. This fish can be found in many lakes across Canada and the Northern United States. This fish is very mild-tasting and white.

My first experience with walleye was on a trip to Minnesota. Recently, I have been enjoying it during family trips to northern Ohio.

Walleyes can reach 20 lbs. or more. This is why fillets caught on commercial fishing trips to the Great Lakes are quite common.

Walleye has a mild flavor and texture that is similar to red snapper, or another white ocean-going fish.

Pan-fried walleye is great with a little bit of homemade tartar Sauce, and a bit of lemon juice. 

This recipe can be used to pan-fry almost any white fish fillet. Depending on the size of your fillets, cooking times may vary.

Homemade Pan-Fried Walleye Recipe

Easy Homemade Tartar Sauce Recipe

Combine and mix:

  • 1/2 cup Miracle Whip or Mayo
  • 1/8 cup chopped dill pickle relish
  • Sprinkle 1/2 teaspoon dill weed on top if you’re feeling you want it to be a bit fancy😊.

tartar sauce

Tips and Tricks

Most midwestern would agree that fresh breading walleye is the best way to cook them. We’re not talking about any kind of breading. They use a top-secret ingredient in the midwest, and it is Saltine crackers

Saltine crackers, yes, that’s right. Saltine crackers can be used as a substitute for breadcrumbs, even though it sounds silly at first. It is mild in flavor and makes one of the flakiest crusts that you can eat. It is perfect for walleye filets.

  • This recipe calls for saltine crackers, but you can substitute them with any other brand of crackers, such as Ritz, Club, Town House, etc.
  • To crush the saltine crackers, simply place them in a bag. Next, crush the saltine crackers with your fists.
  • Wild rice is a popular side dish to pan-fried walleye. It’s a great side dish to pan-fried walleye, and I love pairing it with our purple sweet potatoes.

You can also use other seasonings on walleye

The Best Wet Burritos Recipe (Smothered Burritos)

The Best Wet Burritos Recipe (Smothered Burritos)

Are you ready for the best-ever Wet Burritos? Smothered burritos are made with ground beef and refried beans and wrapped in large tortillas. They’re topped with red sauce and melted Mexican mix cheese. Serve this tasty authentic Mexican dish with your favorite toppings, such as Read More

Easy Vanilla Sponge Cake Recipe

Easy Vanilla Sponge Cake Recipe

Here is the recipe for the perfect Vanilla sponge cake. This super-soft, easy-to-make vanilla sponge cake is the best delight for any occasion. Whether it’s your daughter’s birthday or you want to make your Christmas eve memorable, my easy cake recipe will let to celebrate Read More

Basque Burnt Cheesecake (Ultimate Recipe)

Basque Burnt Cheesecake (Ultimate Recipe)

Basque Burnt Cheesecake is creamy on the inside, caramelized on top and now, with this recipe it’s easy to make. The cheesecake’s distinctive dark, rich top is made by baking at high temperatures. For a foolproof recipe, follow my tips and tricks to be able to create the ultimate version of this popular cheesecake!

Since a lot of people are complaining to recipe websites in general, with their bad user experience and having to go through the entire article scrolling to the bottom of the page, this time, and from now on we are going to jump right into recipe, but to make the best Basque Burnt Cheesecake I highly recommend you read the whole article. 🙂


Basque Burnt Cheesecake

Ingredients

  • 1 lb Philadelphia cream cheese, at room temperature

  • 3 large eggs

  • 8 Tbsp sugar

  • 2 Tbsp all-purpose flour (or rice flour for gluten-free)

  • 8 oz heavy cream

  • 2 tsp cornstarch

  • 1–2 Tbsp lemon juice

  • Pinch of sea salt


Instructions

1. Prep the Pan & Oven

  • Preheat your oven to 450°F (235°C) with convection/fan, or 475°F (245°C) for conventional ovens.

  • Line a 6–7 inch springform pan with two large sheets of parchment paper, making sure there’s a generous overhang on all sides. Press the paper to fit snugly, creasing as needed so it stays in place. (No need to be perfect—rustic is good!)

2. Make the Batter

  • In a large bowl, beat the cream cheese with a spatula or mixer until smooth and fluffy. Add the sugar and mix until combined, scraping down the sides.

  • Add eggs, one at a time, mixing well after each addition until the batter is silky and lump-free.

  • Add lemon juice and a pinch of salt. Sift in the flour and cornstarch, mixing gently until smooth.

  • Gradually add the heavy cream, mixing just until blended. (Don’t overmix.)

  • Give the batter a few taps on the counter to pop any big air bubbles.

3. Bake

  • Pour the batter into the prepared pan and tap again to settle.

  • Place the pan on a baking sheet (to catch any leaks) and bake on the middle rack for 30–35 minutes (convection) or until the top is deep golden brown and the center is still slightly jiggly. For a firmer, less gooey center, add 5 more minutes—but don’t overbake.

4. Cool

  • Remove from the oven. Let the cake cool in the pan at room temperature for about 2 hours (raise the pan on a rack or stovetop so air circulates underneath).

5. Chill or Serve

  • For the creamiest texture, chill uncovered in the fridge for at least 4 hours (or overnight) before slicing.

  • For a softer, custardy center, slice and enjoy at room temperature after it’s cooled for an hour.

6. Serve

  • Gently remove the cheesecake from the pan and peel away the parchment. Slice and serve as is—no garnish needed!


Storage:

  • Store covered in the fridge for up to 4–5 days.


Tips

  • Cream cheese must be at room temperature for the silkiest batter.

  • Every oven is different—watch closely after 30 minutes for the signature burnt top.

  • No water bath needed! This recipe is forgiving and meant to look rustic.

Obsessed with Basque Burnt Cheesecake? Pin the image below to your Pinterest board so you can come back to this show-stopping recipe whenever you crave it!

Basque Burnt Cheesecake

Basque Cheesecake Recipe Variations

You can alter the recipe as you like to make Basque cheesecake creamier, sweeter, or more cheesy. You could also…

  • Gluten-free version: Use a 1-to-1 blend of gluten-free flours (rice flour) in place of all-purpose flour.
  • Orange zest or lemon zest can be added to the cheesecake batter.
  • Add Bourbon: This recipe can also be made with bourbon. We have substituted 3 tablespoons of heavy whip for 3 tablespoons whiskey and it was delicious.
  • You can bake it for longer or shorter times: I prefer the cheesecake to be still soft and creamy in the middle. However, you can bake your cheesecake for less time if the cheesecake is more firm/full-cooked. If the top is not brown enough, you can broil it briefly in the oven. The top will quickly darken if you don’t pay attention. Alternately, you can place a piece of foil on top of your cheesecake after it has finished baking.
  • You can also add a topping to Basque cheesecake. Basque cheesecake is usually served plain. However, you could also use a fruit sauce, caramel sauce or chocolate sauce as a topping.

Basque Burnt Cheesecake

Basque Cheesecake: What to serve it with?

You could serve it with fruit sauce, caramel sauce or chocolate sauce as a topping. But my advice is nothing at all. This cheesecake does not need any syrup, fruit compote, or chocolate sauce. Nothing. It should be consumed at room temperature, and totally on its own. It will be easy to understand once you have taken your first bite.

Also, if you have some Basque cheesecake leftovers, you can use it to make this fantastic fried cheesecake bites!


Doneness: Creamy vs. Dense Basque Burnt Cheesecake

Basque Burnt Cheesecake’s unique feature is its doneness. It can be made creamy or creamy with a ‘raw’ center. Or it can have a firm texture like regular cheesecake.

After letting cool to room temperature, the texture will be creamy (left), whereas it will become firmer after cooling in the fridge (right).

For a cream texture, use:

  • Bake for a normal baking time in the oven
  • As the cheesecake cools, the cheesecake filling will set up to form a firm texture. It can be served at room temperature.
  • Chill for 30 minutes before serving.

For a firmer texture, use:

  • Bake for a longer time in the oven
  • Keep it in the refrigerator for longer periods of time.
  • Serve it chilled or leave it out for 10 minutes.

To get a “raw” cream texture

  • Bake the cheesecake in a shorter time.
  • Let cool overnight. Refrigeration is required to cut a cake perfectly.

FAQs

The top won’t burn well. So, what can you do to get your cake’s top to burn as it should?

You are not alone. I have struggled with my oven for years. These were the things that helped me:

  • As I said earlier, you can use the convection oven.
  • Pre-heat at a higher temperature. Preheating the oven to 550°F (290°C) for a while worked well.
  • Bake at a higher heat
  • As heat rises, bake at a higher oven rack. If your oven has top heating, ensure that the parchment paper does not touch the heating element/ceiling.

How to mix the batter?

  • Do not overmix the batter. It is easy to accidentally whip some air into cheesecake batter when the ingredients are being mixed too fast or too long. Mix each ingredient until it is fully incorporated. Then, move on to the next step as instructed.

Can I use a larger cake pan?

  • To make a 7-inch deep round pan of 3 inches, you can either multiply the recipe by 1.5 or 2 to make it 3 inches deep. The baking time will need to be increased, but I have never tried it. If you would like to make a larger serving, I recommend the 6-inch cake. You can also bake two cakes pans, as I have mentioned. Because you have multiple pans, it will take slightly longer to bake.

My cake crumbles on top. What can I do to fix this?

  • I noticed that the cake batter rose higher than usual, sometimes unevenly. The batter then fell apart, creating cracks. As more air bubbles were trapped in the batter, it seemed to be inevitable. I tried taping the pan to pop the air bubbles and resting the batter before baking. This seemed to work a bit.

I have had no issues with cracking since I stopped using a spatula. Mixing/blending the ingredients is easy for me. If you have any issues with cracks, you might want to use a spatula.

How do I get a shiny, smooth surface? Mine looks bubbly.

  • There were tiny bubbles in the cheesecakes I’ve baked before. Your batter must have had tiny bubbles in it before baking, or they may have risen while baking. The same process I used in the Q&A was applied.
  • What gives my cheesecake its gooey, raw texture at the center?
  • The cake will retain its gooey texture after it has been chilled. Next time, bake the cake for a bit longer. Your oven may not work in the same way, so I cannot give you a suggested baking time or temperature.

Sparkling Sake is a great pairing for the Cheesecake

Sparkling sake is one of our favorite celebratory drinks that we love to introduce to our friends. It is very popular in Japan and slowly becoming more popular in the USA.

Sparkling sake is a different kind of sake than traditional sake. It is sweet and fruity with a mild taste. It has a lower ABV than traditional sake (5% ABV, similar to beer).

This cheesecake is best enjoyed with sweet wine. We paired it with the Sho Chiku Bai Shirakabegura’s favorite Mio Sparkling Sake. The cheesecake’s caramel and sweet flavors were perfectly complemented by the sparkling sake’s bright notes and sweetness. As you sip this delicious drink, the tiny bubbles add just a little texture to enhance the creamy texture.

Many of our friends were surprised at how fun and delicious Mio Sparkling Sake was when we introduced it to them. Mio sparkling sake is a great choice for anyone looking to celebrate and enjoy the depth of flavor that sake offers.

Mio Sparkling Sake can be found in Asian supermarkets and wine shops. They can also be purchased from Takara Sake (21 and older only).

Are you a fan of cheesecakes? These recipes will be a hit!

If you liked this Basque Burnt Cheesecake recipe, get the newsletter for free delivered straight to your inbox. Stay connected with me on Pinterest for the most recent updates.

How to make Nihari – Pakistani Beef Stew Recipe

How to make Nihari – Pakistani Beef Stew Recipe

Today I’m going to show you how to make Nihari, one of the most popular Pakistani Beef stews; this recipe is quick and easy to make. It takes only one pot and requires less than 30 minutes to prepare. This recipe contains instructions for making Read More

Crispy Air Fryer Chicken Nuggets Recipe

Crispy Air Fryer Chicken Nuggets Recipe

Air Fryer Chicken Nuggets are a healthier option than cooking with other methods, and it’s way easier to prepare them this way. They cook perfectly crispy and have tender, juicy chicken inside. I will show you two versions, one with store-bought frozen chicken nuggets and Read More

Original Pakistani Chicken Tikka Recipe

Original Pakistani Chicken Tikka Recipe

This was a must! Recipes here on Cooking Frog needed to include a traditional Pakistani Chicken Tikka recipe. There are some recipes that have become so popular that there’s no right or wrong way to do them anymore. Chicken Tikka falls into that category. Even though I disagree with those who make chicken tikka masala west, it doesn’t contain cream, and that’s a fact! But that’s another debate.

Chicken Tikka is a South Asian dish that has become a very popular choice. Tikka is a South Asian cuisine that I’m sure you have tried at least once. This one is what I’ve learned from my Pakistani friend. There are a million versions online. I’m about to share the authentic one.

The original version of Chicken Tikka calls for marinating chicken pieces in a spicy sauce and then grilling them over the hot coals, which are called Angethi, in Urdu. This is usually served with a Tarmarind Chutney or Mint Chutney, along with lemons and sliced onion. Yummy!

There have been many versions of this famous dish. There are many versions of this popular dish, including a boneless, a biryani, a curry, and even a crispy version. Today, I thought I’d start by introducing the basics of Chicken Tikka. Although there are many spice blends that can be used to make Tikkas now, I prefer fresh spices. Sometimes, you want to feel like a true chef.

Here is a list of everything you will need to make this deliciousness. Now, I’m going to dive into the more important steps.

Chicken Tikka Marinade

Here I will show you everything you need to marinate your chicken.  If you make the marinade for Chicken Tikka the right way, everything else is easy.

Okay, so it’s pretty simple. Just add all the ingredients (spices, paste, and liquids) to the bowl and mix them together.

NOTE: Although the marinate will be slightly sour due to the lemon and heavy vinegar content, once cooked it will be mild and blend well with the rest of the spices.

Chicken Tikka’s color is often due to the addition of orange-red color. Some restaurants are very heavy with this color, and I don’t like my hands turning orange while eating. It’s up to you how many colors you add. I prefer to add just enough color to give it a reddish hue but not too much. To achieve this effect, use a good-quality color. Some people also use beetroot juice to create a natural hue. This is something I haven’t tried yet. Please let me know if you do.

DISCLAIMER – If you don’t want to have your hands a bit orange after the quick chicken massage, use gloves to rub the spices on your chicken.

Can You Substitute Anything In This Marinade?

You can reduce or skip the red chili powder if you don’t like your tikkas spicy. You can also reduce the amount of one spice, but it won’t affect the flavor. Vinegar is essential in this instance. Vinegar will be used as a meat tenderizer in this recipe, so make sure you have it. The oil prevents the chicken from drying out in the refrigerator.

A single chicken will yield 4 Tikka pieces, two thighs, and two breast pieces. Double the recipe if you plan to make more than one chicken. You can use a knife to make cuts along the length of your chicken so it has deep places for the marinate.

Rub the marinade on the chicken. Give the chicken a little massage, just like you would in a spa. You will also need to book a spa day. Cover all the corners and crevices. Cover the chicken with foil, cling wrap, or a lid and place it in the refrigerator to marinate.

How Long To MarinateChicken Tikka?

To get all the spices to really rub in, it takes at least 3-4 hours, but to get the best results I recommend 8 hours. You can cook the chicken immediately if you use boneless chicken. However, for chicken with bones, it is best to allow it to marinate overnight for 8 hours or at least 3-4 hours. This is because it gives vinegar time to react with chicken and tenderize. The top layer of the chicken becomes tough, and all the juices from the chicken are sealed within the chicken piece. This gives you tender Chicken tikka after it is cooked.

How To Cook Chicken Tikka

Tikka can be prepared in three ways

  • In the oven.
  • On the stove
  • Grill it outside.

It’s easier to cook it on the stove than in the oven. You can either bake or cook on the stove. First, grill the chicken on high heat and then slow cook it.

This seals all the juices and gives you that charred look of an outdoor Tikka.

Outdoor grills can be used by placing the tikka directly on the grill. You can then continue to oil the grill every 5 minutes using a brush. Every time you oil the tikka, keep turning it. This will take approximately 20-25 minutes to cook your chicken.

You can freeze the chickens!

Let’s suppose you like to prepare meals ahead of time. This recipe is perfect for you. You can marinate the chicken in butter and then freeze it. You can keep it in the freezer up to 60 days. Once you’re ready to eat it, take it out of the freezer. Grill it once it has thawed.

LEFT-OVERS is a blessing

While it is easier to make tikka with other dishes, I still hope for some leftovers. Because spicy chicken goes well with many different things, to make the most of your leftovers, you can check out this Chicken Tikka Sandwich recipe.

Let me know if you make this chicken tikka, have any questions, or just want to say hello. Pin the image below if you like this recipe and want to support my effort! Enjoy a wonderful day!

Original Pakistani Chicken Tikka Recipe

CHICKEN TIKKA RECIPE:

Ingredients

  • 1 chicken (whole ), cut into thighs and legs
  • 1 1/2 teaspoons of Salt
  • 1 teaspoon Black pepper
  • 2 teaspoons of Red chili powder
  • 1/4 teaspoon of Turmeric powder
  • 1 tsp of Cumin powder (zeera).
  • 2 TBSP of Lemon Juice
  • 2 TBSP of  Vinegar
  • 1/2 teaspoon of Garam masala powder 
  • 1 TBSP of Garlic ginger paste
  • 1 tsp of Coriander Powder
  • 3 teaspoons of orange food color
  • 2 TBSP of vegetable oil

Instructions

  • To ensure that all the marinate is absorbed, make horizontal cuts in your chicken pieces.
  • Mix all ingredients in a bowl to create your marinade.
  • Place all the pieces of chicken in a flat dish and generously rub the marinade on them. Cover all edges and cuts.
  • Cover the chicken with plastic wrap and let it rest for at least 8 hours.
  • Before cooking, remove the chicken from the oven.
  • You can cook chicken in one of these ways:

Chicken Tikka On Stove

  • To a frying pan or grill pan, add 1 tbsp oil.
  • Grill your chicken pieces on high heat for 3 minutes on each side. This will give the chicken juices a nice charred appearance.
  • Cover the pan with a lid, and cook the chicken on low heat for 8 minutes.
  • Turn the pieces over and continue cooking for 8 minutes.
  • Serve hot

Chicken Tikka In The Oven.

  • To a frying pan or grill pan, add 1 tbsp oil.
  • Grill your chicken pieces on high heat for 3 minutes on each side. This will give the chicken juices a nice charred appearance.
  • Place the chicken in foil, and bake at 190°C for 30 minutes.

Chicken Tikka On BBQ Grill

  • This one is pretty straightforward. Grill it until you get a nice charred appearance. To keep the juices from escaping, you should continue to coat the chicken with oil at least five times. Every time you oil the chicken, flip it. This will take approximately 20 minutes.

Notes

If you wish to give your chicken a coal-like aroma while it cooks indoors, you can smoke the chicken during marinating.

Nutrition Information:

Calories: 507 Total Fat: 32g Saturated Fat: 7g  Unsaturated Fat: 22g  Cholesterol: 176mg Sodium: 115mg Carbohydrates: 3g Fiber: 2g  Protein: 50g


Crispy Onion Bhaji Recipe – Indian Kanda Bhaji

Crispy Onion Bhaji Recipe – Indian Kanda Bhaji

Step-by-step recipe for Crispy Onion Bhaji, Indian Kanda Bhaji Recipe. Onion Bhaji is fried onion fritters. These crispy fritters are made mainly from onion and gram flour (besan). This street food is very popular in Maharashtra. There are many ways to prepare them. Here is Read More