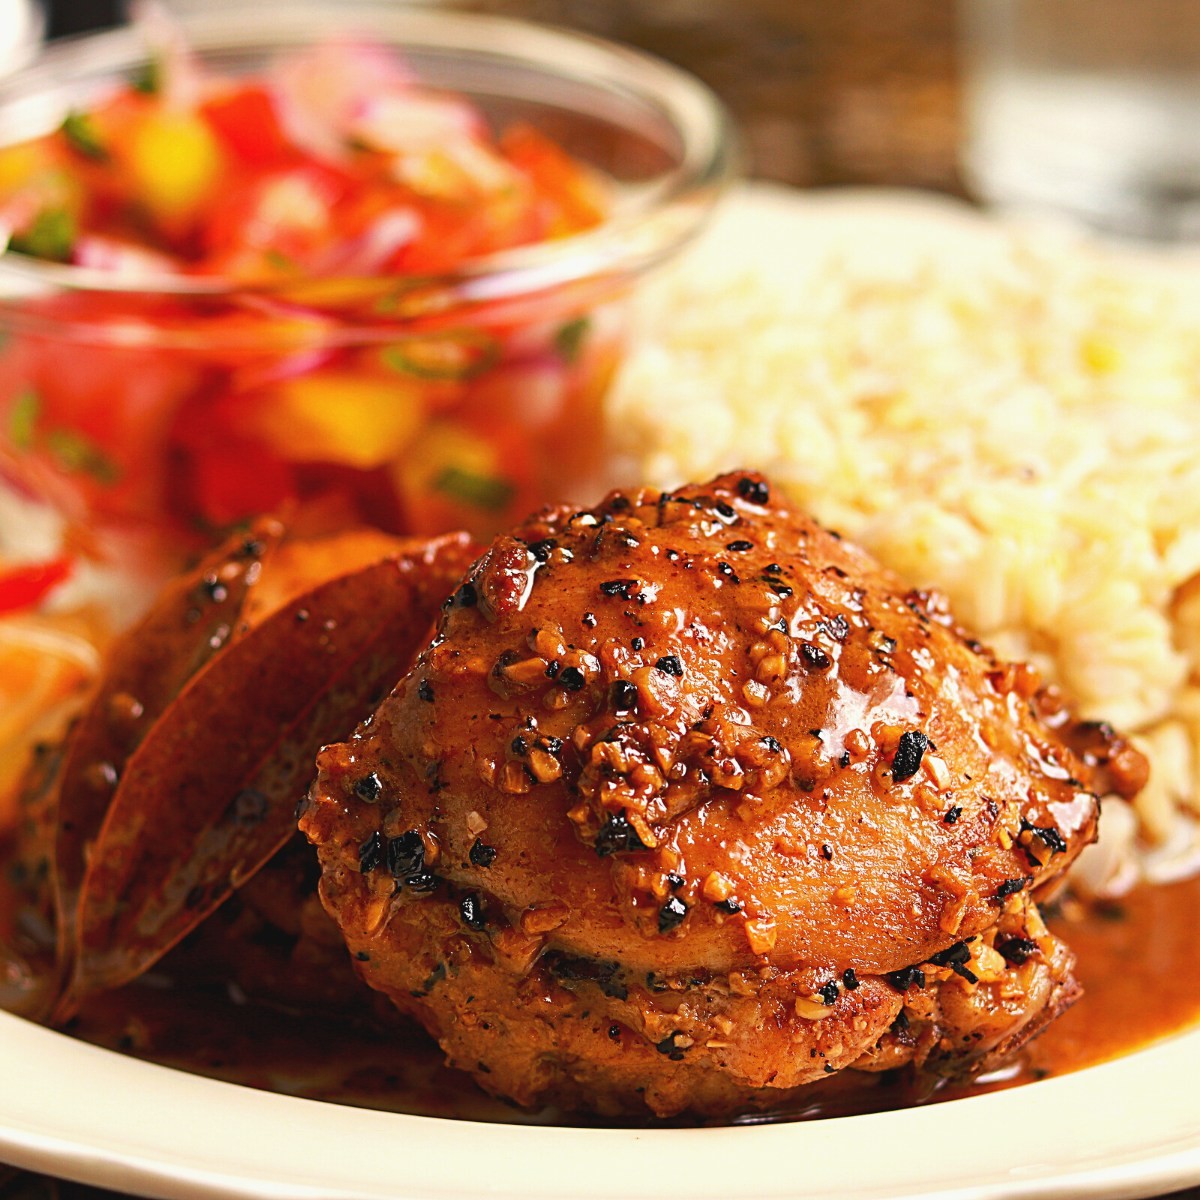
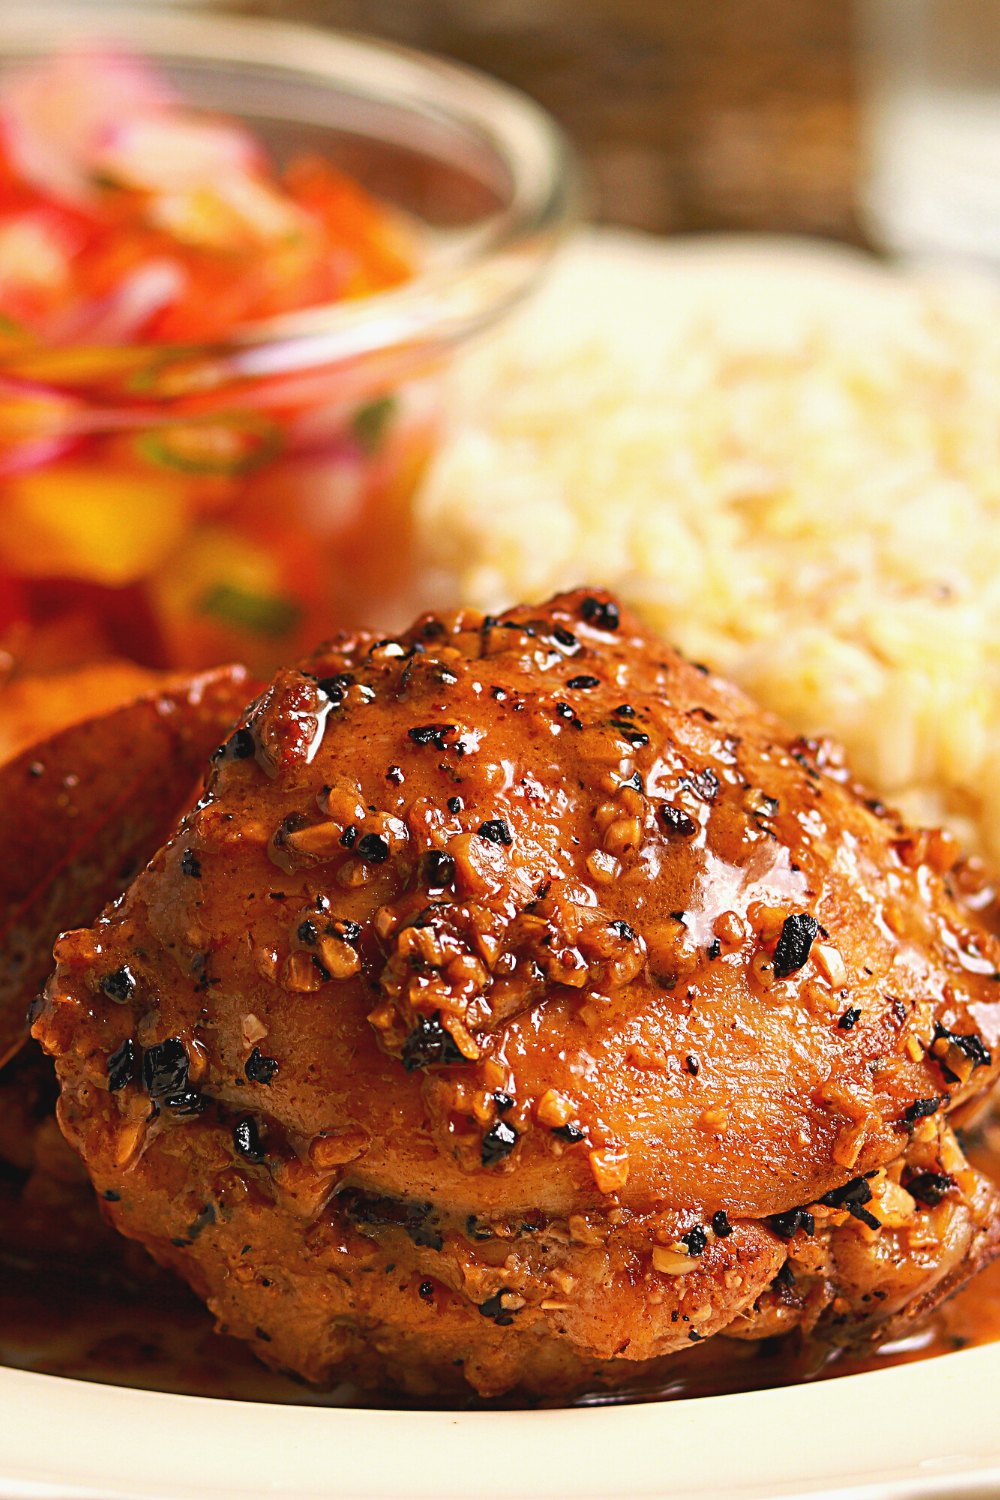
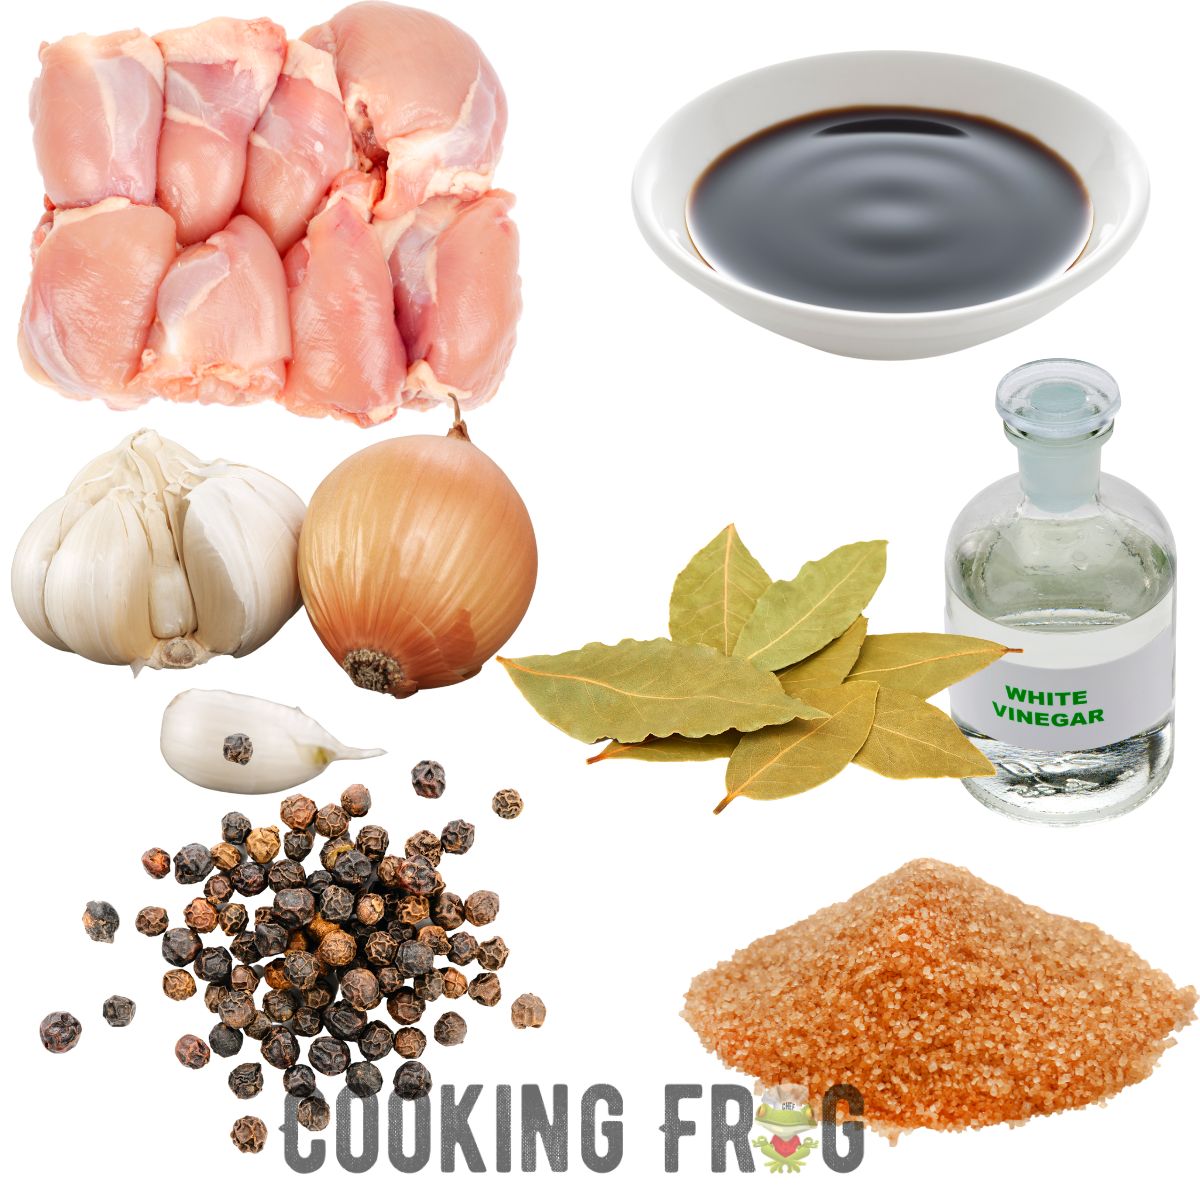
Easy and Delicious Recipes

Recent Posts

Homemade Croffle Recipe (Croissant Waffles)

Homemade Croffle Recipe (Croissant Waffles)

The hottest street food in Korea is croissant waffles, A.K.A croffle, the subject of my most recent fascination. For those unable to travel to Korea,  I thought I would make a replica of this delectable treat at home. What are Croffles? Croffles are a mix Read More

Homemade Lobster Ravioli Sauce Easy Recipe

Homemade Lobster Ravioli Sauce Easy Recipe

This elegant recipe for the BEST Lobster Ravioli sauce has only basic ingredients, which you probably have at your hand, and can be made in just 20 minutes. The lemon brown butter and Pecorino Romano cheese are the star ingredients in combination with a bit Read More

How to Cook Venison Backstrap (3 Ways + Marinade Recipe)

How to Cook Venison Backstrap (3 Ways + Marinade Recipe)

Without a doubt, the finest deer cut is the backstrap. It is a no-brainer why this is one of the best wild game cuts since it is simple to prepare and melts in your mouth—a must-have for any cuisine from a rural farmhouse or romantic supper.

If you’re a fan of game meat, be sure to check my Venison Burger and Elk Burger recipe, this Elk burger is one of the most popular recipes on this website. 

Fun Fact: Arby’s is paving the way for the mainstream consumption of game meats. In 2016, Arby’s debuted a venison sandwich, which was a limited-time offering that could only be purchased at a select number of locations. People began lining up hours in advance in 2020 when Arby’s brought it back and sold it across the country for only one day; they were eager to get their hands on one.

However, if you want to make Arby’s venison sandwich, you can. Just substitute venison for beef in this Arby’s beef and cheddar sandwich

What is a Venison Backstrap?

Deer backstrap is exactly what it sounds like. The portion of a deer’s flesh runs down the spine. When it comes to a recipe, it’s best to make it count since you only get two per deer. The spine spans the whole length of the deer’s back and is known as the venison backstrap or venison loin.

But venison tenderloin and backstrap are not the same types of meat. The term “venison tenderloin” refers to the cut of meat located below the backstrap and between the ribs and the rump.

Why is this Venison Backstrap Recipe So Good?

A marinated venison backstrap that is juicy, delicious, and tender is then pan-seared, grilled, or air-fried until it is well browned on the outside and slightly pink within. Creating a recipe for out-of-this-world venison that doesn’t taste gamey is straightforward.

The flavor of venison need not be gamey. This venison backstrap dish is one of my favorites since the marinade enhances the flavor and helps to mask the gamey taste.

Backstrap may be prepared in 3 ways after marinating: pan-seared and finished in the oven, grilled or using an air-fryer. The backstrap of deer is incredibly delicate and juicy when cooked correctly to the optimal internal temperature. You’ll adore it, I can tell!

How to Cook Venison Backstrap (3 Ways + Marinade Recipe)

How to make Venison Backstrap Tender?

If not overdone, venison backstrap is a highly tender piece of meat. Venison backstrap is soft, juicy, and tasty when cooked correctly to medium-rare to medium. In fact, venison will still be delicate and juicy even if you cook it to medium well.

The venison backstrap is marinated in this recipe, which adds a ton of flavor and helps to tenderize the meat further.

How to eliminate the game flavor from venison?

If the venison is recently taken, you may help eliminate the gamey flavor and draw out the blood by soaking the backstrap in buttermilk for a few hours or overnight. Give it a rinse after removing it from the buttermilk.

There is no need to soak the venison in buttermilk if it hasn’t just been harvested. Mix the defrosted venison with the marinade, cover, and refrigerate for up to 24 hours. Venison may be marinated to provide tons of fantastic flavor while also assisting in eliminating any gamey flavor.

How to Cook Venison Backstrap (3 Ways + Marinade Recipe)

Ingredients you’ll need for this recipe.

Olive oil

Soy sauce

Lemon juice

Italian seasoning

Apple Cider vinegar or Balsamic vinegar

Worcestershire

Red Wine

Garlic

Pepper

Allow the backstrap to marinade for a minimum of four hours and ideally up to twenty-four hours, turning it over halfway through to ensure that both sides are covered.

Similar to this steak marinade, which uses the same ingredients, this marinade for wild game is also fantastic for beef.

How to cook Venison Backstrap

Deer backstrap, also known as venison backstrap, is typically prepared in the pan or on the grill; however, air-fryer venison is rising in popularity due to its efficacy. 

  • Pan-fried venison backstrap with an oven finish
  • Grilled venison backstrap
  • Air-fryer venison backstrap

Although I like all approaches, I choose to pan-sear and oven-finish my venison backstrap. This seals in all the fluids and gives you a pretty lovely sear.

Use a meat thermometer while cooking venison, as you should with most meat, to prevent overcooking, which makes the flesh tough and dry.

Pan-Fried Venison Backstrap

Step 1: Butter or olive oil should be added to a cast iron or stainless steel pan that may be used in the oven.

Step 2: The venison should be well-browned and caramelized on the outside after being seared in the hot pan on both sides. Heat the oven to 375 degrees Fahrenheit while you are searing the venison.

Step 3: Place the venison backstrap-containing oven-safe pan in the preheated oven. For medium-rare to medium, bake for 12 to 15 minutes or until a meat thermometer registers 130 to 135 degrees Fahrenheit. Before slicing, allow it to rest for at least 5 minutes.

Grilled Venison Backstrap

Step 1: Turn the grill’s heat up to medium-high.

Step 2: For medium-rare to medium, grill the backstrap on each side for 6 to 8 minutes or until a meat thermometer registers 130 to 135 degrees Fahrenheit. Before slicing, allow it to rest for 5 to 10 minutes.

Air-Fryer Venison Backstrap

For the air fryer version of the venison backstrap, you want to cut your backstrap into steak bites before frying. 

Step 1: Pre-heat your air fryer to 400 degrees Fahrenheit for 5 minutes

Step 2: Cut your venison into bite-size pieces, and don’t overcrowd your air-fryer. If needed, cook in batches. 

Step 2: Cook for 6-7 minutes. The internal temperature should be 130-135 degrees Fahrenheit.  Enjoy!

Extra Tips

Remember that it will keep cooking after the meat is removed from the heat source. The temperature will continue to climb 5 to 10 degrees as the remaining heat in the meat continues to cook the meat.

The venison backstrap, for instance, should be removed from the heat source at 130 degrees Fahrenheit and allowed to rest for 5 to 10 minutes until it reaches 135 degrees Fahrenheit if you want it to be cooked to medium (135.5 degrees F).

Venison Internal Temperature Chart

To avoid overcooking the meat and producing dry, tough meat, I highly advise using a meat thermometer while cooking meat. Here are the temperatures for determining the degree of doneness for the venison backstrap:

  • Rare: 125 Fahrenheit. (52 Celsius)
  • Medium-rare: 130-135 Fahrenheit. (57 Celsius)
  • Medium: 135-140 Fahrenheit. (60 Celsius)
  • Medium-well: 140-145 Fahrenheit. (62 Celsius)
  • Well: 145-150 Fahrenheit. (65 Celsius)

I prefer to cook venison backstrap to a temperature of about 135 F. Although not raw, it is still pink and juicy in the middle, and the edges are caramelized.

Why you should let your Venison rest after cooking

When you cut into cooked meat without letting it rest, all of the fluids will flow out, leaving you with drier meat. This is because cooking attracts all of the liquids to the surface of the flesh.

Therefore, after removing the cooked venison from the heat source, allow it to rest for at least minutes. This makes for soft, juicy slices by redistributing the liquids throughout the meat.

Share the image below to your Pinterest board if you like this venison backstrap recipe!

How to Cook Venison Backstrap (3 Ways + Marinade Recipe)

Venison Backstrap Recipe

Venison Backstrap that has been marinated, then pan-seared, grilled or air-fried until the exterior is well-browned and the interior is just barely pink. Tender, juicy, and full of flavor. Deer meat is straightforward to prepare and melts in your tongue without having a gamey flavor.

Ingredients

For the Venison

  • 1 lb. of venison backstrap
  • 1 Tbsp of olive oil

For the Marinade

  • 4 Tbsp of olive oil
  • 4 Tbsp of soy sauce
  • 2 Tbsp of lemon juice
  • 2 Tbsp of balsamic vinegar (or apple cider vinegar)
  • 1 Tbsp of Worcestershire
  • 2 Tbsp of Italian Seasoning
  • 2 minces garlic cloves
  • 1 tsp of black pepper
  • 2 Tbsp of Red Wine

Instructions

For the Marinade

  • Combine the marinade ingredients in a zip-top bag or small dish. Place in the refrigerator after adding the backstrap. Turning halfway through, marinate for a minimum of 4 hours and a maximum of 24 hours.
  • Take the venison out of the marinade, give it a good rinse, and pat it dry for 30 minutes before you’re ready to cook. Place it on a clean platter and give it time to warm up.

Pan-Seared Method

  • Set the oven to 375 degrees Fahrenheit.
  • Heat olive oil in an oven-safe cast iron or stainless steel pan over medium-high heat. When the pan is heated, add the backstrap and sear on all sides, including the ends, until a lovely brown crust forms. To do this, hold the backstrap in the pan with tongs.
  • Move the pan containing the backstrap into the preheated oven if it is an oven-safe skillet. Transfer the backstrap to an oven-safe dish with some olive oil if your skillet doesn’t support the oven’s heat.

For Grilling Method

  • Turn on the grill to a medium-high setting.
  • Put the venison backstrap on the hot grill and cook it for 6–8 minutes before flipping it over and cooking it for a further 6–8 minutes.
  • The backstrap should register between 130 and 135 degrees Fahrenheit on a meat thermometer for medium-rare. Remember that if the heat source is turned off, the body’s temperature will continue to rise. Slice the backstrap after transferring it to a platter and lightly covering it with tinfoil for 5 to 10 minutes. The temperature will increase by another 5 to 10 degrees while the food is resting, getting it even closer to medium doneness.

Air-Frying Method

  • Heat your air fryer for five minutes at 400 degrees Fahrenheit.
  • Avoid packing your air fryer too tightly, and cut your venison into bite-sized pieces—Cook in batches as necessary.
  • Cook for 6-7 minutes. The temperature on the inside should be between 130 and 135 degrees Fahrenheit. Enjoy!
Pollo Asado Chipotle Copycat Recipe

Pollo Asado Chipotle Copycat Recipe

Copycat Chipotle Pollo Asado is one of the tastiest grilled chicken recipes I’ve made recently. This chicken is flavorful and tender with lime and orange juice in a chipotle-based marinade. Fans of Chipotle Mexican Grill will recall that the chain finally introduced a fresh chicken Read More

How Long to Cook Salmon at 400 F? (With Recipes)

How Long to Cook Salmon at 400 F? (With Recipes)

You are concerned about how long it takes to cook salmon at 400 F since it is more complex than you believe in preparing salmon. When cooking salmon, it’s essential to use the proper technique and temperature so that the fresh salmon fillet flavor is Read More

How to make Chicken Wing Brine (Effortless recipe)

How to make Chicken Wing Brine (Effortless recipe)

Would you like to make the most delicious and simplest chicken wing brine? With an extra spicy kick, this simple brined chicken wing dish is salty, a little bit sweet, and spicy.

Without a doubt, one of the most well-liked party dishes is chicken wings. I adore chicken wings, especially using a Blackstone griddle, but also Hennessy Chicken Wings, and even these Keto Chicken wings are amongst my favorites, as you may know if you often make my dishes.

There are several benefits to liking chicken wings, including affordability, taste, and crowd-feeding capacity. Is there a way to improve wings even more? Yes, brining them!

When chicken wings are brined, they go from excellent to superb, whether they are baked, fried, or grilled. Learn how to prepare this Simple Chicken Wing Brine; your next batch of wings will be the greatest.

Fun fact about chicken wings:  444 chicken wings set a global record for most wings ever. An individual by the name of Patrick Bertoletti consumed 444 wings in under 26 minutes at the 2015 Wing Bowl eating competition. 

How to make Chicken Wing Brine

What is brining used for?

A culinary method called brining is used to flavor foods, usually meats, and ensure that they remain extremely juicy after cooking. The brine is a mixture of salt and water with flavorings from other carefully chosen substances.

The meat absorbs water and salt from the brine by assimilation and diffusion.

Why are chicken wings brined?

You can absolutely make chicken wings without brining them, but doing so yields moister, more tender, and more delicious wings. In addition to salt, the brine’s sugar will help your wings become crispier, and any spices you add will enhance their taste through absorption.

Ingredients you’ll need  

  1. Chicken Wings
  2. Water
  3. Kosher salt
  4. Sugar
  5. Apple cider vinegar
  6. Red pepper flakes
  7. Ground black pepper
  8. Cayenne Pepper

How to Brine Chicken Wings – Steps

Now you’ll see how simple it is to make brine.

Step 1: Heat the water, salt, and sugar in a large pot just long enough for the salt and sugar to dissolve.

Step 2: Stir in the apple cider vinegar, cayenne pepper, red pepper flakes, and black pepper.

Step 3: Chicken wings can be brined in a big bowl or a resealable plastic bag; step 3 combines the brine and the wings, ensuring they are well immersed.

Step 4: Place the chicken wings in brine and refrigerate for at least 2 hours and up to 4 hours (because of the tiny size of chicken wings, a more extended brining period is not necessary).

Step 5: Dry the wings by patting them, but don’t rinse them, and cook them in the way you choose ( Blackstone, baking, grilling, frying, or in the air fryer).

How to make Chicken Wing Brine

For How Long to Brine Chicken Wings?

To get the most flavor from your chicken wings, brine them for around 2 hours. Chicken wings can be brined for anything from a few hours to a few days, depending on the size of the wings and the salinity of the brine (water to salt ratio). Chicken wings are rather small compared to other cuts or types of meat that you could brine.

Obviously, a chicken wing is not as big as a complete turkey or a chicken leg. Due to their size, chicken wings shouldn’t be brined for too long; otherwise, the skin and flesh will become tough and salty. Complete submersion in the brine is ideal for chicken wings.

What dishes go well with chicken wings?

I’ll say that the brined chicken wings are so delicious that they don’t even need wing sauce, but if you must, you must try the greatest Tiger Sauce! It is very amazing and simple to create. Spicy Chipotle Sauce and Popeyes Blackened Ranch Sauce are my next two picks for chicken wing sauces.

Some delectable carbohydrates that go well with chicken wings are Air Fryer Frozen French Fries or Sweet Potato. Along with a side of blue cheese and ranch dressing, don’t forget to offer a side of very crunchy vegetables like sliced bell peppers, celery, carrots, and cucumbers. In addition, use these fantastic Candied jalapenos. 

Chicken Wing Brine Recipe

Ok, it’s time for detailed instructions. Your chicken wings will be moist, soft, and tasty after using this simple brine. Learn how to make the most incredible chicken wing brine recipe for grilling, frying, or baking chicken wings.

Ingredients

  • 3 pounds of chicken wings
  • 5 cups of water
  • 1/2 cup of kosher salt
  • 1/3 cup of sugar
  • 2 tbsp of apple cider vinegar
  • 1.5 tbsp of red pepper flakes
  • 2 tbsp of ground black pepper
  • 1 tsp cayenne pepper

Instructions

  • First, dissolve the salt and sugar in the water using low heat in a large pot. Toss in the crushed red pepper, cayenne pepper,  freshly ground black pepper, and apple cider vinegar. Let your brine cool. 
  • Place the chicken wings in a big bowl or resealable bag to brine them. Make sure the wings are well soaked in the brine.
  • Place the brined chicken wings in the fridge for a minimum of 2 hours and a maximum of 4 hours. Take the wings out of the brine, then get rid of the brine.
  • After patting the wings dry, use your favorite method of preparation. (Don’t rinse your chicken wings)

Share the image below to your Pinterest board if you like this chicken wing brine recipe!

How to make Chicken Wing Brine (Effortless recipe)

FAQs

How do I brine the chicken for smoking?

Make your brine for chicken wings. Depending on the size of the chicken, brine it for the proper period. Before smoking, remove from the mixture and let it completely dry.

Should I brine chicken wings before smoking?

Brining chicken wings before smoking them produces wings with more taste and skin that is very crispy. It is advised to brine for around two hours before smoking.

How long may chicken wings be brined?

Your chicken wings can brine for around two to four hours. Any longer, you run the danger of having excessively salty meat, regardless of the type of brine and the size of the chicken wings.

Should I brine chicken wings before frying?

Brining chicken wings before frying them produces wings with more taste and skin that is very crispy. It is advised to brine for around two hours before frying.

Is brining going to make my chicken too salty?

If you are bringing a smaller piece of meat, such as a chicken wing, brining the meat will make it salty. It’s crucial to avoid letting your meat soak in the brine mixture for an excessively long time because this might cause it to become too salty and alter the texture of the meat.

Will brining chicken make a difference to my dish?

Bringing does make a difference since it gives the meat more taste. Additionally, it enables the meat to be juicy on the inside and exceptionally crispy on the outside.

Juicy & Tender Air-Fryer Ribs Recipe

Juicy & Tender Air-Fryer Ribs Recipe

Considering how simple it is to make, you’ll be astonished by how wonderfully Air-Fryer ribs turn out, with tender meat and perfectly crisp edges. People were raving about my oven-baked baby back rib recipe a day after I posted it, so it only seems logical Read More

Oven-Baked Baby Back Ribs Easy Recipe

Oven-Baked Baby Back Ribs Easy Recipe

It’s hard to believe how juicy and tender these oven-baked baby back ribs are—cooked till they fall off the bone after being rubbed with a delicious dry rub. Then perfectly cooked while covered in a delicious barbecue sauce. Cook Advice: Cooking baby back ribs in the Read More

Homemade McDonald’s Hash Browns Copycat Recipe

Homemade McDonald’s Hash Browns Copycat Recipe

It is time for another McDonald’s copycat recipe. After making these delicious Egg McMuffins, and Chicken McGriddles, we’re making McDonald’s hash browns this time. These mouthwatering hash brown patties made from shredded potatoes are cooked to be fluffy inside and crispy and toasted on the exterior.

Since no other recipe even comes close to the original and, in my opinion, doesn’t merit the moniker “Copycat recipe,” the primary cause is wrong or missing ingredients. This recipe has been waiting patiently to be published.

Thus I’ll walk you through the process of making these hash browns in the McDonald’s way today. The best part about them is that you can prepare them ahead of time and freeze them for whenever you’re ready to cook them.

The Best McDonald’s Hash Browns Copycat Recipe

I’m not sure about you, but I consider McDonald’s hash browns among their most delicate items. They’re great in the restaurant, but I think my version is much better when it’s cooked at home!

Once you try these easy and delectable homemade hash browns, you’ll be addicted. That has certainly been the case for me. So far this week, I’ve cooked these for breakfast nearly every morning.

Making these McDonald’s hash browns at home is also great because no harmful ingredients are added, which I appreciate. My meal should not contain anything like sodium acid pyrophosphate or hydrogenated soybean oil!

The original McDonald’s hash browns don’t contain any cheese, cayenne pepper, or other additives. Still, I see most, if not all, online versions that do—missing essential flavors, such as those from beef stock and a little sugar. But don’t worry; you’re going to create something genuine.

The second item that appears to be ignored by everyone is confit cooking. Cooking anything in fat or oil at a reduced temperature is known as confit cooking. Because it changes the starch within, most restaurants “double fried” their potatoes.

As a result, it becomes even crispier when you re-fry it after chilling. Confit, indeed, yep.

Homemade McDonald's Hash Browns Copycat Recipe

Ingredients you’ll need

Okay, to prepare these delectable McDonald’s hash browns, you just need some basic ingredients. And while this recipe calls for a few more ingredients compared to standard hash brown recipes, they are more than worth it.

Here is all you will need to prepare this simple hash browns recipe:

  • Russet Potatoes
  • Salt
  • Sugar
  • Pepper
  • Cornstarch
  • Vegetable Oil (sunflower or rapeseed)
  • Dry beef stock powder

Since Yukon potatoes have excellent consistency, I occasionally use them to create hash browns, but any potato would work in this recipe. Because the original recipe calls for russet potatoes, I’ve included them.

Regarding the oil, McDonald’s uses a blend of rapeseed and sunflower oils. Any neutral high-heat oil, such as canola oil, avocado oil, peanut oil, or macadamia nut oil, can be used.

How to make McDonald’s Hash Browns Copycat

Once more, making a homemade hash brown that tastes like the one from McDonald’s couldn’t be simpler. To make them, you only need to follow a few simple steps. And the steps in the procedure are basically peeling, grating, straining, shaping, and frying.

You’ll find this recipe incredibly straightforward to create, even if it’s your first time cooking hash brown patties from scratch. And, to be honest, once you’ve prepared these hash browns, cooking them again and again will be simple.

Now, let’s start with the recipe and quit wasting time!

Step 1: Prepare the potatoes.

The potatoes must first be peeled and placed in a dish of cold water to prevent browning. Use a box grater’s big hole to shred the potatoes. Fill the bowl with cold water, then stir the potatoes well. Drain off the water when it becomes cloudy.

Then, move the chopped potatoes to a mesh sieve or strainer and squeeze them to remove most of their extra liquid.

Homemade McDonald's Hash Browns Copycat Recipe

Step 2: Confit Cooking

To get the restaurant quality hash browns, I advise you don’t skip this step.

A non-stick skillet should be heated at low heat. Add the potatoes to the hot oil and cook them for 5 to 6 minutes. Before continuing, strain the potatoes and let them a little period of cooling.

Step 4: Combine the ingredients and form the hash brown patties.

Combine the potatoes in a bowl with the sugar, cornstarch, dry beef stock powder, salt, and pepper—Transfer 1/4 cup of the hashbrown mixture on a piece of parchment paper afterward.

Make a rectangle out of the potatoes by flattening them. Add another 2-3 tablespoons of the potatoes on top, then fold the parchment paper over the top to help create the patties.

Repeat these final two procedures with the remaining hash brown mixture until you have about four large patties.

Step 5: Frying and Serving

Next, add the oil to a nonstick skillet and heat it over medium-high heat. After that, add the hashbrowns and fry them there for a few minutes on each side or until golden brown.

How To Store Hash Browns

You are aware by now that this McDonald’s hash browns recipe yields around four patties. Don’t worry if you can’t eat them all or decide to double the recipe since they really keep nicely.

You may keep the cooked hash browns in the refrigerator for up to 5 days in an airtight container. By the way, you can freeze the hash browns for up to 10 months if you want to store them for even longer. Just make sure the bag is freezer-safe. This is the approach I normally take. I usually prepare an extra batch of these McDonald’s hash browns since I like preparing and eating them so much. The excess batch is simply frozen, so it’s available anytime I need a quick side for breakfast.

In any case, I advise using parchment paper to line each patty in order to keep them from adhering or disintegrating.

Homemade McDonald's Hash Browns Copycat Recipe

Reheating Hash Browns

The simplest method to reheat hash browns is to put them in the microwave and cook them for 20 seconds at a time until well hot.

Alternatively, you may bake your hash brown patties at 350°F for 15-20 minutes, or until they are well cooked, on a baking sheet coated with parchment paper or foil. This is the best approach if you want them to crisp back up.

McDonald’s Hash Browns Recipe

Ok, time for more detailed recipe instructions.

Ingredients

  • 3 Russet Potatoes
  • 1 tsp of Salt
  • 1 tsp of pepper
  • 1 tsp of sugar
  • 6 tbsp of Cornstarch
  • 2 tbsp of Vegetable Oil (sunflower or rapeseed)
  • 1 tsp of dry beef stock powder

Instructions

  • Peel and cut the potatoes, then put them in a bowl of cold water so they won’t turn brown. Next, grate the potatoes thru the large hole on a box grater.
  • Add cold water to the basin, then stir the potatoes well. Drain the water after it has become murky.
  • To release most of the liquid, move to a strainer and press.
  • On low heat, preheat a nonstick skillet. Add the potatoes to the heated oil and cook for 5 to 6 minutes. Before continuing, drain the potatoes using an oil strainer and give them a little time to cool.
  • Combine the salt, pepper, dry beef stock powder, and cornstarch with the potatoes in a bowl.
  • Put 1/4 cup of the mixture on a piece of parchment paper. Make it flat, like a rectangle shape. Add another 2–3 tablespoons of potatoes on top, and then fold the parchment paper over the top to make it flat. You can make the patties with the help of paper. Do the same thing with the rest of the mix.
  • Add the oil to a nonstick skillet that has been heated to medium-high. Add the hashbrowns to the skillet and cook them for a few minutes, turning them occasionally, until golden brown all over.

Share the image below to your Pinterest board if you like these McDonald’s hash browns!

Homemade McDonald's Hash Browns Copycat Recipe

Conclusion

There is no way that this hash brown dish could be any more authentic. Every bite has the same deliciousness you adored every time you’ve eaten at McDonald’s, and the outside’s crisp crunch, buttery middle.

Smoked Pork Loin (With Sweet Rub Recipe)

Smoked Pork Loin (With Sweet Rub Recipe)

The smoked pork loin is a delicious meal. It’s a fantastically multipurpose cut that lends itself to a wide variety of seasonings, smokes in a short amount of time, and looks great when served. This recipe for smoked pork loin includes detailed instructions for cooking Read More