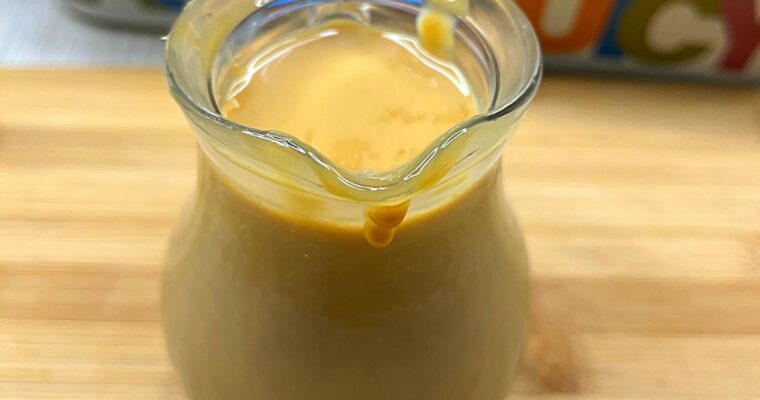
Easy and Delicious Recipes

Author: Sarah Berthold

Homemade Battered Sausage Easy Recipe

Homemade Battered Sausage Easy Recipe

Irish and British cuisines frequently feature battered sausage. This meal is popular and even matches fish and chips in popularity. This recipe for battered sausage is delicious, crunchy, and wonderfully filling. The sausages are perfectly coated with the light, crunchy batter, which tastes precisely like Read More

Homemade Croffle Recipe (Croissant Waffles)

Homemade Croffle Recipe (Croissant Waffles)

The hottest street food in Korea is croissant waffles, A.K.A croffle, the subject of my most recent fascination. For those unable to travel to Korea,  I thought I would make a replica of this delectable treat at home. What are Croffles? Croffles are a mix Read More

Homemade Lobster Ravioli Sauce Easy Recipe

Homemade Lobster Ravioli Sauce Easy Recipe

This elegant recipe for the BEST Lobster Ravioli sauce has only basic ingredients, which you probably have at your hand, and can be made in just 20 minutes. The lemon brown butter and Pecorino Romano cheese are the star ingredients in combination with a bit of red wine. The recipe is simple enough to make on a weekday yet elegant enough to serve on a date night at home.

What Makes a Good Lobster Ravioli Sauce?

Whenever you order lobster ravioli, the first thing that pops into your head is probably, “What does lobster ravioli sauce truly look like?” To be honest, it may look like a variety of things, but the choices that are unquestionably the finest, in my opinion, are a sauce that is based on cream or a sauce that is based on butter.

Because lobster is such a decadent and rich food, the sauce it is combined with needs to compete with it. In addition, butter and lobster have been best friends since the beginning of recorded history.

Lobster Ravioli Sauce Variations

When it comes to lobster ravioli sauce, you have a wide variety of options to choose from, as I indicated before. Suppose you’re searching for something that features butter as a primary ingredient. In that case, I make an incredible brown butter and pine nut sauce that goes wonderfully with lobster ravioli (really, it’s one of the best things I’ve ever eaten).

You could also try alfredo sauce, garlic butter (which is very similar to the method I use for brown butter), vodka sauce, pink sauce, or in this particular case, white sauce made with strong and sweet pecorino Romano cheese (we are adding a little tomato paste to bring out the sweetness of the lobster). Because of this, it is the ideal dish to serve to your significant other on a date. You can also try this Garlic Parmesan White Sauce; it is excellent with lobster ravioli. 

A few different things are going on with this sauce that we will discuss. To begin, the lobster shells impart an incredible taste to the dish. Second, there is a hint of sweetness contributed by the tomato, and third, to tie everything together, we are going to add some white wine, lemon juice, and tarragon.

If you’ve been eating lobster for any length of time, you probably already know that each taste is a traditional complement to the crustacean.

P.S. Make an effort to purchase some Chardonnay for the wine. You can use it to make this sauce, and then after that, you can drink it with dinner, and it will go great with it!

Homemade Lobster Ravioli Sauce Easy Recipe

Where to buy Ravioli?

Listen, I’m not going to sugarcoat this; I’m going to tell it like it is. Although making handmade lobster ravioli from scratch is worth the effort, it is a Task. If you don’t have the time to make ravioli but you want indulgence, you should purchase some.

If you’re going home to have a nice evening with your partner and you need something to combine with a soapy bottle of champagne or white wine if you prefer,  Trader Joe’s and Costco both have great selections of ravioli for you to choose from. P.S you’ll need a white wine for this recipe, so go for that instead of champagne. 

Ingredients you’ll need

  • Lobster ravioli
  • White Wine
  • Butter
  • Lemon
  • Lemon zest
  • Minced garlic
  • Pecorino Romano cheese (If you don’t like Pecorino, use Parmesan cheese)
  • Fresh parsley for garnish
  • Salt and Pepper

Red pepper flakes or a dash of Old Bay seasoning can be added for spiciness, and a splash of heavy cream can provide richness. These ingredients are optional.

How to Make Lobster Ravioli Sauce

This mouthwatering brown butter sauce is rich in brown butter, pecorino cheese, and fresh from the lemon. This sauce is ideal for lobster ravioli.

Step 1: Melt the butter over medium heat in a large frying pan.

Step 2: Lemon slices should be browned on all sides. This will allow some lemon flavor to permeate the butter sauce.

Step 3: The lemons should be taken out and placed on a clean dish.  Add the last of the butter. Stir in the minced garlic after adding the butter and after it starts to bubble slightly.

For the lemon garlic sauce

Step 1: For a few minutes, stir the butter as the fat solids begin to brown slightly. Keep an eye out not to burn the butter.

Step 2: Heat up a large pot of water with salt. Add the ravioli and cook it until it’s al dente.

Step 3: Include a cup and a half of the pasta water with white wine, and boil for an additional minute or two, until a smooth sauce emerges.

For the Ravioli

The cooking is complete when all of the ravioli rise to the top.

Step 1: Add the ravioli to the pan using a slotted spoon and gently mix to incorporate.

Step 2: Add freshly grated Pecorino Romano and, If preferred, garnish with parsley and lemon zest.

Step 3: Place a charred lemon on the plate’s side and serve. Enjoy!

How to Cook Store-Bought Ravioli

I use Maine lobster ravioli from the Giovanni RANA brand, which is excellent for this dish. You may get these or other variations at most supermarkets, including Trader Joe’s, Whole Foods, and Kroger. They are stored in the refrigerator area.

In case you can’t locate the directions, which are often printed on the package:

  1. Prepare a big pot of water (about 1 gallon and 2 Tbsp of salt).
  2. Put in the ravioli and bring the water back to a low boil for 3 to 5 minutes. When the ravioli are cooked, they should float to the top.
  3. In case your ravioli are frozen, leave it in the freezer until the water comes to a boil, and boil for 7-8 minutes or until it rises to the surface. Gently stir the pasta in the beginning and middle of cooking to prevent it from sticking to the bottom.
  4. Strain the cooked ravioli and set aside a cup of the cooking water.

Homemade Lobster Ravioli Sauce Easy Recipe

What is the best sauce for lobster ravioli?

A cream or butter sauce is often the finest lobster ravioli sauce. To complement the lobster, the sauce should be delicate but tasty. I enjoy the flavor of lobster.

Brown butter is used in this dish. It gives taste depth without dominating the meal.

Restaurant Quality Lobster Ravioli Sauce

Lobster ravioli is a wonderful delicacy in our house! I enjoy the flavor and prefer not to overthink the sauce to allow the lobster flavor to show.

While the ravioli are cooking, make the creamy garlic butter sauce in minutes. This luscious lemony brown butter sauce with a touch of garlic and Pecorino cheese is the ideal complement!

Recipe Suggestions for Lobster Ravioli Sauce

Grate the cheese and lemon zest using a Microplane.

Brands of lobster ravioli that I recommend:

Giovanni Rana’s, or any locally prepared lobster ravioli also definitely works.

High-quality salted butter, such as Land O Lakes. This will take your sauce to the next level!

Browning Butter Tips

Always brown the butter over medium heat. There is a short period between brown and burned butter. Keep an eye out for it.

Use a light-colored pan to see when the butter starts to brown.

Add the saved pasta water as soon as the butter starts to brown.

Enhance your Lobster Ravioli Sauce

If you’d like to up the protein in this dish, use grilled shrimp or even bits of fresh lobster tail!

You may add heavy cream to make the sauce extra creamy.

This sauce also goes nicely with spinach, butternut squash, and three cheese-packed ravioli.

Fresh herbs that go well with shellfish, such as thyme, can be added.

Share the image below to your Pinterest board if you like this lobster ravioli sauce!

Homemade Lobster Ravioli Sauce Easy Recipe

Lobster Ravioli Sauce Recipe

The sauce for the lobster ravioli is about to become your new favorite! The flavor of the lobster is highlighted by the simple preparation of a sauce made of lemon brown butter and pecorino romano.

Ingredients

  • 1 (13 oz) package of lobster ravioli
  • 5 Tbsp of salted butter
  • 1 garlic clove, minced
  • 1 lemon, cut into slices
  • Pasta water from cooking
  • ¼ Cup of White wine
  • ½ cup freshly grated Pecorino Romano cheese
  • Lemon zest o for garnish (optional)

Instructions

  • In a cast iron skillet or another large saucepan, melt 1 tablespoon of butter over medium-high heat. Add the lemon when the butter has melted, and sauté it until both sides are golden (about 2 minutes per side). Lemons may be taken out of the pan and put aside.
  • Salt the water well and bring a big saucepan of water to a boil. As directed on the packaging, cook the ravioli until it is al dente.
  • Add the final butter chunk in the meantime. The garlic should be added when the butter begins to boil. For a few minutes, continue stirring the butter while the fat solids begin to brown slightly. Keep an eye out not to burn the butter.
  • Drain the ravioli and set aside approximately a half cup of the pasta liquid. When the glossy sauce develops, add the cooking liquid and white wine to the pan and cook for approximately a minute.
  • Add the ravioli and gently mix everything together in the pan. If preferred, add freshly grated Pecorino and lemon zest to the top. On the side of the platter, serve with charred lemon or asparagus if you like. Enjoy!
How to Cook Venison Backstrap (3 Ways + Marinade Recipe)

How to Cook Venison Backstrap (3 Ways + Marinade Recipe)

Without a doubt, the finest deer cut is the backstrap. It is a no-brainer why this is one of the best wild game cuts since it is simple to prepare and melts in your mouth—a must-have for any cuisine from a rural farmhouse or romantic supper. Read More

Pollo Asado Chipotle Copycat Recipe

Pollo Asado Chipotle Copycat Recipe

Copycat Chipotle Pollo Asado is one of the tastiest grilled chicken recipes I’ve made recently. This chicken is flavorful and tender with lime and orange juice in a chipotle-based marinade. Fans of Chipotle Mexican Grill will recall that the chain finally introduced a fresh chicken Read More

How Long to Cook Salmon at 400 F? (With Recipes)

How Long to Cook Salmon at 400 F? (With Recipes)

You are concerned about how long it takes to cook salmon at 400 F since it is more complex than you believe in preparing salmon. When cooking salmon, it’s essential to use the proper technique and temperature so that the fresh salmon fillet flavor is intact while the salmon is soft and moist.

The time needed to cook salmon is 10 minutes for every inch of thickness. As a result, you would cook your salmon fillets for 20 minutes if they had a thickness of two inches. If they were one inch thick, the cooking time would be increased to 10 minutes.

Due to its deliciousness, salmon has become one of the most popular dishes in the world since it was first prepared more than 11.500 years ago, according to Seeker. You may make a variety of dishes using salmon fillets to nourish your family or impress your visitors.

Let’s go on to learn more about high-temperature salmon cooking so that you may prepare salmon to the maximum level of detectability.

Fun Fact: From the Haida and Coast Salish peoples to the Nuu-chah-nulth people in British Columbia, salmon play a significant spiritual and cultural role in Native American mythology along the Pacific coast.

How Long To Bake Salmon At 400F?

Because salmon is a rather lean fish, it can quickly dry up if not prepared correctly. Knowing how long to bake salmon at 400°F is crucial for this reason.

Salmon should be cooked for 10 minutes per inch of thickness as a general rule of thumb. Therefore, if they were two inches thick, you would cook your salmon fillets for 20 minutes. You would need to cook them for 10 minutes if they were an inch thick.

For up to 12 minutes per inch of thickness, some individuals prefer to cook their salmon for a little longer. As a result, the fish will be more perfectly cooked.

It is usually best to be cautious and cook your salmon for less time rather than longer if you are unsure of how long to bake it.

If extra time is required, you may always return it to the oven for a few minutes.

How Long to Cook Salmon at 400 F

How Long to Bake Salmon Using a Foil At 400F?

Try covering the salmon in foil before baking if you’re seeking an even simpler method of preparing salmon. This approach works particularly well when preparing already-marinated or seasoned fish.

Salmon may be baked in foil by simply placing the fish on a sheet of foil and sealing the edges to form a packet. Make sure the package is well packed to prevent steam leaks.

Bake in the foil packet placed on a baking sheet for 18 to 20 minutes or until the salmon is well cooked.

How Long to Cook Salmon at 400 F

How Long to Bake Salmon without Foil At 400F?

The thickness of your salmon filet will determine the answer to this question; nevertheless, it shouldn’t take more than 20 to 25 minutes to bake a filet that is an inch thick.

Salmon can still be baked without foil if you don’t want to. Arrange the salmon fillets on a baking sheet using parchment paper or cooking spray. By gently twisting a fork into the thickest section of the salmon, you can determine when it’s done.

Salmon is fully cooked if it flakes readily. The salmon will turn harsh and dry if it is overcooked. If in doubt, take a look at our table charts suggested temperatures for cooking salmon below.

How Long to Bake 1 lb. Salmon At 400F?

The length of time it takes to bake depends on the salmon’s thickness, kind, and temp when it is placed in the oven. I usually bake salmon fillets that are an inch thick for 12 to 14 minutes at 400 degrees.

It would be best if you modified the cooking time based on how thick or thin the salmon is. The cooking time will also need to be increased if you are using frozen salmon. You must alter the cooking time if you want your salmon more rare or well done.

If you like this article and enjoy seafood, be sure to check these articles: What is Tobiko and Tobiko Sushi Recipe and What is Masago and Masago Sushi Recipe

How Long to Cook Salmon in Air-Fryer at 400F?

Your salmon fillets’ size and thickness will determine the answer.

When using an air fryer, larger, thicker fillets need to be cooked for 4-5 minutes on each side, while smaller, thinner fillets only need to be cooked for 2-3 minutes per side.

There are a few factors to think about before settling on the appropriate cooking time for your salmon.

The size of the salmon fillets is the first consideration. Smaller fillets require less time to cook than larger fillets do, so cook them for a shorter amount of time. The thickness of the fillets is another thing to take into account. Cooking time will be longer for thick fillets than for thin ones.

After considering these things, you may choose the cooking time that would be most effective for your salmon. For instance, you should only need to cook tiny, thin fillets for two to three minutes on each side. Larger, thicker fillets require a longer cooking time—four to five minutes on each side.

Enjoy your tasty fish after adjusting the cooking time as necessary.

How long does it take to Bake Salmon at 450 F?

In a preheated 450°F oven, salmon will be ready to eat after 8-12 minutes. Again, it all depends on the thickness of the salmon. Quick to prepare and delicious, salmon is an excellent addition to any dinner. It can withstand high heat because of its fat content. The ultimate result will have a golden hue and be soft and juicy even after being cooked.

How To Know When Salmon Is Cooked?

Salmon may be cooked in a few different ways, and certain signs can alert you when it’s done. You can gauge when to end cooking salmon based on them since overcooking them will cause them to lose moisture and taste.

When the meat of the salmon fillets is opaque and easily flakeable, they are done. To check whether the fish is finished, twist it with a fork.

Using a meat thermometer is another simple technique to determine when your salmon fillets are finished cooking. The salmon fillets will be ready for consumption when their internal temperature varies between 110 F and 145 F (or 43 C and 63 C), depending on how well done you like your salmon.

Some of you may be huge fans of eating things that are medium-rare, medium, or well-done. These are a few of the notes between the three salmon varieties. The inside fillets will start to dry out after they reach 145°F or 63°C.

Measuring method Medium-rare Medium Well Done
Temp. in Fahrenheit 110 F – 115 F 120 F – 125 F 145 F
Temp. in Celsius 43 C – 46 C 49 C – 52 C 63 C

When to Remove Your Salmon from the Heat?

Although the preceding section explains how to identify when your salmon is done, it doesn’t follow that you should remove the salmon fillets from the heat as soon as they reach the desired temperature.

Cooking time Medium – Rare Salmon Medium Salmon Well done Salmon
The cooking temperature in Fahrenheit 100 F – 110 F 110 F – 115 F 135 F
Time to remove in Fahrenheit 110 F-115 F 120 F-125 F 145 F

The salmon continues to cook after you remove it from the flame because of the internal heat, which causes the temperature to rise even after removal. Take salmon out before the internal temperature reaches your ideal level since it typically rises from 10°F to 15°F.

It’s critical to keep in mind the cooked salmon’s shelf life in the refrigerator if you intend to save it for a future dinner. After cooking salmon, you typically only have a few days to consume it.

How Long To Cook Salmon At 400F? (Recipes with guide)

To learn how to prepare salmon in your preferred manner, keep reading. Three methods of searing and roasting are available: roasting, baking in parchment, grilling, air-frying, or even pan-frying.

It’s a good idea to estimate how much salmon you’ll need to prepare beforehand using the average quantity consumed by a person. You won’t be able to cook too much or too little as a result. After all, nobody likes it when the main course is over before everyone is satisfied.

See also this fantastic Mahi Mahi Easy Recipe.

Roasting Salmon – Recipe with cooking time

How Long to Cook Salmon at 400 F

The simplest method for your supper meals is to roast or bake salmon fillets, and you may finish the meal in under 20 minutes.

Step 1: Based on your equipment, preheat the oven to 400 degrees Fahrenheit before cooking for 5 to 10 minutes.

Step 2: To achieve medium doneness, coat the salmon fillets with your favorite spices, glaze, and bake for around 12 minutes. Depending on the thickness of the salmon, you may choose how long to cook it.

Add 4-6 minutes for every additional 1/2 inch of salmon thickness. For those who want their salmon rare, the cooking time is 4 minutes; for completely cooked salmon, the cooking time is 6.

Searing And Roasting Salmon – Recipe with cooking time

How Long to Cook Salmon at 400 F

You may finish cooking salmon efficiently and satisfactorily by following the instructions below. This approach is ideal for you if you enjoy eating salmon fillets with crispy edges and juicy centers.

Step 1: Heat your cast-iron pan to 400 degrees Fahrenheit.

Step 2: Marinate the salmon fillet with your preferred spice mixture. To enhance the flavor of the salmon fillets, top them generously with melted butter, garlic, asparagus, lemon juice, salt, and freshly cracked black pepper. To further enhance the flavor of the fish, place some lemon slices around the fillets.

Step 3: Melt unsalted butter in the cast-iron pan. The melted butter gives the salmon fillets a golden brown outside while maintaining a juicy inside. With the skin side down, add the salmon fillets.

Step 4: After roughly three minutes of cooking over high heat, spread the melted butter over the fillets.

Step 5: Place the pan in the oven and cook for a further 8 to 10 minutes prior to serving.

Salmon In Parchment (En Papillote) – Recipe with cooking time

How Long to Cook Salmon at 400 F

Similar to roasting salmon, this technique will result in more adaptable salmon slices thanks to the foil or package of parchment support.

Step 1: Make sure your oven is preheated at 400 degrees.

Step 2: After seasoning the salmon, cover it in foil or parchment paper and set it in a sheet pan.

Step 3: Bake the salmon in the oven for 10 to 15 minutes or until it is fully cooked. The salmon will be cooked with moisture thanks to the trickle from the wrapper.

Grilling Salmon In The Foil – Recipe with cooking time

How Long to Cook Salmon at 400 F

Grilling salmon in a foil packet at 400 degrees is another method you may use. Salmon fillets that have been grilled can develop rich, smokey tastes and become more seasoned.

Step 1: Set up your oven and preheat it to 400 degrees F.

Step 2: Cover the salmon fillets with a piece of foil and some seasonings.

Step 3: Grill the salmon for 14 to 18 minutes or until the thickest portions are cooked to your liking. You need to increase the duration if your salmon is larger, and conversely.

Cooking Salmon in Air Fryer – Recipe with cooking time

How Long to Cook Salmon at 400 F

Salmon cooked in an air fryer will be more flavorful and crispy. With this technique, salmon fillets will be moist and flavorful. Are you unsure if air fryers may use aluminum foil? Don’t worry; you don’t have to cover the salmon fillets in aluminum foil for this technique.

Step 1: Sprinkle some basic spices on the salmon. I advise choosing butter and garlic for a low-carb (keto) air fryer meal since they will enhance the flavor of your salmon while preserving its moisture.

Step 2: Depending on the type of air fryer you use, the cooking time will change. Use an oven air fryer for 10-15 minutes at 400F for the best results. A basket air fryer phase lasts for at least 12 minutes. Of course, the longer you require, the thicker the salmon is.

How Long to Cook Salmon at 400 F

How to make Chicken Wing Brine (Effortless recipe)

How to make Chicken Wing Brine (Effortless recipe)

Would you like to make the most delicious and simplest chicken wing brine? With an extra spicy kick, this simple brined chicken wing dish is salty, a little bit sweet, and spicy. Without a doubt, one of the most well-liked party dishes is chicken wings. Read More

Juicy & Tender Air-Fryer Ribs Recipe

Juicy & Tender Air-Fryer Ribs Recipe

Considering how simple it is to make, you’ll be astonished by how wonderfully Air-Fryer ribs turn out, with tender meat and perfectly crisp edges. People were raving about my oven-baked baby back rib recipe a day after I posted it, so it only seems logical Read More

Oven-Baked Baby Back Ribs Easy Recipe

Oven-Baked Baby Back Ribs Easy Recipe

It’s hard to believe how juicy and tender these oven-baked baby back ribs are—cooked till they fall off the bone after being rubbed with a delicious dry rub. Then perfectly cooked while covered in a delicious barbecue sauce.

Cook Advice: Cooking baby back ribs in the oven slowly and steadily in a “foil pack” that traps the steam is the secret to ensuring they fall apart. I always get absolutely beautiful ribs when I bake the ribs at 275° F for a couple of hours covered in foil.

BBQ Baby Back Ribs Ingredients

Pork Baby back ribs: I prefer to go for the leanest baby back ribs when buying pork. Before using the dry rub, I’ll cut off any extra fat.

BBQ Sauce: You can use homemade or store-bought BBQ sauce. I particularly enjoy the baby back rib BBQ sauce from Stonewall Kitchen.

Onion: Include onions in your recipe; they truly enhance the flavor during baking. You can use your preferred kind of substitution.

Brown Sugar: I chose dark brown sugar, but light brown may also work fine.

Paprika: This gives the ribs a stunning color, and I prefer to use sweet paprika rather than smoked paprika.

Salt & Pepper: You can adjust the salt and pepper to your taste.

Garlic Powder: I prefer to use garlic powder here rather than raw garlic to ensure that all ribs are coated equally.

Onion Powder: This dish also features excellent onion powder as a flavoring agent. It aids in giving the spice rub the traditional taste.

Dry ground mustard: This is what I used. However, if you want to, you can use yellow mustard. The ribs should be covered in wet yellow mustard and marinade for at least two hours in the refrigerator.

Cayenne Pepper: This spice provides the ribs with a little kick that complements the other flavors. You may eliminate this or adjust the amount to your liking if you don’t like spice.

Oven-Baked Baby Back Ribs

How to make Baby Back Ribs

Here is a brief guide on how to cook these baby back ribs in the oven.

Step 1: Prepare the ribs by removing the silver skin

Note: If you can’t find the membrane, the butcher probably took it off already.

Remember that the thin silver skin or membrane that runs around the back of the ribs must be removed while cooking ribs. The membrane, a thick layer of skin, will stop the ribs from dislocating. Leaving it on will make the ribs less tender and less enjoyable to eat, which is not good.

It’s simple to get rid of. Simply flip the ribs over and search for a section of the membrane around the meat’s margins that you can grip onto. To free the silver skin from the ribs, you can also slide a little knife blade between them.

It produces a very thin covering across the back and is silver in hue. Use a paper towel and pull a piece back once you’ve caught it, just like you would tape. The membrane may be pulled entirely off in one piece if you do it just properly.

Step 2: Prepare and apply the dry rub

The dry rub should next be prepared, applied, and thoroughly rubbed into the ribs. It adds a ton of flavor and is simple to create.

For even more flavor, you may let it lie with the rub in the refrigerator overnight, but it’s not required. The rub gives the ribs an additional layer of strong flavor. I strongly advise applying it.

But you may just add salt and pepper if you choose. Give the ribs plenty of seasoning.

Step 3: Bake the ribs

You must set up the ideal conditions for pork baby back ribs to steam cook if you want to bake them in the oven. The simplest method to accomplish that is to wrap them with tin foil. If you prefer not to cook using foil, you can alternatively use parchment or butcher paper.

To create a pouch for the ribs, cut off a piece of tin foil that is large enough. Place sliced onions over the top of the ribs in an even layer. The foil must completely enclose them. To keep the steam inside, crimp the edges together. The ribs acquire their tenderness in this way. 

Bake the baking sheet at 275 degrees Fahrenheit. The time it will take to cook a rack of ribs depends significantly on how large the rack is.

It’s possible to bemoan the lack of sear you get on the grill while preparing these ribs in the oven. However, don’t panic; we have a solution for it.

For three to five minutes, broil the ribs. Watch it closely in case it flares up. To properly caramelize the sauce, I like to brush them with more sauce and place them back under the broiler for an additional three to five minutes. The second time is optional if you’re pressed for time.

Simply place the ribs meat side up on a hot grill, cover it, and cook them on the grill instead of the broiler. Before basting again, let the edges of the meat get a bit charred. The top will have a fantastic caramelized crust in 5 to 10 minutes.

After finishing cooking, the ribs will have a slight sear on the sauce, giving them a grilled appearance and flavor. The taste strength is increased as a result.

Step 4: Apply BBQ sauce

When finished, take the ribs out of the foil and drain the liquids. Apply BBQ sauce liberally to the ribs. For me, baby back ribs must be served with BBQ sauce.
The sauce is what preserves the liquids and intensifies the taste.

Oven-Baked Baby Back Ribs

For how long should the ribs in the oven be cooked?

The best generalization for the softest and juicy baby back ribs is to cook them low and slowly. I like to roast ribs in the oven for 2 to 2 1/2 hours at 275 degrees Fahrenheit. Then set the oven to broil and let it run for 5 to 10 minutes to caramelize the barbecue sauce. 

If you’re in a hurry but still want to make these fantastic ribs, check out my Air-Fryer ribs recipe.

Important Notes

  • A small rack with ribs will take around 2 1/2 hours to cook.
  • For a medium rack, plan on spending about three hours. Four hours is a possible time frame for a large rack.
  • Give it at least 2 hours in the oven before you check it for the first time. After then, have a look at it.
  • The meat should have come off from the bone edges. Insert a fork into the flesh and give it a little pull if you’re unsure if it’s cooked. It should break easily.
  • If not, return it to the oven for an additional 30 minutes. Remember that, depending on the size of the ribs, roasting them to perfection might take up to four hours.
  • When the bones are excessively tender, it is more difficult to pick them up. The meat should begin to peel away from the bones but not totally released.

Oven-Baked Baby Back Ribs Recipe

Ok, it is time to go with a more detailed recipe for these fantastic baby back ribs. Once you make them, you’ll see just how simple this recipe is. 

Ingredients 

For the Ribs

  • 3 lbs of baby back ribs
  • 1 sliced onion
  • BBQ sauce

For the BBQ Rub

  • 2 TBSP of brown sugar
  • 1 TBSP of paprika
  • 1 tsp of black pepper, ground
  • 1 tsp of salt
  • 1 ½ tsp of garlic powder
  • 1 tsp of onion powder
  • 1 tsp of ground mustard
  • ½ tsp of cayenne pepper

Instructions

  • Set the oven’s temperature to 275° F.
  • Wash the ribs and use a paper towel to dry them. Take off the membrane with the silver skin from the bottom.
  • Apply the dry rub on the ribs. (Although it’s not required, you may improve the flavor by covering the dish and letting it remain in the refrigerator for two hours or overnight.)
  • Over the top of the ribs, spread out the sliced onions evenly. Cover the ribs with foil on a baking sheet, closing the edges firmly to form a packet.
  • Bake for two hours in the oven. When the meat breaks away from the bone and becomes fork-tender, it is ready. Cook the meat until the bone readily breaks when pulled.
  • Remove the foil and remove any liquids. Rub the ribs with barbecue sauce and serve.

Grill the ribs for extra char

You may grill or broil the ribs as an additional step to gently char the top. Prepare the grill for cooking. Put the ribs over the flames when the grill is heated and cook for 3–4 minutes or until the marinade is boiling.

The meat is very sensitive and can easily come apart while moving to and from the grill, so take care.

Turn the oven on to broil. Bake the baking sheet for three to five minutes under the broiler once it is hot. If desired, repeat the process and add another coating of barbecue sauce.

If you like this recipe you will also love these Dr.Pepper Short Ribs.

Share the image below to your Pinterest board if you like these pork baby back ribs in the oven!

Oven-Baked Baby Back Ribs

FAQs

What’s the best temperature for baking the ribs?

In this dish, baby back ribs are baked for 2 to 3 hours at 275 degrees F. The rack size of ribs is the main factor in determining how long they must cook at this temperature. A smaller rack will probably take about two hours, while a bigger rack might take up to three hours.

When baking ribs, should I cover them?

Yes, to prevent the ribs from drying out while baking, it is better to cover them. Every time, excellent ribs will be produced by wrapping the ribs in tin foil and grilling them there.

How do you tell whether the ribs in the oven are done?

When the bone easily separates from the meat when pulled, your ribs are cooked.

Do ribs get more tender as they cook longer?

Yes, as they simmer longer, ribs get more tender, but there comes the point where they stop being soft and start to dry up. Toward the end of cooking, check the flesh every 10 minutes to see if it hasn’t dried out, and tug on the bone to see how readily it separates from the meat.

It will eventually just slip off the bone. The flesh will start drying out after that.

Is it better to cook ribs with the bone up or down?

The meaty side of the ribs should always be facing up while the bony side is cooking. 

Homemade McDonald’s Hash Browns Copycat Recipe

Homemade McDonald’s Hash Browns Copycat Recipe

It is time for another McDonald’s copycat recipe. After making these delicious Egg McMuffins, and Chicken McGriddles, we’re making McDonald’s hash browns this time. These mouthwatering hash brown patties made from shredded potatoes are cooked to be fluffy inside and crispy and toasted on the exterior. Read More