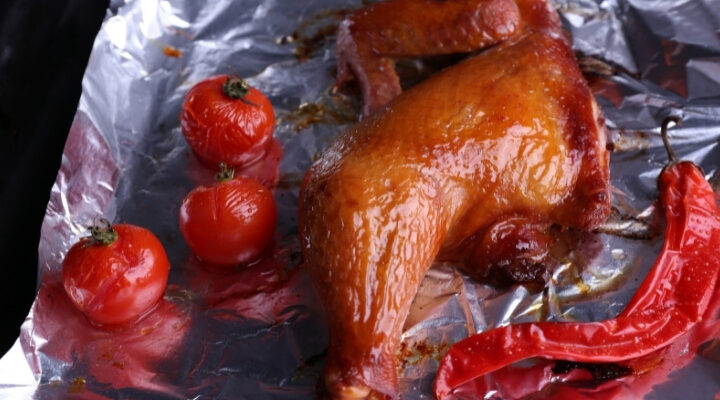
Easy and Delicious Recipes

Author: Sarah Berthold

Homemade German Bierocks Recipe

Homemade German Bierocks Recipe

Are you tired of making the same boring sandwiches again and again? Don’t worry. Today we are going to share the German stuffed Bierocks recipe. This particular recipe will teach you how to make Bierocks from scratch, so they’ll be more delicious than any store-bought Read More

Homemade Brazilian Picanha Steak Recipe

Homemade Brazilian Picanha Steak Recipe

Brazilian Picanha Steak – This triangularly shaped steak that comes from the rump cap muscle is not very easy to grill to perfection at home. This doesn’t mean that it’s impossible, but you need to know a couple of tricks to get it right. We’ll Read More

Yellowtail Sashimi With Soy Citrus Yuzu Ponzu Sauce

Yellowtail Sashimi With Soy Citrus Yuzu Ponzu Sauce

Yellowtail Sashimi – When it comes to eating raw fish, you’re probably familiar with the more common sushi choices: tuna, salmon, and shrimp. But did you know that the freshest, most delicious raw fish of all comes from Yellowtail?

I’ve really enjoyed making seafood delicacies lately, and I’m proud to say I’m getting some really good feedback that motivates me to make these recipes even better. 

Yellowtail Sashimi

Yellowtail, or Japanese amberjack, is the king of raw fish. With a buttery texture, a mild sweet flavor, and a tender texture, the Yellowtail is the fish that other fish want to be when they grow up. Yellowtail is so good that you’ll find it in almost every sushi restaurant.

We have a simple recipe for you if you want to try Yellowtail Sashimi at home with a delicious Soy Citrus Yuzu Ponzu Sauce.

The best thing about this dish is that it can be made within 5 minutes by using only a few ingredients. All you’ll need is a sharp knife and a clean cutting board. So, what are you waiting for?

Yellowtail Sashimi Recipe

Ingredients

For Yellowtail Sashimi

  • 6-7 ounces Yellowtail Fish

For Soy Citrus Yuzu Ponzu Sauce

  • 1 tbsp citrus pons sauce
  • 1 tbsp soy sauce

For Garnishing

  • 1/2 tsp wasabi
  • 5-6 lemon slices
  • 5-6 thinly sliced jalapeno
  • 1 tbsp thinly sliced pickled ginger

Instructions

  1. Preparing the Yellowtail Sashimi:
    • Cut the yellowtail tuna fish into thin rectangles, each about ¼ inch thick.
    • Set these slices aside on a plate.
  2. Making Soy Citrus Yuzu Ponzu Sauce:
    • In a small bowl, combine citrus yuzu sauce with soy sauce. Stir well.
    • This sauce can be used for dipping, or you can add wasabi to it for extra flavor and spice.
  3. Garnishing:
    • Top the yellowtail slices with thinly sliced jalapeno and lemon slices.
  4. Serving:
    • Serve the sashimi with pickled ginger and wasabi on the side.
    • You can also mix wasabi into the Soy Citrus Yuzu Ponzu Sauce if desired.

This method gives you a flavorful and spicy Yellowtail Sashimi dish, complemented by the tangy and rich Soy Citrus Yuzu Ponzu Sauce. Enjoy your meal!

If this Yellowtail Sashimi recipe has caught your eye, don’t forget to pin the image below to keep it handy and share this tasty discovery with others!

Yellowtail Sashimi With Soy Citrus Yuzu Ponzu Sauce

FAQs

What is the difference between Sashimi and Crudo?

Sashimi and Crudo are both types of thinly sliced raw fish. Most people assume that sashimi and Crudo are interchangeable, but there are a handful of important differences. Crudo is an Italian or Spanish dish. The fish is usually marinated in citrus juice, which is why it is sometimes called “citrus-marinated raw fish.”

Crudo is usually served chilled and is meant to be eaten with a spoon. The texture of the fish will be soft, almost like a ceviche. On the other hand, Sashimi is a Japanese dish that is not marinated. It is usually served with Japanese sauces such as soy sauce or Ponzu.

How to Cut Yellowtail Sashimi?

Cutting Sashimi is an art, and if done correctly, it should be as easy as slicing through butter. The first thing you must remember is to sharpen your knife.

The second main thing is to have a stable base for cutting your fish – your cutting board should not slide. Most of the time, the fish is frozen before cutting, which helps make the cuts consistent and also helps in keeping the fish fresh.

Here, you should know that the quality of the fish is more important than the quality of the cut.

Cut Yellowtail Sashimi

Is Yellowtail Sashimi healthy?

This dish is very healthy because it is made from fresh fish and meat. Sashimi is especially healthy for pregnant women because of its high level of highly needed nutrients, especially protein and Omega 3.

Is Yellowtail a Tuna?

Yellowtail is a fish, not a tuna. The yellowtail is a fish that can be found in the Pacific Ocean. It is commonly found around the waters of North America and Japan. Sometimes the yellowtail can grow to a length of one meter.

One of the most effective ways to catch them is by using a long line. They are known to live at a depth of from 5 to 200 meters and are usually caught by anglers that are fishing for other species of fish.

Moreover, they have a yellow streak on their sides, which makes them distinctive. Their taste is slightly sour, but it is not a bad flavor. Yellowtails are often eaten as sashimi and in ceviche. You can also use them for smoking, pickling, salting, or making fish paste.

What does Yellowtail Sashimi taste like?

If you have ever had the chance to taste yellowtail sashimi, then you already know that it is one of the most delicious fish in the ocean. It has a tender, yet firm and succulent flesh which is why it is a favorite among sushi and sashimi lovers. It tastes smooth and buttery and when eaten with Soy Citrus Yuzu Ponzu Sauce, it has a bold and spicy flavor.

The only problem is that Yellowtail can be hard to find. The best Yellowtail comes from Japan, but the best Yellowtail of all comes from Hawaii. That’s why only the very best restaurants serve Yellowtail.

How to store leftovers?

It is not suggested to store Yellowtail Sashimi. Eat it immediately or store it in the fridge for less than 2 hours.


Here are some other seafood recipes you might like:

The Ultimate Blackened Tuna Steak Recipe

Seafood Boil with Delicious Garlic Butter Sauce

What is Tobiko and Tobiko Sushi Recipe

Homemade Unagi Sushi Rolls Original Recipe

Boiling Crab Shrimp Copycat Recipe

How To Cook Mahi Mahi Easy Recipe

What is Masago and Masago Sushi Recipe

Nutrition Value (per serving)

  • Calories: 374kcal
  • Protein: 40g
  • Carbohydrates: 37g
  • Fat: 9g

Tips & Tricks for Yellowtail Sashimi

  • If you want to make garlic ponzu sauce, add ¼ minced or pressed garlic to your Soy Citrus Yuzu Ponzu Sauce.
  • Both Wasabi paste and Wasabi powder will work for this recipe.
  • You must lubricate the knife by dipping it into the water for proper slicing.
  • Don’t overlap yellowtail fish slices in the plate for making Nobu-style sashimi.
  • Wasabi helps to kill microbes in the fish. So, always serve your Yellowtail sashimi with Wasabi.

Let’s Sum Up

We hope you enjoyed this simple recipe and this information helped you learn more about Yellowtail Sashimi and the ingredients you need to make it. If you have any more questions about this recipe or about fish in general, please contact us anytime.

Thank you for reading, we are always excited when one of our posts is able to provide useful information on a topic like this!

Yellowtail Sashimi Food Safety!

Consuming uncooked or raw seafood may increase your risk of foodborne illness. It is recommended to check with FDA regarding food safety and consumption recommendations.

Peanut Butter Skrewball Whiskey Cocktail Recipe

Peanut Butter Skrewball Whiskey Cocktail Recipe

We have a Peanut Butter Skrewball Whiskey Cocktail recipe so that you can enjoy a nice whiskey cocktail with your friends or during the holiday season. If you’re looking for some new cocktail recipes, this peanut butter whiskey and chocolate liqueur are perfect for you. Read More

Homemade Polish Cabbage Pierogi Recipe

Homemade Polish Cabbage Pierogi Recipe

I have a love affair going on with pierogi. Actually, I have a love affair going on with anything dumpling, but these Cabbage Pierogi are one of my favorites. I don’t know what it is about them, but I always feel like it’s a better Read More

Authentic Arby’s Jamocha Shake Copycat Recipe

Authentic Arby’s Jamocha Shake Copycat Recipe

It’s time for another copycat recipe from Arby’s menu! After Arby’s Bronco Berry Sauce and Arby’s Beef and Cheddar Sandwich is time for Arby’s Jamocha shake.  A few months ago, I was at Arby’s and noticed they had a Jamocha Shake. I had never tried this popular shake before, believe it or not,  but I put it on my to-do list to try out.

I’ve never been a fan of the Jamocha Lattes at Starbucks, so I was a bit skeptical about this shake. I decided to get one, and I also got a regular shake to try out. The Jamocha Shake was delicious. I like it better than the Jamocha Lattes at Starbucks, as I enjoyed my Jamocha Shake and decided to try it at home. 

I have modified it and brought it down to simple ingredients that are easy to get for anyone looking for an easy drink recipe or just looking for an Authentic version of this Arby’s shake. Read on to see how I did it.

What is Arby’s Jamocha Shake?

Arby’s is a fast-food chain that prides itself on serving customers delicious roast beef sandwiches. On Thursday, January 12, 2017, Arby’s announced the release of their new Jamocha Shake.

After a poll ran on their website, Arby’s decided to release their new Jamocha Shake to the public!

This shake is a kind of milkshake with a bit of a twist. It’s not your typical milkshake. It’s loaded with ice cream, chocolate, and coffee, making it a very delicious treat. It is sure to be a hit with coffee and chocolate lovers everywhere. 

Oh, and It is so easy to Arby’s Jamocha Shake that even my kid can make it. 🙂 

It is so easy that my kid helped me make this Arby's Jamocha Shake. :)

Ingredients

  • ¾ cup whole milk (for extra creaminess; see tips for swaps)

  • 1½ cups cold brewed coffee (strong or mild, to taste)

  • 2 Tbsp sugar

  • 5 Tbsp chocolate syrup (plus more for drizzling)

  • 3 cups vanilla bean ice cream


Instructions

  1. Blend the Base:
    In a blender, combine cold coffee, whole milk, and sugar. Blend until the sugar is dissolved and the mixture is smooth.

  2. Add Ice Cream & Chocolate:
    Turn off the blender and add ice cream and chocolate syrup. Blend again until everything is smooth and creamy.

  3. Chill (Optional):
    For an extra thick shake, place the blender jar (or poured shake) in the fridge for 15–30 minutes to set up.

  4. Serve:
    Pour into glasses. Drizzle extra chocolate syrup over the top for that classic look. Enjoy immediately!


Tips & Tricks

  • Always turn the blender off before adding ice cream—no mess!

  • Whole milk gives the thickest shake, but feel free to use any milk you like.

  • Make sure your coffee is fully cooled so it doesn’t melt the ice cream.

  • Adjust the strength of your coffee to match your taste.

  • Chocolate syrup and chocolate sauce are both fine—use what you have.

  • For an extra-thick shake, add more ice cream until you reach your perfect consistency.

Pin the image below if you like this Arby’s Jamocha Shake Recipe!

Authentic Arby’s Jamocha Shake Copycat Recipe

What is the difference between Mocha and Jamocha?

These two beverages may seem the same, but they have very little in common. Mocha blends chocolate syrup, milk, and espresso. This drink has caffeine because it uses brewed coffee. On the other hand, Jamocha is a famous authentic shake by a fast-food restaurant and has a unique taste. It uses cold coffee and chocolate syrup, which is not like Mocha at all. 

How to Store Leftovers?

Don’t leave your shake in the refrigerator for more than 4-6 hours. If you keep it in the fridge for too long, it will become too liquidy. It is suggested to put it back into the freezer for 30 minutes to solidify.

Can I freeze Arby’s Jamocha shake?

I have been getting lots of questions about how to freeze Arby’s Jamocha Shake; I have no idea why. But I am going to do my best to answer this question. If you want to freeze Arby’s Jamocha Shake, then there are two things you need to remember. 

  • First, It will get an ice cream consistency and not a shake. 
  • Second, don’t leave it in the freezer for more than seven days in an airtight container. 

You can also freeze it and then blend it with ice cream. The results will be fantastic! It tastes just like a Wendy’s Frosty! 

How to create a vegan version of Arby’s Jamocha Shake?

Unfortunately, Arby’s doesn’t sell the vegan version of it. So, I decided to create a vegan version by reverse-engineering the original shake. It turned out great. So great that I will suggest all vegans try it. Simply use soy, coconut, or almond milk. Don’t forget to add dairy-free, plant-based vanilla ice cream to your shake as well. The rest of the steps will remain the same. 


Easy Chicken Tocino Recipe In No Time

Easy Chicken Tocino Recipe In No Time

Are you ready for another amazing Filipino dish? For breakfast, lunch, or supper, try our delectable Chicken Tocino Recipe. It’s composed of pineapple juice, brown sugar, garlic powder, ketchup, and chili sauce. The Chicken Tocino recipe is an excellent genuine Filipino dinner. This Filipino recipe Read More

Homemade Beef Stroganoff Hamburger Helper Recipe (With a Twist)

Homemade Beef Stroganoff Hamburger Helper Recipe (With a Twist)

Homemade Beef Stroganoff Hamburger Helper Recipe – A rich pot full of beef that everyone will love. This is a great recipe to put on your list if you have a busy daily life. Hamburger Helper truly saved my life 😊 It takes approximately 40 Read More

The Best Japanese Cotton Cheesecake Recipe

The Best Japanese Cotton Cheesecake Recipe

Today we’re making another amazing Japanese dessert. Japanese Cotton Cheesecake is a lighter, fluffy, and more wobbly variation of a traditional cheesecake. It has just enough sweetness and is rich in taste just like a traditional cheesecake.

Japanese Cotton Cheesecake is my favorite dessert. I’m sure you will love this recipe! This is the perfect combination of cheesecake and sponge cake in taste and texture.

So let’s jump right into the recipe; however, I highly suggest you read through the whole article for the best resultse. 

Ingredients

  • 5 large eggs, separated

  • ½ cup sugar, divided

  • ⅓ tsp cream of tartar

  • 9 oz (255g) cream cheese, at room temperature

  • ½ cup milk (low-fat or whole)

  • 4 Tbsp unsalted butter, melted

  • 1 Tbsp lemon juice

  • 2 Tbsp cornstarch

  • 4 Tbsp all-purpose flour


Instructions

1. Prep the Pan & Oven

  • Line the bottom and sides of a 9-inch (23cm) springform pan with parchment paper.

  • Wrap the outside of the pan tightly with a few layers of foil (to prevent leaks during the water bath).

  • Preheat oven to 315°F (157°C).

  • Place a large roasting pan on the lowest rack of the oven and fill it halfway with hot water (for the water bath).

2. Make the Meringue

  • Separate the eggs—whites in a large bowl, yolks in a small bowl.

  • Beat egg whites on low for 30 seconds until foamy.

  • Add cream of tartar, then increase to medium-high and beat until soft peaks form.

  • Gradually add ¼ cup sugar while beating.

  • Continue until you get soft, shiny peaks (do not overbeat).

3. Make the Cheesecake Batter

  • In another large bowl, combine cream cheese and milk. Beat on low until smooth and creamy (about 2–3 minutes).

  • Add melted butter, lemon juice, remaining ¼ cup sugar, cornstarch, and flour. Beat until fully blended and smooth.

  • Add egg yolks and mix until just incorporated.

  • Strain the batter through a sieve for a perfectly smooth texture.

4. Combine Meringue & Batter

  • Gently fold ⅓ of the meringue into the cheesecake batter to lighten it.

  • Repeat with another ⅓, then fold in the remaining meringue until just combined—don’t overmix.

5. Bake

  • Pour the batter into the prepared pan. Smooth the top with a spatula.

  • Tap the pan gently on the counter to remove large air bubbles.

  • Place the springform pan in the preheated water bath in the oven.

  • Bake for 1 hour and 10 minutes, or until a toothpick inserted in the center comes out clean.

  • For a browned top, continue baking for another 10–15 minutes.

6. Cool Gradually

  • Turn off the oven. Leave the door slightly open and let the cake cool inside for 1 hour (this helps prevent collapse).

  • Remove from oven and pan. Transfer to a plate and refrigerate for 4–5 hours, or until fully chilled.

7. Serve

  • Slice and serve plain, or top with whipped cream, fresh fruit, fruit purees, or chocolate sauce.


Storage:

  • Keep leftover cheesecake covered in the fridge for up to 7 days.

Pin the image below if you like this Japanese Cheesecake Recipe!

The Best Japanese Cotton Cheesecake Recipe

What is Japanese Cotton Cheesecake?

It is often referred to as Japanese jiggly cake, Japanese souffle cheesecake or Japanese light cheesecake and Japanese cotton cheesecake. This cheesecake is made with less cream cheese and sugar than traditional cheesecakes. The addition of whipped meringue makes it light and fluffy.

You might want to check out this recipe for Asian Mango Sponge Cake!

Japanese Cotton Cheesecake taste

Japanese cotton cheesecakes are light and fluffy and have a sweet, tangy and rich texture.

This delicious cake is not as sweet as other cakes. It’s heavenly to combine fluffy cake and a bit of tart cream cheese. I am sure you will enjoy this Japanese Cheesecake recipe. This recipe is easy if you follow the exact instruction, however, if you diverge, just a little bit, it can be tricky to get it right.

What is the Secret of Japanese Cheesecake Fluffy and Jiggly Texture?

Whipping meringue is the secret to fluffy, jiggly Japanese Cheesecakes. The meringue acts like a rising agent lifting the cheesecake up just as it does in souffles. It also helps lighten the cheesecake’s texture. This makes the Japanese cheesecake fluffy inside and makes it jiggly.

Why is my Japanese Cotton Cheesecake dense and not fluffy?

There are several possible reasons why your Japanese cheesecake is dense instead of fluffy.

  • Too much air was lost when the white eggs mixture (meringue) was folded into the base batter.
  • There is a possibility that you’ve over whipped the meringue.
  • The cheesecake wasn’t properly baked.

How to make Japanese Cheesecake Fluffy and Jiggly

Make a fluffy, beautiful Japanese cheesecake by whipping the meringue until it reaches a soft-medium point. You’ll know when it’s done because the meringue will be shiny when it reaches this stage. The peak of the meringue should curve down and hooks rather than standing straight up.

Avoid whipping the meringue too stiffly. This will cause the meringue not to be properly incorporated into your batter base, which will lead to dense cheesecakes. Soft-medium peak cheesecakes will be the most fluffy and have the least shrinkage.

If you don’t mind the shrinkage, you can whip your meringue until it reaches a soft peak. You will get a cheesecake that is fluffy and is extra jiggly. This is how you can use different stiffnesses of meringue.

Japanese Cotton Cheesecake

Japanese Cotton Cheesecake Tips and Tricks

  • For this cheesecake to work, you must plan ahead as the eggs, butter and cream cheese perform the best at room temperature. Remove the cream cheese and butter from the refrigerator at least two hours before you start baking your cheesecake. Take the eggs out of the fridge about an hour before you start to bake the cake. For perfect Japanese Cotton cheesecake, the cream cheese and butter must be softened nicely. These ingredients can be microwaved on low for 20 seconds to make sure they are ready.
  • Cold eggs are easier to separate. To achieve the best texture, egg whites should be beaten at room temperatures.  Separate the eggs while they’re cold, after that, you can let them chill before you begin preparing the remaining ingredients.
  • An 8 by 3 inch round springform aluminum pan is highly recommended. Place the parchment paper 2 inches above the pan. Since the cake rises while baking, the parchment paper will make great support. The height of the parchment paper shouldn’t exceed five inches.
  • A water bath is necessary because this Japanese Cheesecake takes longer to bake than a normal cake. The water bath also insulates the cake, allowing it to cook at a consistent temperature. These are key factors in achieving a jiggly, moist texture in Japanese Cotton Cheesecake.
  • Make sure you fold the egg whites mixture (meringue) into your batter. Don’t beat the eggs or mix too hard, as this will cause them to become brittle.
  • Oven temperatures can vary so check the cake after an hour to make sure it is cooked. Bake the cake for about 1 hour and 10 minutes, or until it is golden brown. A bit of over-baking is not a big issue with Japanese Cotton Cheesecake. It won’t damage the cake. Just be careful you don’t undercook it. It can take as long as 1 1/2 hours depending on the oven. This is perfectly normal.
  • After cooling, the cake will shrink a bit. The deflating can be minimized by leaving the cake in the oven once it has been baked.
  • Before you eat the cake, let it cool for at least 4 hours, ideally 5 hours. The cold air helps to set the cream cheese, which in turn makes the Japanese cotton cheesecake taste and texture much better.
  • If you have cotton cheesecake leftovers, which I doubt you do, you can make this amazing deep-fried cheesecake


Crispy Air Fryer Corn Dogs Easy Recipe

Crispy Air Fryer Corn Dogs Easy Recipe

Today, we’re making the easiest Air Fryer Corn Dogs recipe you will find! These crispy air fryer corn dogs make a great meal for family or friends and are one of those meals that taste better in the air fryer. This is because the air Read More