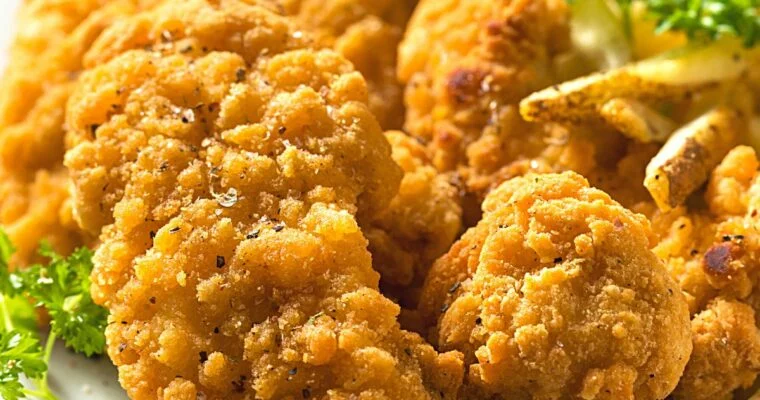
Easy and Delicious Recipes

Recent Posts

Italian Pizzelle Cookies Recipe (The Oldest Known Cookie)

Italian Pizzelle Cookies Recipe (The Oldest Known Cookie)

Imagine taking a stroll through the lovely streets of an Italian village while inhaling the smell of freshly brewed espresso and warm cookies. Yes, we’re referring to the authentic Italian Pizzelle recipe, a sweet treat that has won people’s hearts and taste buds worldwide. In Read More

Homemade Canestrelli Recipe (Italian Egg Yolk Cookies)

Homemade Canestrelli Recipe (Italian Egg Yolk Cookies)

On a sunny morning in Tuscany, a soft breeze rustled through the rolling hills, carrying the sweet aroma of Nonna’s seductive Canestrelli. Oh, these little golden jewels! Just the name “Italian Egg Yolk Cookies” makes your taste buds dance to the tarantella in anticipation. Canestrelli Read More

Authentic Filipino Beef Caldereta Recipe

Authentic Filipino Beef Caldereta Recipe

Beef Caldereta is a must-try dish if you want a meal with strong flavors and hearty ingredients. This tasty beef stew is a popular staple in Filipino cuisine and has earned a reputation for its rich taste and colorful ingredients.

Beef Caldereta is different from other stews because it is made with a unique combination of tomato sauce and liver spread (or liver pate), creating a rich and flavorful base. This is enhanced by adding vegetables like potatoes, carrots, green olives, and capsicum, which give the dish texture and nutrition.

Filipino Beef Caldereta

Beef Caldereta, also called Kaldereta, is a traditional Filipino dish that will take your taste buds on a flavorful trip. This hearty and tasty dish is a staple in Filipino cuisine. It is usually served at weddings, birthdays, and other special events.

While it is usually served with white rice, don’t be afraid to get creative and try it with other main dishes. And foodies who like to try new things can try Kaldereta made with goat meat or pork, called Kalderetang Kambing and Pork Kaldereta, respectively, to try out different flavors.

So why not make Beef Kaldereta at home and bring a taste of the Philippines to your family dinner? Your taste buds will love you for it!

Filipino Beef Caldereta

Beef Caldereta Ingredients and Substitutions

Here are some juicy details about the ingredients and how they make this Filipino dish taste so good:

Beef: Selecting the appropriate cut of beef is the key to making a tasty Beef Caldereta. Search for lean beef with some fat and connective tissue that will stay moist even after being cooked for a long time. A few great choices are chuck beef, boneless beef shank, point-cut brisket, and bone-in short ribs. So go ahead and add some of these tasty cuts to your Caldereta.

Tomato sauce: The main ingredient here is 1 can of regular tomato sauce. If you don’t have any at hand, you can use half as much tomato puree mixed with water. Another option is tomato paste, but be aware that it’s thicker than sauce, so you’ll only need about a third of the amount and will need to add water to make up the rest. So get some tomato sauce and use it to flavor your Beef Caldereta.

Liver spread: Liver spread may sound like an unusual ingredient, but trust us: it’s what makes your Caldereta go from good to great. Liver spread is a canned mixture of beef, pork, chicken liver, and other parts and fillers. It gives your Caldereta a creamy texture and lots of flavors, making it truly unforgettable. Spread some liver love on your Beef Caldereta and watch it become the star of the dinner table. You can also use liver paté for this dish. 

How to make Beef Caldereta 

Step 1: Start by heating 3-4 tablespoons of cooking oil in a pot. Add 5 crushed and chopped garlic cloves and 1 medium red onion that has been cut into small pieces. Sauté all of these things together until the onions become translucent.

Step 2: Next, add 2 lbs. of beef chuck that has been cut into cubes. Cook it until the beef chunks turn a light brown in color.

Step 3: Time to add some aroma to Beef Caldereta! Pour 4 Tablespoons of brandy into the pan and stir in 4 Tablespoons of liver spread or liver paté. Cook for a couple of minutes before adding 1 can (8 ounces) of tomato sauce and 2 cups of beef broth. Mix everything together, put a lid on your pot, and let it cook on low heat for 45 minutes to an hour. If the mixture gets dry, add some water to keep it from burning.

Step 4: Now it’s time to put in some vegetables. Add 1 cup of pitted green olives, 1 large cubed carrot, 1 large cubed potato, 1/2 cup of sliced medium red bell pepper, and 1/2 cup of sliced green bell pepper. Stir everything together, then let it cook for another 8 to 10 minutes.

Step 5: Lastly, season with salt and pepper to taste.

Filipino Beef Caldereta

Can I make Beef Caldereta in an Instant Pot?

You can definitely make Beef Caldereta in an instant pot. Not only is it possible, but it’s also a piece of cake. Just keep in mind that with all that steamy goodness locked in, you’ll need to reduce the amount of water called for in the recipe. But don’t worry, meat lovers, because the beef will release its own juices as it cooks to make up for it.

Beef Caldereta Recipe

Want a hearty, flavorful meal that will make you feel like you’re in the Philippines? Look no further than this Beef Caldereta recipe that will make your mouth water! This Filipino dish is a must-try for anyone who likes food. It has tender chunks of beef, a tasty tomato-based sauce, and veggies that smell great. So put on your apron and get ready to make a feast that will make your family and friends want more.

Ingredients

  • 2 lbs. of chuck beef, sliced into cubes
  • 5-6 garlic cloves, chopped
  • 1 diced red onion
  • 1 potato, sliced into cubes
  • 1 carrot, sliced into cubes
  • 1 cup of pitted green olives
  • ½ red bell pepper, sliced
  • ½ green bell pepper, sliced
  • 4 Tbsp of liver spread
  • 3-4 Tbsp of cooking oil
  • 8 oz of tomato sauce
  • 4 Tbsp of brandy
  • 2 cups of beef broth
  • Salt and pepper to your liking

Instructions

  • Get your cooking pot ready and add oil. Heat 3 to 4 tablespoons of cooking oil in a pot.
  • Add 5-6 crushed and chopped garlic cloves and a diced medium red onion and sauté until the onion becomes translucent.
  • Add in 2 lbs. of chuck beef that has been cut into small cubes.
  • Cook the beef chunks until they start to turn a light brown color.
  • Pour in 4 Tablespoons of brandy and mix in 4 Tablespoons of liver spread or paté.
  • After a couple of minutes, add one can (8 ounces) of tomato sauce and two cups of beef broth.
  • Mix everything together, put the lid on your pot, and let it simmer on low heat for 45 minutes to an hour.
  • If the mixture gets too dry and starts to burn, add some water.
  • Next, add in 1 cup of pitted green olives, 1 cubed carrot, 1 cubed potato, 1/2 cup of sliced medium red bell pepper, and 1/2 cup of sliced green bell pepper.
  • Mix everything together, then let it cook for another 8 to 10 minutes. Add salt and pepper to your liking.

Video Recipe

Hi there, foodie! If you just had a taste of this Filipino culinary heaven, don’t keep it to yourself. Give your Pinterest board some delight by sharing the image below. And, while you’re at it, why not make your followers’ mouths water as well? Sharing is caring, after all! 🙂

Filipino Beef Caldereta

Easy Buko Pandan Recipe (Filipino Coconut Dessert)

Easy Buko Pandan Recipe (Filipino Coconut Dessert)

Listen up, dessert fans! Summer will be here sooner than you think, and we have a treat that will blow your mind and make your taste buds dance with delight. It’s Buko Pandan, the best cold dessert in the Philippines. This delicious dessert is a Read More

Starbucks Cake Pops Recipe (Birthday & Chocolate)

Starbucks Cake Pops Recipe (Birthday & Chocolate)

Whoever thought of putting the cake on a stick deserves an award, and Starbucks Cake Pops are the crown jewel of this brilliant idea. These tiny treats never fail to improve my day; my kids love them just as much. It’s the perfect way to Read More

Authentic Greek Gyro Recipe

Authentic Greek Gyro Recipe

Have you ever tried the wonder that is a gyro? It’s easily one of my top choices regarding Greek food. Imagine juicy, flavorful meat that is baked, thinly sliced, and pan-fried until it is perfectly crisp. And the best part is? It’s all wrapped up in a warm and toasty pita and stuffed with the most delicious combination of toppings.

We’re talking about cool and creamy tzatziki sauce, refreshing cucumber, spicy red onion, and the cherry on top: crumbly, tangy feta cheese. Honestly, just thinking about it makes my mouth water! Trust me, once you try this gyro, you’ll ask yourself how you ever got by without it.

You might think you need some fancy tools to make these tasty wraps, but trust me, it’s much easier than you think.

Even though the warm pita and fresh vegetables are tasty, it’s the gyro meat that really stands out. Usually made with lamb, a mix of lamb and beef, or even chicken, the meat is heavily seasoned with garlic, herbs, and spices, making every bite taste like an explosion of flavor.

The best part is making your own gyro meat at home. You don’t need a vertical rotisserie. Just form the meat into a loaf, put it on a skewer, and bake it until the inside is juicy and the outside is crispy. Then, just cut thin pieces of meat at an angle and eat them with your favorite toppings.

So, instead of ordering out, why not make gyros at home and wow your family and friends? They’re easy to make, taste great, and will take your taste buds straight to the sunny beaches of Greece.

What is a Gyro?

Gyro is a popular Greek traditional dish with thin slices of meat that have been cooked on a vertical rotisserie. The meat is usually lamb, beef, or chicken. The meat is often served on pita bread with tomato, onion, and lettuce, as well as sauces and condiments like tzatziki, hummus, and tahini. It can also be served with this amazing Greek lemon rice

Feta cheese, olives, and hot peppers are some other common toppings. In some versions of gyro, the pita may also have French fries or other fried vegetables. Overall, gyro is a flavorful and filling dish that has become popular in many regions worldwide.

Authentic Greek Gyro Recipe

Gyro Meat Blend

Beef and/or Lamb: Traditionally, this classic Greek dish is made with both beef and lamb. Feel free to try out different ways to put things together to see what you like. Just make sure you use medium or lean ground beef. If you use extra-lean meat, the gyro will be dry.

Onion and Garlic: Pureed garlic and onion are mixed into the meat, giving the dish a flavorful punch. Pureed onion also helps keep the meat from drying out.

Herbs and spices: You’ll need a mix of herbs and spices to really bring out the authentic flavors of a Greek gyro. Think rosemary, oregano (if you can find Greek oregano), cumin, marjoram, thyme, salt, and pepper. Don’t be shy about adding these seasonings—they’re what really make the gyro sing.

How to make Greek Gyro

Step 1: Get the gyro meat ready

First, we’ll get the meat for the gyros ready:

Mix together the amount of ground beef and lamb that you want.

Add chopped onions, garlic, and any spices you like, such as cumin, oregano, paprika, and cinnamon.

Stir everything together until the meat is smooth.

Let the meat rest in the refrigerator for a few hours or overnight to get the most out of its flavors.

Step 2: Shape the meat and cook it.

Once the meat is ready, it is time to shape and bake it:

Turn your oven on to 325°F and line a baking sheet with foil.

Form the meat into a log, drop it a few times on the kitchen counter to get rid of any air pockets, and wrap it tightly in foil.

If you’re using a loaf pan instead, press the meat down to get rid of any air pockets, cover the pan with foil, and place it on the baking tray.

Put the meat in the middle rack of your oven and bake it for about an hour and a half or until the internal temperature of the meat reaches 160°F.

After 1 hour in the oven, turn the meat over once.

If you are using a loaf pan, turn the pan while it is in the oven and remove any fat or grease that builds up.

Step 3: Slice your Gyro

Once the meat is cooked, it’s time to cut it up and prepare it for the gyro sandwich:

Let the meat rest for 5 minutes after taking it out of the oven.

Once the skewer has cooled enough to manage, use it to stand up the meat and cut thin slices off of it.

In a skillet, heat some oil over medium-high heat, and cook the shaved gyro meat for about 2 to 3 minutes per side or until it is slightly crispy.

Step 4: Gyro Assembly 

Finally, it’s time to make your gyro pita sandwich:

Warm the pita bread and spread tzatziki sauce on it.

Add lettuce, tomato, and red onions on top.

Pile on your freshly sliced gyro meat.

Crumble feta cheese over it for some extra tang.

Add some French fries for a real Greek street food experience.

Roll it up tightly and wrap it in foil or parchment paper to keep it together and make it easier to eat.

Authentic Greek Gyro Recipe

Save time and effort by cooking Gyros ahead.

One great thing about gyros is that they can be made ahead of time. You can cook the meat, cut it into pieces, and keep it in the fridge for a few days. This makes it easy to put the gyros together when you’re ready to eat. Also, cooking the meat ahead of time gives it a chance to soak in a marinade and get more flavor.

Can I Freeze Gyro meat?

If you don’t plan to eat the gyros in the next two to three days, you can freeze them for 2-3 months. We suggest cutting the cooked meat into pieces before you freeze it. So, you can thaw only what you need instead of having to thaw the whole batch.

Reheating Gyro

When you’re ready to eat your gyros, you can simply reheat the meat. To do this, put a little oil in a frying pan and heat it over medium heat. Add the sliced gyros and pan-fry until heated through and crispy. Then, put the toppings and sauces you want on your pita.

Greek Gyro Recipe

Prepare to add a new favorite meal to your menu with our gyro recipe. With succulent meat, fresh veggies, and creamy tzatziki sauce wrapped in a warm pita, this flavorful dish is a must-try for every gourmet. This dish is simple to follow and sure to wow, whether you are new to Mediterranean cuisine or a seasoned chef. Now, gather your ingredients, and let’s start cooking!

Ingredients

For the Gyro Meat

  • 1 pound of ground beef, medium or lean (not too lean)
  • 1 pound of ground lamb or pork (You can use all beef)
  • 1 onion, roughly chopped
  • 6-7 garlic cloves,
  • 2 Tbsp of dried oregano
  • 1 Tbsp of dried thyme
  • 1 ½ tsp of dried rosemary, crushed
  • 2 ½ tsp of dried marjoram
  • 2 tsp of cumin
  • 3 tsp of salt, or to your liking
  • 2 tsp of black pepper

For the Gyro Pitas

  • Pitas
  • Tzatziki sauce
  • Tomatoes
  • Cooking Oil
  • Lettuce salad
  • Red onions
  • Feta cheese
  • French Fries (this is optional)

Instructions

For the Gyro meat

  • Start by cutting an onion and garlic cloves into small pieces. You can cut them up by hand or use a blender or food processor to make a smooth puree.
  • Mix the ground beef and lamb (or just beef) with the pureed onion and garlic in a large bowl or a stand mixer. Mix in all the spices until the mixture looks like a paste.
  • If you have time, cover the bowl with plastic wrap and put the meat in the fridge for a few hours or up to 24 hours to let the flavors blend.
  • Turn your oven on to 325°F and line a baking tray with foil.
  • After that, shape the meat mixture into a log and tap it a few times on the kitchen counter to remove any air pockets. Alternatively, you can shape the meat into a loaf and put it in a loaf pan.
  • Wrap the meat in foil with a skewer through the middle to keep it from drying out and to keep it from losing moisture. Make sure the foil is tightly wrapped around the meat, but be cautious not to push or bend the foil into the meat.
  • Place the wrapped gyro meat on the prepared baking tray and bake it for about 1.5 hours on the middle rack of your oven. After an hour, turn the meat over once to ensure that it cooks evenly. If you’re using a loaf pan, you can get the same result by turning the pan in the oven.
  • When the meat’s internal temperature reaches 160°F, remove it from the oven and let it rest for 5 minutes before removing the foil. Using the skewer, stand the meat up and cut thin slices from it.

Finishing and Gyro Assembly 

  • Put some oil in a skillet and heat it over medium-high heat. Cook the shaved gyro on each side for two to three minutes or until it’s slightly crispy.
  • For the Gyro assembly, put warm pita bread on a plate and add a big scoop of tzatziki sauce, lettuce, red onion, tomato, feta cheese, and some shaved gyro meat.
  • You can also add French fries for an authentic Greek street food experience.
  • Wrap the pita tightly in aluminum foil or parchment paper to keep it together and make it easier to enjoy.
  • Have fun eating your authentic homemade gyro.

Hey there! Already feel like a gyro expert? It’s time to show off your cooking skills and spread the joy of this mouth-watering Greek gyros recipe. Let’s give our Pinterest friends something to salivate over. So, come on, click that share button, and let’s make the planet a tastier place, one gyro at a time!

Authentic Greek Gyro Recipe

Mango Habanero Wingstop Copycat Recipe

Mango Habanero Wingstop Copycat Recipe

We have another chicken wings recipe for you that will knock your socks off! It’s time to enjoy the best copycat recipe for Mango Habanero Wingstop chicken wings. This recipe has just the right amount of sweetness and heat to make your mouth water. Deep-frying Read More

The Best Burrito Sauce Recipe in No Time

The Best Burrito Sauce Recipe in No Time

Have you ever been disappointed by a burrito sauce you bought at the store? If so, you need to step up your burrito game with a homemade sauce that will surpass your expectations. This burrito sauce is the real deal. It has authentic Mexican flavors Read More

Crispy Air Fryer Cauliflower Recipe with Seasoning Mix

Crispy Air Fryer Cauliflower Recipe with Seasoning Mix

With this air fryer cauliflower recipe, you’re in for a ride full of flavor. In just 15 minutes, this crispy, charred, and delicious cauliflower will make your taste buds dance with joy. We’ve added a lively mix of spices to this dish that will tingle your senses.

The outside is nicely charred and crispy, elevating the cauliflower’s natural sweetness and making you crave for more. This recipe will make your taste buds sing and your belly happy, whether you’re looking for a quick and easy side dish or a tasty snack.

Cauliflower is the unsung hero of the vegetable world. It can be used in many different ways and tastes amazing. This superfood can play any role, from a supporting role in a group of vegetables to stealing the show as a meat substitute in a main dish.

When it’s roasted in the air-fryer at 400 F for just 15 minutes, it becomes a beautiful thing with a taste and texture that will make you want more. Cauliflower is the show’s star, whether you like cruciferous veggies or want to try something new.

Crispy Air Fryer Cauliflower Recipe with Seasoning Mix

How to choose the right Cauliflower

The key to success is choosing the freshest cauliflower possible. When you’re in the produce section, look for a head of cauliflower that is free of blemishes or dark spots and has tightly packed florets and bright green leaves. The weight of the cauliflower also matters because a heavier head means it’s moist and full of nutrients, which results in flavor and enjoyment on your plate.

Do not, however, stop at weight and appearance! You want the gorgeous creamy white color and fragrant freshness that only a truly fresh cauliflower can offer. To avoid any heads with an overpowering odor, be sure to give it a good smell.

With these suggestions, you can make crispy, delectable air-fried cauliflower that is both aesthetically pleasing and delicious, and you’ll be sure to amaze your dinner guests as well.

How to cut the Cauliflower

Start by removing the leaves and any extra stem pieces from the cauliflower to prepare it for the air fryer. Just outside the stem, a quick knife motion will do.

Cut the florets from the stem with a sharp knife or gently pull them off by hand to separate them from the stem. The finished result should be snack-friendly 1-2 inches bite-sized bits.

Once it has been prepared, the cauliflower is ready for seasoning mix and to go into the air fryer, where it will be turned into a crunchy, crispy delight.

Crispy Air Fryer Cauliflower Recipe with Seasoning Mix - How to cut cauliflower

The Best Seasoning Mix for Air-Fried Cauliflower

Are you prepared to step up your roasted cauliflower game? Grab your air fryer, then, and be ready to discover a whole new culinary world!

As we all know, roasted cauliflower is excellent on its own, but adding a mixture of flavorful spices elevates it to a whole new level. We’re talking a seasoning mixture that will take this cauliflower to a whole new level!

Let’s now discuss this seasoning mixture. We’re not simply using any old spices; instead, we’re utilizing a specially formulated blend that will bring out the best in your cauliflower. What you’ll need is as follows: ground mustard, smoked paprika, red pepper flakes, turmeric, cumin, oregano, onion and garlic powder, and a dash of salt and pepper.

The red pepper flakes give spice, while the smoked paprika adds a smokey depth. The turmeric gives the cauliflower a wonderful golden color and adds a warm, earthy flavor. Oregano offers a mildly bitter, herbaceous flavor, and cumin contributes a toasty, nutty flavor. Ground mustard adds an acidic undertone, while onion and garlic powder give it a savory edge. A last sprinkle of salt and pepper enhances the natural flavors of the cauliflower.

How to make Air Fryer Cauliflower

Make the Flavorful Seasoning Mix and Combine

Let’s start by getting the seasoning mix ready. In a bowl, mix together the dry ingredients: smoked paprika, red pepper flakes, turmeric, cumin, oregano, onion and garlic powder, ground mustard, and a pinch of salt and pepper. Leave aside.

Next, cut a head of cauliflower into small pieces that are about an inch or two long. Mix the cauliflower with 1 1/2 tablespoons of vegetable oil in a large bowl, making sure that all of the florets are evenly coated.

Now, add the seasoning mix to the cauliflower and toss by hand for a minute or two, ensuring that every piece of cauliflower is covered with the tasty seasoning.

Air-Fry the Cauliflower

Heat your air fryer for 5 minutes at 400°F. When it’s ready, put the seasoned cauliflower in the basket or tray of the air fryer and use the “air fry” setting at 400°F for 15 minutes. Make sure to flip, shake, or stir the cauliflower two or three times while it’s cooking so that it browns evenly.

Serve and enjoy!

When the air-fryer timer beeps, pull the roasted cauliflower out of the air-fryer basket and serve straight away with this air fryer chicken breasts and some dipping sauce. Want to take things to the next level? Sprinkle some Parmesan cheese on top for a cheese kick!

Crispy Air Fryer Cauliflower Recipe with Seasoning Mix

How to Serve Cauliflower?

The ways to serve and enjoy this roasted cauliflower are endless. You can eat it like popcorn for a tasty snack or squeeze some fresh lemon juice on top for a refreshing change.

It’s also the perfect side dish for almost any meal and goes especially well with pork chops, pork tenderloin, chicken, or fish.

Air Fryer Cauliflower Recipe

Now it’s time for a detailed recipe for a yummy ride with this air fryer cauliflower! Forget about bland, boring veggies because this recipe is anything but that. We’re talking about tender and crunchy cauliflower florets that have been perfectly seasoned and cooked to a golden-brown crisp in just a few minutes.

Ingredients

  • 1 head of cauliflower, fresh
  • 1 tsp of salt
  • ½ tsp of smoked paprika
  • ¼ tsp of turmeric powder
  • ¼ tsp of cumin
  • ½ tsp black pepper
  • ½ tsp of ground mustard
  • 1/3 tsp of oregano
  • ½ tsp onion powder
  • ½ tsp garlic powder
  • 1-2 Tbsp of vegetable oil
  • Parmesan cheese, optional

Instructions

  • First, take off the leaves and trim the stem. Then, cut the cauliflower into bite-sized pieces about 1 to 2 inches.
  • Next, mix all of the dry seasoning ingredients together in a separate bowl and set it aside.
  • Put the cauliflower bites in a large mixing bowl and drizzle them with vegetable oil, making sure to cover them well.
  • Add the prepared seasoning mix to the bowl and mix everything together until the cauliflower is uniformly coated.
  • Before putting the seasoned cauliflower in the air fryer, heat it for 5 minutes at 400°F.
  • Air-fry the cauliflower for 15 minutes, shaking or stirring the basket a couple of times to ensure it browns evenly.
  • Once the cauliflower is cooked perfectly, take it out of the air fryer and serve it immediately.
  • You can eat your delicious and healthy air-fried cauliflower as a snack or side dish with your favorite dipping sauce.

Do you love thist recipe for air fryer cauliflower? It’s a snack you can eat without feeling bad about it. It’s crunchy, tasty, and just plain good! Don’t keep the secret all to yourself. Share the image below on your Pinterest board to spread the love. Your friends and followers will thank you for giving them ideas, and you’ll be known as the greatest foodie guru. 🙂


Crispy Air Fryer Cauliflower with Seasoning Mix

Air Fryer Cauliflower Video

How to Make Corn Nuggets in No Time

How to Make Corn Nuggets in No Time

Have you ever wanted a fast and easy-to-make snack that is crunchy and savory? Look no further than corn nuggets you make yourself. These tasty little nuggets have a crispy outside and a moist, flavorful inside that will make your taste buds dance happily. And Read More