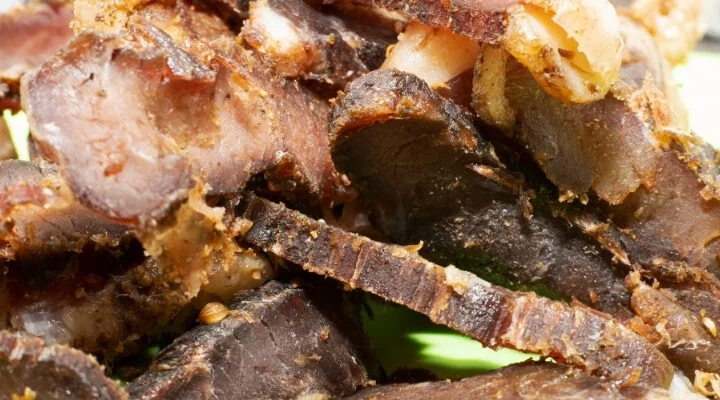
Easy and Delicious Recipes

Recent Posts

Maja Blanca Easy Recipe

Maja Blanca Easy Recipe

This a super simple homemade Maja Blanca recipe that I will teach you how to make so it’s nice and soft. The sweetness is not excessive and is packed with a rich corn and coconut flavor. You may use dry latik on the top to Read More

Homemade Carrabba’s Chicken Bryan

Homemade Carrabba’s Chicken Bryan

“Carrabba’s Chicken Bryan” is one of my all-time favorite restaurant dishes. I simply enjoy the chicken bits smothered in a zesty lemony basil sauce with a bit of goat cheese added on top. I like having this with mashed potatoes on the side because I Read More

Chicken of the Woods Recipe

Chicken of the Woods Recipe

Are you looking to venture into our Chicken of the Woods recipe? Well, if you enjoy delicious wild mushrooms that have a similar texture and taste to chicken, then this is a recipe worth digging your teeth into during the coming week!


Chicken of the Woods is commonly a meat substitute due to the similarities it bears with chicken. They are a highly versatile mushroom that you can saute naked in a pan, fry and steam them, bread them – the possibilities are endless when it comes to creating a beautifully tasty dish that is both succulent and pleasing to look at.


No matter what time of year you cook Chicken of the Woods, the mushroom harmonizes with most seasonal savory treats and can be a gorgeous dinner no matter the weather.


Chicken of the Woods

Does A Chicken of the Woods Really Taste Like Chicken?


Often in the case of frog, opossum, and squirrel, the phrase ‘’tastes like chicken’ is loosely thrown about as an unfortunately dishonest descriptor of their flavor, to try and make the dish seem more palpable to even the pickiest of eaters. Yet, this mushroom truly tastes like chicken.


Boasting a meaty, stringy texture that absorbs moisture and retains the succulent flavors of the mushroom  – this is the closest faux chicken substitute you’ll likely ever find.


What more could you want than a healthy option that tastes great?


Identifying Chicken of the Woods


Out of all mushrooms you can forage, Chicken of the Woods tends to be a relatively easy mushroom to categorize due to its unique characteristics.


Because of the bright orange mass-like quality of the mushroom that tends to encompass tree trunks or the base of hardwood trees – this is a mushroom you can spot from far away. The mushroom tends to grow in shelves ranging from bright orange or yellow at the base that fades into a pale whitish color towards the outer edge.


With the underside lined generously with tiny pores, this polypore mushroom releases its spores from small tube structures instead of gills – pretty cool right?


Health and Safety for Chicken of the Woods


  • Don’t eat Chicken of the Woods raw: Like most wild mushrooms, eating them raw can cause stomach upset – so cook them thoroughly before consuming to be on the safe side!
  • Can cause sickness: If eaten in large quantities, some people can experience gastrointestinal distress. So if you’ve never tried Chicken of the Woods, sample a small amount and observe how it reacts with your body.
  • Avoid conifer or eucalyptus trees: It is crucial that you avoid Chicken of the Woods, which is growing on the base of conifer or eucalyptus trees, as these trees permeate the mushrooms with toxins that are absorbed into the flesh.


Cleaning Chicken of the Woods


It’s essential to clean your Chicken of the Woods thoroughly, so start by separating the shelves carefully to access every aspect so that this cleaning process is simple and quick.


Use a gentle mushroom brush to remove any large dirt particles, and then quickly wipe your mushrooms over with a damp paper towel or cloth to ensure that they are squeaky clean and ready for use!


However, if you’re mushrooms are filthy (like mine tend to be!), start off by soaking the mushrooms briefly to remove any dirt or cheeky creepy crawlies that might be lurking inside. Just be careful you don’t soak them too long in case they become waterlogged and lose that gorgeous flavor!


How to Make Sautéed Chicken of the Woods

Chicken of the Woods Recipe


Ingredients

  • 2 tablespoons extra virgin olive oil.
  • 1 pound tender Chicken of the Woods cleaned (sliced into 1/2′ strips).
  • 2 shallots (sliced).
  • 3 cloves garlic (sliced).
  • 1/2 teaspoon sea salt
  • 1/4 teaspoon freshly cracked black pepper
  • 1/2 cup dry white wine
  • 2 teaspoons fresh lemon juice
  • 2 tablespoons fresh parsley chopped

Instructions

  • After your mushroom has been gently scrubbed and dried, slice or tear it into one-inch pieces.
  • Heat two tablespoons of olive oil in a large skillet on medium heat before starting to introduce your mushroom slices in a single layer.
  • Gently fry the mushrooms for about 5 minutes as they turn a deep golden brown.
  • Next, slice some shallots and garlic and throw them into the mix alongside some salt and pepper.
  • Cook for a further 5 minutes until the shallots appear soft to the touch, then follow this by pouring a generous ½ cup of dry white wine into the mix.
  • Now simmer until the mushrooms absorb a majority of the dry wine.
  • Now stir in some fresh parsley and lemon juice to fully bring out the gorgeous flavors of the Chicken of the Woods.

Fried Chicken of the Woods

Ingredients

  • 4 x 2 oz pieces of young chicken of the woods, the size of a small fist.
  • All purpose flour, as needed for breading, roughly 1 cup
  • kosher salt and fresh ground black pepper to taste
  • 1 generous pinch of sweet paprika
  • 1 small pinch of cayenne pepper
  • 3 eggs for breading
  • A few sprigs of fresh thyme optional
  • Small clove of garlic crushed lightly with the back of a knife optional
  • Lemon wedges for serving

Instructions

  1. Gather your Chicken of the Woods mushrooms and trim off the stem and the tough parts of the mushroom from where it previously was attached to the tree.
  2. Gently scrub and dry the mushrooms to help the later absorption of seasoning (following the guidelines we suggested before!).
  3. Season the flour with salt, pepper, paprika, and cayenne to give the flour some color and some taste! Just go easy on the cayenne – unless you like things on the spicier side of life.
  4. Liberally coat the mushrooms in flour, then egg, and coat in flour once again.**
  5. Heat a skillet with ¼ cup of cooking oil, followed by a generous 2tbsp of unsalted butter, before adding your breaded chicken mushrooms, crushed garlic clove, and thyme.
  6. Cook the Chicken of the Woods until they are golden brown on either side, so for approximately 4-5 minutes per side. Ensure you add extra oil if the pan dries and carefully blot the mushrooms following frying to catch the excess oil.
  7. Sprinkle with some salt or red-eye gravy and salad before serving immediately.

Notes

**If your Chicken of the Woods have been in the fridge for a day too many, they may have grown dry – which will make them troublesome to coat! So consider steaming them and patting them dry prior to coating if they appeared to have dried out so that they can be thoroughly coated/

Like your typical chicken fried steak, these would be fine with some red-eye gravy, or just a few lemon slices and a green salad for a lighter touch.

Easy Popcorn Chicken Recipe

Easy Popcorn Chicken Recipe

Craving a takeout but resenting the cost and the unhealthiness? Well, I’m here to help! Sure, it may still be more on the cheat day side of life, but my delicious and easy popcorn chicken recipe will have the whole family coming back for more. Read More

Roasted Beef Shank Recipe

Roasted Beef Shank Recipe

Fancy something different for dinner tonight? Our delectable roasted beef shank recipe, topped with a gorgeous vegetable medley, is the ideal comfort food for those looking to warm up during the week with a fragrant and flavourful meal! Whether you prefer to slow cook or Read More

How To Cook Mahi Mahi Easy Recipe

How To Cook Mahi Mahi Easy Recipe

Hey People!!! Today I’m here with another exciting recipe on how to cook Mahi Mahi perfectly suitable for the chilly winters. Mahi-Mahi is a widely famous fish found in tropical, subtropical, and temperate off-shore waters worldwide.

Its name, “Mahi-Mahi,” comes from the Hawaiian language and means “Very Strong.” The ray-finned fish is also known as common dolphinfish but don’t confuse it with the real dolphin. It’s also widely known as Dorado (its Spanish name). This golden-skinned lean fish is commonly found in the waters around Hawaii, Costa Rica, the Gulf of Mexico, and the Indian Ocean.

This fish has a strong texture and can be baked, fried, grilled, broiled, or seared. Whatever cooking method you use, this fish is perfect for all. This is a great, low-priced, fantastic fish that tastes just remarkable and gives a beautiful brownish texture.

 Buy the best mahi-mahi

Many factors determine the freshness and firmness of mahi-mahi. The most important of which is how the fish is caught. The fish selection guided by the Monterey Bay Aquarium Seafood Watch divided the fish into three basic categories depending upon their quality, firmness, and freshness.

According to this website:

  • Best – The best mahi-mahi is caught in the U.S. Northwest and Western Central Atlantic Oceans with hand lines and trolling lines.
  • Second-best – The second-best mahi-mahi is caught by the U.S Ecuadorian and Panamanian fleets or in the Eastern and Western Central Pacific oceans in the unassociated purse seine fishery. These fishes are ranked second-best because some issues are linked to overfished or at-risk species in these areas.
  • Avoid – It is recommended to avoid all other mahi-mahi imported from the Pacific, Indian, and Atlantic Oceans other than the specified areas for best mahi-mahi.

Note: Whenever you go to the market to buy mahi-mahi, keep the criteria mentioned above in mind and avoid imported mahi-mahi, as most of the mahi-mahi available in the US is imported.

Hawaiian Mahi Mahi Recipe

Ingredients

  • 4 mahi-mahi fillets (4–6 oz each)

  • 1 medium lemon

  • 1 clove garlic, finely chopped

  • 1¼ tsp kosher salt, plus more to taste

  • ¼ tsp freshly ground black pepper

  • 2 tbsp olive oil

  • 4 tbsp cold unsalted butter, cut into 4 pieces

  • 1 tbsp fresh parsley, chopped


Instructions

  1. Prep the Lemon & Fish

    • Cut the lemon in half. Squeeze the juice from one half (about 1½ tbsp). Slice the other half into thin rounds.

    • Pat the mahi-mahi fillets completely dry with paper towels.

    • Season both sides with 1 tsp kosher salt and black pepper.

  2. Sear the Fish

    • Heat olive oil in a large cast-iron or nonstick skillet over medium-high until shimmering and just starting to smoke.

    • Place the fillets in the pan and sear without moving them for about 3–4 minutes, until the bottoms are golden brown.

    • Flip and cook the other side for 2–4 minutes, depending on thickness, until the fish is opaque and flakes easily.

    • Transfer to a serving platter.

  3. Make the Lemon Butter Sauce

    • Lower the heat to medium-low. In the same skillet, add the lemon juice, garlic, and ¼ tsp kosher salt. Scrape up any browned bits with a wooden spoon.

    • Add the lemon slices and butter, one piece at a time, letting each melt before adding the next.

    • Stir in parsley and remove from heat.

  4. Serve

    • Spoon the sauce over the mahi-mahi and serve immediately.


Tips for Best Results:

  • Dry fish + hot oil = crisp, golden crust.

  • Thicker fillets need the longer side of the cooking time.

  • For a spicy kick, add a pinch of red pepper flakes to the sauce.

How to serve Mahi-Mahi?

This recipe of mahi-mahi is so amazing. It will give you the most delicious fish fillets ever. These mahi-mahi fillets are so delicious that you can eat them without any serving options. However, if you like, you can have it with rice, mashed potatoes, or golden bread toast.

They would be great serving partners. You can also pair it up with some green vegetables like asparagus, brussel sprouts, green beans, broccoli, and more of your choice. A salad is always the best option. To make the recipe even more Hawaiian, serve it in a pineapple bowl. Just make a pineapple boat with some coconut rice and wonderful salsa. 

How To Cook Mahi Mahi Easy Recipe

Ghirardelli Brownie Mix Easy Recipe

Ghirardelli Brownie Mix Easy Recipe

Want to give a Ghirardelli chocolate twist to your Classic brownies? Then look no further! I am here with another fun and exciting recipe that will be quite special for the ones who love sweets and desserts. By the way, who doesn’t love classic brownies? Read More

Subway Bread Copycat Recipe

Subway Bread Copycat Recipe

Subway is a famous American restaurant chain that sells the best sandwiches, salads, and beverages around the globe. Their sandwiches are so good that you instantly become a fan. The good thing is you can make sandwiches like theirs at home too. But first!!! Let’s Read More

Crustless Creamy Cheesecake Recipe

Crustless Creamy Cheesecake Recipe

Hello people! Today I’m going to share another exciting recipe, and it’s Crustless Creamy Cheesecake. This recipe is not only unmatchable in taste but low on carbs as well. Because of its low-calorie content, this recipe fits best in a keto diet plan. So, if you’re following any keto diet plan, you can surely satisfy your dessert cravings with this amazing crustless cheesecake.

This recipe is unique in the way that it has no crust and is baked on a pie plate. It creates its own beautiful crust when baked in the oven. The crust is then topped with a sour cream topping. The ingredients of this recipe are plain and simple. This recipe is so easy to make that anyone without any baking experience can bake an excellent cake out of it.

The best thing about this recipe is that you can have it anytime. It’s fit for everyday and special occasions like Christmas, Thanksgiving, etc. Having this recipe on the table makes your meals even more special.

Low-Carb Crustless Creamy Cheesecake

The special thing about this recipe is that it’s a sugar-free version of cheesecake and is low on calories. It goes well with the keto diet and will surely satisfy your cravings for dessert. It does not have any crust and creates its own unique crust that’s topped with sour cream to take it to another level of taste. This recipe is best suitable for diabetic people too.

So let’s move forward to the recipe for crustless cheesecake.  

Crustless Creamy Cheesecake Recipe


Ingredients

For Cheesecake

  • 16 ounces of reduced-fat Cream Cheese (softened)
  • 4 Eggs (large)
  • 1/2 cup of Sukrin (Powdered)
  • 1/2 tsp. of Stevia Glycerite
  • 1 tbsp. of Vanilla Extract
  • 1/4 tsp. of Lemon Extract (optional)
  • 1/4 tsp. Of Orange Extract (optional)

Sour Cream Topping

  • 16 ounces of Sour Cream
  • 2 tbsp. of Sukrin (powdered)
  • 1 tsp. of vanilla Extract
  • Nutmeg powder (optional)

Instructions

  • Preheat the oven to 325°F.
  • Take a pie plate of size 9 ½ – 10 inches and spray it with baking spray.
  • Add softened, fat-reduced cream cheese into a medium mixing bowl.
  • Beat the cream with a hand mixer until it gets smooth and even.
  • Now add powdered Sukrin, stevia glycerite, and one egg. Beat it again until it gets mixed well, and the mixture gets smooth.
  • Add the remaining eggs one by one while beating the mixture consistently.
  • Add vanilla and lemon extract and mix it again until it gets smooth and puffy.
  • Add this mixture to the pie plate and bake it in the preheated oven for about 30 minutes.
  • After 30 minutes, the cream cheesecake will puff up, and the edges will get brown.
  • Remove the cake from the oven and let it cool for about half an hour.

Sour Cream Topping:

  • Take a bowl and add sour cream to it.
  • Now add powdered Sukrin and vanilla extract into the sour cream and mix it well until the Sukrin gets dissolved.
  • Your sour cream mixture is ready. Add a layer of sour cream to the top of the cheesecake.
  • Sprinkle the powdered nutmeg on top of the sour cream.
  • Now place the cake back into the oven and bake it again at 325°F for 15 – 20 minutes.
  • Take the cream cheesecake out of the oven and let it cool.
  • Place the cake into the refrigerator overnight.
  • Serve it to your loved ones and enjoy 

Some Important Tips:

  • You can use Greek yogurt for topping instead of sour cream. It also serves as the best topping.
  • You can change the texture of the cake by beating it more. A less-beaten cheesecake will have a darker color. To get a light-colored cheesecake, beat the cream cheese mixture more before baking.
  • You can add lemon extract along with the vanilla extract to give a tangy twist to the flavor. But that’s optional. You can skip it if you don’t like it.
  • If your cake gets cracks when baked in the oven, don’t worry. The sour cream topping will hide them all.
  • It’s recommended to add Stevia Glycerite as a sweetener as it is the only liquid stevia that doesn’t get bitter and works well in all baking recipes.
  • It’s better to refrigerate the cream cheesecake overnight. Because the more it sits, the better it gets.
Oven Baked Beef Jerky Easy Recipe

Oven Baked Beef Jerky Easy Recipe

Today I’m here with another delicious and mouthwatering easy recipe, and that is… Oven Baked The Beef Jerky. It’s totally different from the regular recipes and serves as the best snack for everybody.  What is Beef Jerky? Beef Jerky is basically dried lean beef strips Read More