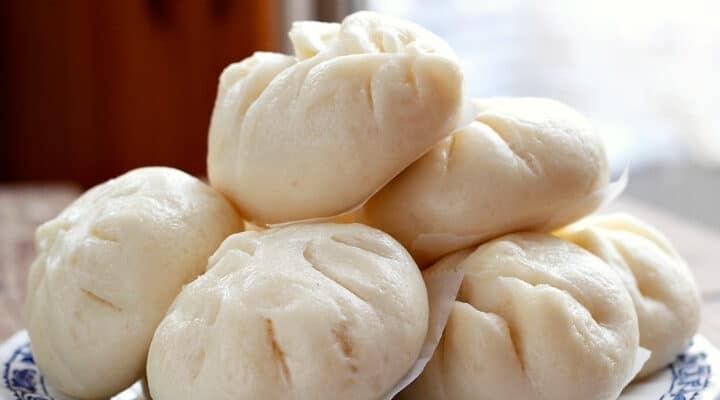
Easy and Delicious Recipes

Recent Posts

Homemade Pan-Fried Walleye Recipe

Homemade Pan-Fried Walleye Recipe

Are you ready for this amazing homemade pan-fried walleye recipe? Walleye is undisputedly the champion of fish-dish in states like Minnesota or Wisconsin. It’s a good reason. It has a mild, sweet flavor, while its flesh, which is white, is firm, and flakey. Walleye is Read More

The Best Wet Burritos Recipe (Smothered Burritos)

The Best Wet Burritos Recipe (Smothered Burritos)

Are you ready for the best-ever Wet Burritos? Smothered burritos are made with ground beef and refried beans and wrapped in large tortillas. They’re topped with red sauce and melted Mexican mix cheese. Serve this tasty authentic Mexican dish with your favorite toppings, such as Read More

Easy Vanilla Sponge Cake Recipe

Easy Vanilla Sponge Cake Recipe

Here is the recipe for the perfect Vanilla sponge cake. This super-soft, easy-to-make vanilla sponge cake is the best delight for any occasion.

Whether it’s your daughter’s birthday or you want to make your Christmas eve memorable, my easy cake recipe will let to celebrate your special events to the next level.

When a soft and spongy cake, layered with fluffy and creamy frosting, enters your mouth, the taste and flavor will amaze you leaving a lasting impression on your taste buds.

Without any delay, just get into the recipe and make your day sweet and smiley.

Vanilla Cake Ingredients

  • All-Purpose Flour: 2 ½ Cups
  • Buttermilk: 1 cup
  • Baking powder: 1 TBSP
  • Salt: ½ TSP
  • Soft unsalted butter: 1 cup
  • Eggs: 4
  • Pure vanilla extract: 4 TSP
  • Granulated sugar: 1 ½ Cup

Buttercream Frosting Ingredients

  • Unsalted butter: 1 ½ cups
  • Castor sugar: 5 Cups
  • Vanilla extract: 4 TSP
  • Heavy cream: 5 TBSP
  • Salt: ¼ TSP

Directions.

  • Preheat the oven to 350F with the rack in the center of the oven.
  • Next, brush the sides and bottom of two 9-inch baking pans with melted butter. Then, sprinkle some flour on the baking pan. Tap the sides to remove extra flour. These two steps will help in the easy release of baked sponge cake.
  • Take a medium-sized bowl. Add in the flour, baking powder, and half a teaspoon of salt. Mix everything together.
  • To a bowl of a standing mixer, add unsalted butter and granulated sugar. Now beat everything on medium to high speed for 5 minutes.
  • Once you see the fluffiness in the bowl, add in eggs. Beat one egg at a time, then add another egg. Make sure each egg is well-mixed with the butter and sugar mix before adding the next egg.
  • Next, add in the vanilla extract.
  • Then, whisk in the dry ingredients, followed by the addition of buttermilk. Beat until everything is combined.
  • Now divide this batter into two baking pans and spread them evenly.
  • Now bake the cake in the oven at 350F for 3o minutes.
  • When a skewer inserted in the center comes out clean, you are done with making your sponge vanilla cake.
  • Allow the cakes to rest for 10 minutes before taking them out of their pan.
  • Now let the cake cool down completely on a wire rack.
  • Meanwhile, move on to making vanilla buttercream frosting.

Vanilla Buttercream Frosting Preparation

  • In the bowl of a stand mixer, beat your unsalted butter for 5 minutes at high speed until it gets a light creamy texture.
  • When the butter is evenly blended, add in 1 tablespoon of castor sugar, beat it, and well incorporate, following another tablespoon of sugar.
  • When the sugar is well-beaten in parts, add in the vanilla extract.
  • To make a thick consistency, add heavy cream to the bowl. Beat it.
  • The best vanilla frosting is ready to make your sponge cake more delightful and yummy.
  • Place the first layer of cake on the cake platter, and cover it with a layer of frosting. Put on the second cake layer and evenly apply frosting on the cake.
  • Now decorate the cake according to your choice.
  • Your perfect vanilla sponge cake layered with fluffy and creamy frosting is ready to go.

Tips & Tricks

  • Accurately weigh all the ingredients.
  • Sift powdered ingredients to make a smooth and clumps-free batter.
  • Use ingredients at room temperature to make a smooth and thick batter.
  • Avoid over-mixing the wet ingredients with the dry ingredients to achieve the desired texture.
  • Add all the wet ingredients in the right amount, e.g., use large eggs rather than small eggs.
  • The batter must be evenly divided in both pans. Using a kitchen scale will help you in the equal division of the batter in both pans.
  • Always allow the cake to cool completely, or otherwise, your frosting will melt, making your cake the least tempting.

Pin the image below if you like this vanilla sponge cake recipe!

Easy Vanilla Sponge Cake Recipe

FAQs

How to store vanilla sponge cake?

To best store vanilla sponge cake, wrap the slices of cake in a cling film and then place them in an air-tight box. This way, you can store the cake for 4 to 5 days. Cling-wrapping the cake will keep it moist and soft. If you want to store the cake for longer, then you can refrigerate the cake for 1 week.

What if my cake is undercooked?

If your cake is not properly cooked in the given time, it means your oven was not preheated. Note the temperature of the oven with the help of a thermometer, and bake the cake for a few minutes more until the skewer comes out dry and clean.

What adds fluffiness to the sponge vanilla cake?

The softness and fluffiness in the sponge vanilla cake are the results of the creaming process. When the butter is mixed with sugar, the creaming process occurs due to the entrapment of the tiny air bubbles. This makes your cake aerated and fluffy. The release of carbon dioxide gas by rising agents plus these air bubbles contributes to the fluffy texture of the cake while baking.

Why does my vanilla sponge cake always gets deflated?

A vanilla sponge cake is more prone to deflating than any other type of cake because it contains eggs in large proportions. It also contains air in large amounts. When the cake is allowed to cool, it gets deflated due to the release of heat. To fix this, make sure the door of the oven is closed properly to maintain the required amount of heat in the oven.

Nutrition Facts

Serving size: 1 slice (89g)

  • Calories in one slice: 330
  • Carbohydrates: 39g
  • Fats: 16g
  • Proteins: 3g

Conclusion:

Vanilla sponge cake is just a perfect fit to make your day memorable. I have best tried to write for you the simplest and easiest cake recipe. I hope you liked it, and if you really did, get into the recipe and give it a try.

Share this delicious cake recipe with your loved ones and add some sweetness to their life.

Thanks!

Basque Burnt Cheesecake (Ultimate Recipe)

Basque Burnt Cheesecake (Ultimate Recipe)

Basque Burnt Cheesecake is creamy on the inside, caramelized on top and now, with this recipe it’s easy to make. The cheesecake’s distinctive dark, rich top is made by baking at high temperatures. For a foolproof recipe, follow my tips and tricks to be able Read More

How to make Nihari – Pakistani Beef Stew Recipe

How to make Nihari – Pakistani Beef Stew Recipe

Today I’m going to show you how to make Nihari, one of the most popular Pakistani Beef stews; this recipe is quick and easy to make. It takes only one pot and requires less than 30 minutes to prepare. This recipe contains instructions for making Read More

Crispy Air Fryer Chicken Nuggets Recipe

Crispy Air Fryer Chicken Nuggets Recipe

Air Fryer Chicken Nuggets are a healthier option than cooking with other methods, and it’s way easier to prepare them this way. They cook perfectly crispy and have tender, juicy chicken inside. I will show you two versions, one with store-bought frozen chicken nuggets and how to make air fryer chicken nuggets from scratch.

You can also try my Air Fryer Pork Chops, Air Fryer Pork Tenderloin, Air Fryer Frozen French Fries, Air Fryer Corn Dogs, and Air Fryer Hamburgers.

My husband is just as excited about these Air fryer chicken nuggets as my children are. They are quick to prepare and take only a few minutes to fry.

Ingredients

Chicken & Quick Brine

  • 2 lb boneless, skinless chicken breasts, cut into 1½-in nuggets (about 3–4 cm)

  • ½ cup dill pickle juice (120 ml)

Wet Dip

  • ½ cup whole milk (120 ml)

  • 1 large egg

Breading

  • 1 cup all-purpose flour (120 g)

  • 2 Tbsp cornstarch (optional, extra crunch)

  • 3 Tbsp powdered sugar (confectioners’)

  • 1 tsp kosher salt (or ½ tsp table salt)

  • 1 tsp freshly ground black pepper

  • ½ tsp paprika

  • ½ tsp chili powder

  • ½ tsp baking powder

  • ½–1 tsp cayenne (optional, heat to taste)

To Cook

  • Neutral oil spray (canola/avocado)


Instructions (Air Fryer)

  1. Brine (20–60 min). Toss the chicken with the pickle juice in a bowl or zipper bag. Chill 20–60 minutes. Drain well and pat very dry.

  2. Set up. In one bowl, whisk milk + egg. In a large bag or bowl, mix all breading ingredients.

  3. Double-coat.

    • Add chicken to the breading, toss to coat; shake off excess.

    • Dip into the milk-egg, letting excess drip.

    • Return to the breading and coat again. Press lightly so it adheres. Rest breaded pieces on a rack 5 minutes so the coating sets.

  4. Air fry. Preheat air fryer to 380°F (193°C). Lightly spray basket. Arrange nuggets in a single layer with space. Spray tops generously.

    • Cook 7 minutes. Flip, spray again, increase to 400°F (205°C), and cook 5–7 minutes more, until crispy and 165°F (74°C) in the thickest piece. Work in batches; don’t overcrowd.

  5. Season & serve. Sprinkle with a pinch of salt while hot. Serve with your favorite dips.


Oven Option

  • Heat to 425°F (220°C). Set a rack on a sheet pan and spray lightly. Arrange nuggets, spray tops, and bake 12–14 min. Flip, spray again, and bake 8–10 min more, until crisp and 165°F.


Tips

  • Crispier finish: Don’t skip the rest after breading and the oil spray on both sides.

  • Flavor twist: Add ½ tsp garlic powder to the breading or a dash of hot sauce to the milk-egg.

  • Make-ahead: Brined (undipped) chicken keeps up to 24 hours in the fridge. Bread just before cooking.

  • Reheat: Air fry 375°F (190°C) for 4–6 min to re-crisp.

Pin the image below if you like these crispy chicken nuggets!

Air Fryer Crispy Chicken Nuggets

Frozen Chicken Nuggets – Which Brand is Best?

Many brands offer different sizes and thicknesses for chicken nuggets. For a few nuggets, try a small batch. Once you have cooked a few batches, you can determine your brand’s best temp and cooking time. You will also notice a decrease in crispy time the more you cook it. You should be flexible and ensure the nuggets have been cooked to your satisfaction.

Frozen chicken nuggets made from organic brands are great for use in the fryer. Organic brands are great for consuming more chicken nuggets; you can eat them without worrying about what you eat!

Air Fryer Frozen Chicken Nuggets

Air Fryer Frozen Chicken Nuggets

Many factors influence the outcome of frozen chicken nuggets cooking. You will need to adjust the timing because they all have different sizes, thicknesses, and coatings. Don’t fill the basket with too many chicken nuggets. This will make it difficult to cook evenly. Only fill a single layer with chicken nuggets. Air fryers cook at different temperatures. After you have cooked your first batch, you will be able to determine what size and type of food work best for you. These recipes were tested with basket-style air fryers.

Ingredients

  • 8 ounces (170 g) Frozen Chicken Nuggets

Recipe

  • The frozen chicken nuggets should be placed in an air fryer basket. Spread them out evenly. You don’t need to spray oil.
  • Air fry at 360 F/205 C  for 6-8 minutes
  • Flip the nuggets and cook for an additional 3-4 minutes at 360degF/205degC or until crispy.

Calories: 453 kcal Carbohydrates: 25g Protein: 43g Fat: 19g Saturated Fat: 4g Cholesterol: 147mg Sodium: 712mg Potassium: 501mg Fiber: 1g Sugar: 5g Vitamin A: 390 IU Calcium: 71mg Iron: 3mg

Have You Made This Recipe?

Tag @cookingfrog on Instagram and Pinterest.

Please rate and comment below! Your experience is greatly appreciated.

Original Pakistani Chicken Tikka Recipe

Original Pakistani Chicken Tikka Recipe

This was a must! Recipes here on Cooking Frog needed to include a traditional Pakistani Chicken Tikka recipe. There are some recipes that have become so popular that there’s no right or wrong way to do them anymore. Chicken Tikka falls into that category. Even Read More

Crispy Onion Bhaji Recipe – Indian Kanda Bhaji

Crispy Onion Bhaji Recipe – Indian Kanda Bhaji

Step-by-step recipe for Crispy Onion Bhaji, Indian Kanda Bhaji Recipe. Onion Bhaji is fried onion fritters. These crispy fritters are made mainly from onion and gram flour (besan). This street food is very popular in Maharashtra. There are many ways to prepare them. Here is Read More

Smoked Chicken Breast Recipe – Glazed and Barbecued

Smoked Chicken Breast Recipe – Glazed and Barbecued

Here is a recipe for glazed and barbecued smoked chicken breast. So tender, so juicy. A nice crispy outer layer of the chicken breast and supper supple inner texture with an extraordinary amazing aroma turns out to be an amazing cuisine.

Smoked chicken breast is a perfect addition to your events. It goes well with any backyard get-together.

It’s so easy to make; prepare the seasoning, apply it to the chicken breast, and let it get smoked.

You must read this article and get into cooking the best-smoked chicken ever.

Ingredients

Chicken

  • 3 boneless, skinless chicken breasts (about 2–2½ lb total)

  • 1 Tbsp neutral oil (to coat)

Dry Rub (balanced, not overpowering)

  • 2 Tbsp light brown sugar

  • 1 Tbsp sweet paprika

  • 1 tsp chili powder

  • 1 tsp garlic powder

  • 1 tsp onion powder

  • 1 tsp freshly ground black pepper

  • 1¼–1½ tsp kosher salt (use ¾–1 tsp if table salt)

  • ⅛–¼ tsp cayenne, to taste

Glaze

  • ¼ cup BBQ sauce

  • 2 Tbsp apple cider vinegar

  • 1 tsp brown sugar

  • Pinch cayenne (optional)

Pellets: Pecan (as you noted), or mix pecan + apple for a slightly sweeter smoke.


Instructions

  1. Prep the chicken (10 min):
    Pat dry. Trim any thick ridges so pieces are a fairly even thickness (aim ~¾–1 in). Lightly coat with oil.

  2. Season:
    Stir the dry rub together. Sprinkle generously on all sides (you may not need every last bit). Press to adhere.
    Tip: Refrigerate 15–30 min uncovered to help the rub set while you heat the smoker.

  3. Preheat smoker:
    Fill hopper with pecan pellets. Preheat to 250°F (121°C). Clean and oil the grates.

  4. Smoke:
    Place breasts on the center rack. Smoke until an instant-read thermometer in the thickest part reads 140°F (60°C), about 30–40 min depending on size.

  5. Make the glaze:
    Whisk BBQ sauce, vinegar, brown sugar, cayenne. You want a runny, brushable consistency—add a splash of water if needed.

  6. Glaze & finish:
    Brush both sides of the chicken with glaze. Continue smoking until the internal temp reaches 162–165°F (72–74°C), about 15–25 min more. (Thinner pieces finish faster.)

  7. Rest & serve:
    Transfer to a board, tent loosely with foil, and rest 10 minutes (carryover brings it to 165°F). Slice across the grain and serve with extra glaze.


Notes & Tips

  • Don’t over-salt: Breasts are lean—this rub is scaled to season without turning them briny.

  • Juiciness cue: Pull at 162°F if you plan a 10-minute rest; you’ll hit 165°F as it rests.

  • No smoker? Roast at 375°F (190°C) on a rack until 140°F, glaze, then finish to 165°F (total 22–30 min).

  • Wood swaps: Hickory is stronger; apple/cherry are milder. Pecan sits nicely in the middle.

Pin the image below if you like this recipe!

Smoked Chicken Breast Recipe Glazed and Barbecued 2


Tips & Tricks for Perfect Smoked Chicken Breasts

  • It is better to warm up the glaze for 60 seconds so that everything gets well mixed.
  • If you don’t like a very spicy smoked chicken, then you can re-adjust the seasoning by reducing the quantity of cayenne.
  • Put a thick layer of glaze to make a saucy chicken.
  • Keep an eye on the temperature, the key point of making tender and juicy chicken. I would suggest you double-check the temperature with another thermometer.
  • You may always utilize what rub ingredients you already have or buy a chicken rub from your favorite barbecue restaurant or your local supermarket if you don’t want to buy all of the individual ingredients for this recipe. The combination of the smoky flavor of the wood chips and the barbecue sauce is the key to this recipe’s success.

FAQs

How to store the leftover smoked chicken?

You can store the leftover smoked chicken in the refrigerator for 24 hours. If you want to store it for longer, then place the leftover in a vacuum-sealed box and freeze it for up to 1 month. This way, you can enjoy the meal later on.

How can I reheat the frozen smoked chicken?

To reheat frozen smoked chicken breast, thaw the chicken overnight in the refrigerator. The next day, wrap it in aluminum foil with a small opening left on it. Add a few drops of water via the opening. Then transfer the chicken to an oven and reheat it until it hits a temperature of about 165 degrees F.

Is it necessary to bring the chicken?

No, it’s not. Well, it also depends on your choice. I don’t like bringing the chicken to save my time and energy. If you have good control over the temperature throughout the process, then you will be able to cook a perfect smoked chicken even without getting it brined. If you plan to brine the chicken before smoking, then allow the chicken to get brined for 4 hours to attain the juiciest texture.

Why does my smoked chicken breast get dried?

Cooking a perfect smoked chicken breast is all about the game of controlling temperature. You must have taken temperature-controlling requirements for granted. Just buy a good-quality meat thermometer and smoke the chicken pieces until they reach a temperature of about 160 degrees Fahrenheit. This way, you will nail your task very well.

Why does my smoked chicken breast turn black?

Creosote or excess moisture in the smoker causes smoked meat to become black. It could, however, be the result of stale smoke or inadequate ventilation. Furthermore, cooking it at a high temperature can cause it to turn black. It could also be the result of too much wood or a sugar rub on the meat.

The Best Blackstone Griddle Recipes

The Best Blackstone Griddle Recipes

Blackstone Griddle-Cook anything, Anytime, Anywhere! Blackstone griddle is just like a piece of magic equipment. It gives you endless possibilities to play with your culinary skills and make some extraordinary out of it. Here I’ve presented some of the best Blackstone griddle recipes that are Read More