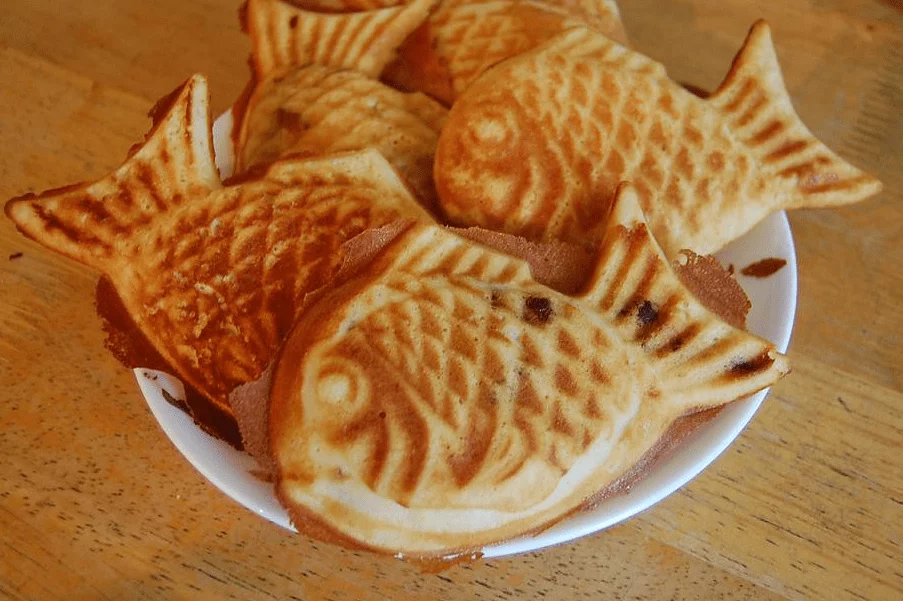
Easy and Delicious Recipes

Recent Posts

Dr.Pepper Short Ribs (Braised)

Dr.Pepper Short Ribs (Braised)

So juicy and tender Dr.Pepper short ribs braised in the oven slowly on a low temp for a lovely, spicy, shredded beef dinner. A fast stovetop simmer and sear of the ingredients, then several hours within the oven, will break apart braised boneless short ribs Read More

Easy Hibachi Chicken with Fried Rice Recipe

Easy Hibachi Chicken with Fried Rice Recipe

This Hibachi Chicken with Fried Rice is a full chicken dinner that is delicious! With vegetables made restaurant-style, fried rice, and very tender chicken, this hibachi recipe is served with a mustard dipping that is a spicy sauce that teleports you to the Japanese kitchen! Read More

Easy Keto Mason Jar Ice Cream

Easy Keto Mason Jar Ice Cream

Who can resist the allure of ice cream? Equally, finding someone who doesn’t appreciate a simple and quick recipe is rare. We’ve ingeniously combined these universal loves into our Keto Mason Jar Ice Cream, delivering both delight and convenience right to your kitchen.

A Fusion of Flavor and Simplicity: Butter Pecan Keto Ice Cream

Imagine transforming the classic butter pecan ice cream into a keto-friendly treat without the need for any complex equipment. Our recipe not only brings this dream to life but does so with the utmost ease. In today’s fast-paced world, there’s nothing better than a quick and effortless dessert to enjoy during your relaxation moments. However, the high cost and not-so-ideal nutritional content of commercial low-carb ice creams can be a significant deterrent.

Easy Keto Mason Jar Ice Cream

Keto Mason Jar Ice Cream Recipe

Ingredients:

  • Pecans: 1 1/3 cups, raw and chopped
  • Unsalted Butter: 1/4 cup
  • Heavy Cream: 2 cups
  • Powdered Erythritol: 2 tablespoons
  • Liquid Stevia: 10 drops
  • Vanilla Extract: 1 teaspoon
  • Imitation Butter Flavoring: 1 teaspoon (optional for enhanced flavor)

Instructions:

  1. Pecan Preparation:

    • Melt the unsalted butter in a small skillet over medium heat.
    • Add the chopped pecans and toast for 5-6 minutes, or until they turn a light brown color. Ensure they are toasted evenly to unlock their full flavor.
    • Remove from heat and allow the pecans to cool completely. This step is crucial for maintaining the texture and integrity of the pecans in the ice cream.
  2. Combining Ingredients:

    • In a large 24 oz mason jar, combine the toasted pecans with the heavy cream, powdered erythritol, liquid stevia, vanilla extract, and, if desired, the imitation butter flavoring. This blend of ingredients is the secret to its delicious taste and perfect keto-friendly profile.
  3. Shaking to Perfection:

    • Secure the lid tightly on the mason jar to prevent any leaks.
    • Shake vigorously for 4-5 minutes. This process is not only fun but essential for mixing the ingredients thoroughly. The liquid inside will double in volume as air is incorporated, filling the mason jar to the brim with a creamy mixture poised to become your ice cream.
  4. Freezing:

    • Place the mason jar in the freezer for a minimum of 3 hours, though you can leave it up to 24 hours for a firmer consistency.
    • For the perfect ice cream texture, a 3-hour freeze is generally sufficient. If you opt for an overnight freeze, allow the ice cream to sit at room temperature for about 5 minutes before serving. This step ensures it softens slightly for that ideal creamy scoop.

Carbs: 3 grams per serving

Delicious Variations to Elevate Your Keto Mason Jar Ice Cream

The beauty of this Keto Mason Jar Ice Cream lies in its versatility. Below are some delightful variations to tailor your ice cream to any taste preference, ensuring every spoonful remains exciting and indulgent. Explore these alternatives to keep your dessert menu fresh and appealing.

1. Chocolate Dream

  • Modify: Add 1/4 cup of unsweetened cocoa powder and an extra tablespoon of powdered erythritol to the original recipe.
  • Serving Suggestion: Garnish with keto-friendly chocolate chips or a drizzle of sugar-free chocolate syrup for an extra chocolatey experience.

2. Strawberry Bliss

  • Modify: Reduce the heavy cream to 1 3/4 cups and add 1/4 cup of pureed strawberries. Omit the pecans and imitation butter flavoring.
  • Serving Suggestion: Serve with fresh sliced strawberries on top for a refreshing and fruity treat.

3. Mint Chocolate Chip

  • Modify: To the original mixture, add 1 teaspoon of mint extract (instead of vanilla extract) and 1/4 cup of chopped sugar-free dark chocolate or chocolate chips.
  • Serving Suggestion: A few fresh mint leaves can add a pop of color and enhance the minty freshness.

4. Cinnamon Roll

  • Modify: Omit the pecans and imitation butter flavoring. Add 1 teaspoon of ground cinnamon to the mixture and a swirl of sugar-free caramel sauce before freezing.
  • Serving Suggestion: Top with a sprinkle of cinnamon and a drizzle of caramel sauce for that classic cinnamon roll flavor.

5. Coffee Delight

  • Modify: Reduce the heavy cream to 1 3/4 cups and add 1/4 cup of strong brewed cooled coffee. Omit the pecans.
  • Serving Suggestion: Sprinkle with a dash of cocoa powder or a few chocolate-covered espresso beans for an elegant touch.

6. Lemon Cheesecake

  • Modify: Add 2 tablespoons of cream cheese to the mixture for a tangy twist. Incorporate 1 teaspoon of lemon extract or zest in place of the vanilla extract.
  • Serving Suggestion: Garnish with a sprinkle of lemon zest or a few low-carb graham cracker crumbs for a cheesecake-like experience.

7. Pumpkin Spice

  • Modify: Add 2 tablespoons of pumpkin puree and 1 teaspoon of pumpkin spice to the original recipe. This variation is perfect for autumn cravings.
  • Serving Suggestion: A dollop of whipped cream and a sprinkle of extra pumpkin spice can elevate this to a festive treat.
Easy Easy Keto Mason Jar Ice Cream
Air Fryer Pork Tenderloin Recipe

Air Fryer Pork Tenderloin Recipe

Pork tenderloin is better than ever with air fryer style! Fast and high-temperature cooking of the air fryer pork tenderloin makes it brown on the exterior but still juicy inside! Pork tenderloin is really an excellent lean cut of pork. But because of this, you Read More

Garlic Parmesan Creamy White Sauce

Garlic Parmesan Creamy White Sauce

This heavenly Garlic Parmesan White Sauce has amazing flavors from Parmesan cheese and garlic. Combined with pasta, pour it over some roasted veggies; great as a dipping sauce as well as pizza sauce. I like to make a sauce that serves multiple purposes. If you Read More

Sous Vide BBQ Pulled Pork Shoulder Recipe

Sous Vide BBQ Pulled Pork Shoulder Recipe

Sous Vide BBQ Pulled Pork Shoulder slow cooked for 24 hours, and finished a smokey barbecue leading to probably the most tender and juicy pulled pork you’ve tasted.

Like the majority of sous vide recipes, two-step cooking process is the thing. The two-step cooking is almost totaly hands-off and definitely stress free. First you’ll cook the pork shoulder in the sous vide water bath, and then end it either in a the oven or BBQ smoker.

Sous Vide BBQ Pulled Pork Shoulder

Finishing in the BBQ will result in a delicious smoky pulled pork. The beautiful thing about cooking a pork shoulder low and slow is that it’s nearly impossible to get it wrong; especially when cooking it in this sous vide method.

This technique is ideal for entertaining because it could be made in advance and then finished in a smoker or in the oven. The fun part is as soon as your guests are there and they smell what appears like has been cooking all day.

Ingredients

Pork:

  • 1 bone-in or boneless pork shoulder (5–7 lbs)

  • 1 tsp liquid smoke (optional)

Optional Spice Rub:

  • ¼ cup paprika

  • ¼ cup brown sugar

  • 3 Tbsp kosher salt

  • 1 Tbsp yellow mustard seeds (whole)

  • 1 tsp ground black pepper

  • 2 Tbsp granulated garlic powder

  • 1 Tbsp dried oregano

  • 1 Tbsp coriander seeds

  • ½ tsp Prague Powder #1 (optional, for pink “smoke ring” effect)

  • 1 tsp red pepper flakes


Instructions

1. Heat the Water Bath

  • For tender, pull-apart pork: Set your sous vide cooker to 165°F (74°C).

  • For tender but sliceable pork: Set to 145°F (63°C).


2. Make the Spice Rub (Optional)

  1. Combine paprika, brown sugar, salt, mustard seeds, black pepper, garlic powder, oregano, coriander seeds, and red pepper flakes in a spice grinder.

  2. Grind into a fine powder.

  3. If using, add Prague Powder #1 to the rub for a cured, smoky-pink interior.


3. Season the Pork

  • Reserve 3 Tbsp of the rub for finishing later.

  • Rub the rest evenly over the pork shoulder.

  • Drizzle liquid smoke over the pork if using, and pat it in gently.


4. Bag and Seal

  • Place pork in a vacuum-seal bag.

  • Seal using a vacuum sealer or the water displacement method with a zipper-lock bag: Seal all but 1 inch, lower slowly into the water until air is pushed out, then seal fully.


5. Sous Vide Cook

  • Submerge the sealed pork completely in the preheated water bath.

  • Cook 20–24 hours for pull-apart texture, or 16–18 hours for sliceable texture.

  • To prevent water loss during long cooks, cover the water surface with foil or plastic wrap.


6. Finish the Pork

  • Remove from the bag and pat dry.

  • Coat lightly with the reserved spice rub.

  • Finish under a hot broiler for 5–8 minutes, or sear in a cast-iron skillet with a little oil until caramelized.


7. Serve

  • Shred for sandwiches, tacos, or BBQ plates.

  • Drizzle with juices from the bag or your favorite BBQ sauce.


Make-Ahead & Freezer Tips

  • Make Ahead: Cook sous vide, cool, and refrigerate in the sealed bag for up to 4 days. Reheat in a 165°F water bath for 1 hour before serving.

  • Freezer-Friendly: Cool pork completely in the bag, freeze for up to 3 months. Thaw in the fridge overnight, then reheat in sous vide until warmed through.

Sous Vide BBQ Pulled Pork Shoulder Recipe

Sous Vide Pulled Pork Finish

  • After the pork shoulder is cooked, you can cool it and refrigerate for approximately a week before continuing, or simply continue to the finishing steps.
  • The very first thing to do to complete is eliminate the excess moisture by removing the pork and patting it down really good with paper towels.
  • If you wish, you are able to take the nice juices in the sous vide bag, add them to your chosen barbecue sauce, and reduce it on the stovetop to offer your sauce extra pork flavor.
  • The initial sprinkling of rub did an excellent job of having flavor into the pork. An additional coat of rub now provides you with a great foundation for building up that dark, crunchy, full of flavor bark.

Finishing in the Oven

  • Take the pork and place it on a lined rimmed baking sheet with a wire rack on it.
  • Place it in a preheated 300 F oven and cook till outside is a dark, mahogany bark, about 1 hour and 30 min.
  • Take away from the oven and move on to the next step.
  • The pork is ready to be pulled! I find this simplest to do using two forks, however if you have durable heat gloves to guard your fingers from the hot meat, then go right in and use your hands.
  • I prefer to shred apart into, tender, big chunks, however you may also move the shreds to a cutting board and chop it finely with a chef’s knife or cleaver.
  • After the meat is shredded nicely it’s ready to serve with your preferred barbecue sauce. It goes nicely with some pickles, creamy cole slaw, and a nice bun and you’ve got yourself an excellent meal.

Finishing Steps – Gas Grill or Smoker

  • To complete your pork shoulder over live fire, light a smoker and set the temp to 300°F. Or light up a half chimney of coals, and spread them out over 1 / 2 of the coal grates.
  • Add several chunks of hardwood, no need certainly to soak it and the moment it starts smoldering, place the meat in the smoker or on the grill, away from any direct heat.
  • Now for a gas grill, light 1 / 2 of the burners and leave another half turned off.
  • Put the chunks of wood in a foil boat directly on the hot side of the grill and place the pork shoulder on the cooler side.
  • Cook it covered, adding a couple of bits of wood and coals as needed. And maintain the air intake valves to test and keep consistently cooker hovering at around 275F to 300F all the time.
  • Continue cooking till pork has reached a deep, dark, mahogany crust and tears apart when you pick at it. This may take about an 1:30 hours – 2 hours.
  • The pork is now ready to be pulled!

If you like this recipe, check this Instant Pot Pulled Pork

El Pollo Loco Chicken Recipe (Copycat)

El Pollo Loco Chicken Recipe (Copycat)

Marinated overnight in pineapple juice and citrus, this El Pollo Loco Chicken Recipe will be enjoyed by everyone. El Pollo Loco Copycat is really easy to make and has all the classical flavors needed. Have you experienced El Pollo Loco in your area? I believe Read More

New York Strip Roast Recipe (With Garlic and Herbs)

New York Strip Roast Recipe (With Garlic and Herbs)

New York strip loin Roast beef for a holiday dinner or festive occasion is a straightforward and impressive meal that everyone will just love. I’ve made this recipe with an awesome blend of garlic and herbs, and the results are fantastic. The New York Strip Read More

Healthy French Onion Soup for Cold Weather

Healthy French Onion Soup for Cold Weather

French onion soup is a timeless classic that has been loved for generations. Built on a base of slowly caramelized onions and a savory broth, it’s finished with the irresistible pairing of toasted bread and melted cheese. Simple yet deeply flavorful, this dish is perfect whenever you’re craving something warm and satisfying.


Ingredients

  • 10 medium onions, thinly sliced

  • 4 garlic cloves, minced

  • 2 Tbsp olive oil + 1 Tbsp butter (for frying)

  • 1 tsp sea salt (or salt of choice)

  • ½ tsp black pepper

  • 1 Tbsp Dijon mustard (plus extra for bread)

  • 2 bay leaves

  • 1 Tbsp balsamic vinegar

  • 33 oz (about 4 cups) vegetable or beef stock

  • 4 sprigs fresh thyme

  • 1.8 oz total mixed cheese (Emmental, Gruyère, Parmesan – or use one)

  • 4 slices whole-grain bread


Instructions

1. Caramelize the Onions

  1. Heat olive oil and butter in a large saucepan over medium heat.

  2. Add sliced onions and cook for 5 minutes, until softened.

  3. Stir in garlic, thyme, bay leaves, salt, and pepper.

  4. Lower heat and cook 30 minutes, uncovered, stirring occasionally, until onions turn deep golden brown.

    • If onions haven’t caramelized, increase heat slightly and cook for 5 more minutes, stirring often.


2. Build the Broth

  1. Stir in Dijon mustard, balsamic vinegar, and stock.

  2. Bring to a boil, then cover and reduce heat to low.

  3. Simmer gently for 15–20 minutes.

  4. Turn off heat and let sit for a few minutes to allow flavors to infuse.


3. Prepare the Cheese Toasts

  1. Toast bread slices on one side until golden.

  2. Flip, spread lightly with Dijon mustard, and top with cheese.

  3. Place under the broiler for 1 minute, until cheese melts and browns slightly.


4. Serve

  • Ladle the hot soup into bowls.

  • Place a cheesy toast on top (or serve on the side).

  • Enjoy immediately while warm and comforting.


Tips & Variations

  • Cheese Options: Gruyère is traditional, but Emmental and Parmesan add great flavor too.

  • Healthier Twist: Use whole-grain bread for extra fiber and nutrients.

  • Make Ahead: Soup base can be made a day ahead and reheated before serving. Toasts should be prepared fresh.

  • Freezer Friendly: The soup (without bread) freezes well for up to 2 months. Thaw and reheat gently before serving.

Healthy French Onion Soup for Cold Weather 2

Pancakes Without Eggs Recipe

Pancakes Without Eggs Recipe

Hello, it’s Sarah again! Today I’m going to show you how to make light, fluffy, and delicious pancakes—without using eggs. Once you try this recipe, you might not want to go back to the traditional version. I used to think pancakes without eggs or milk Read More