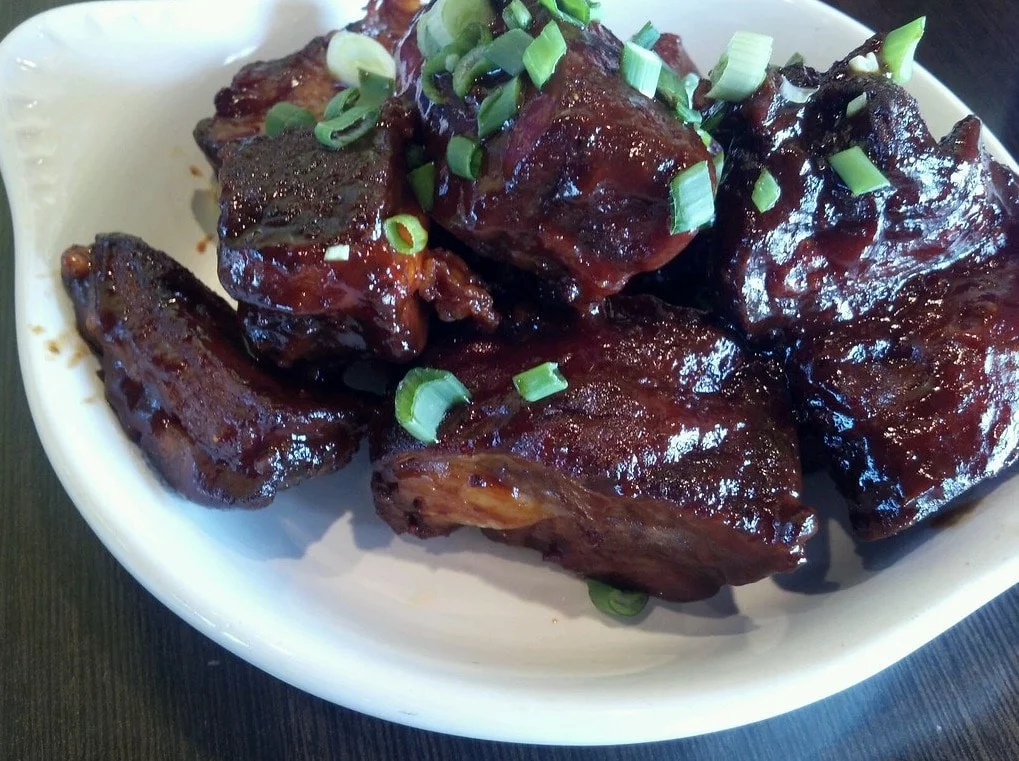
Easy and Delicious Recipes

Recent Posts

Creamy Ravioli with Mushroom Sauce

Creamy Ravioli with Mushroom Sauce

Ravioli with mushroom sauce are a very rich first course, perfect for Sunday lunches or special dinners with guests. They are very tasty, creamy, and really irresistible. Ravioli with Mushroom Sauce is ideal for the autumn season, in which mushrooms are the masters; they are Read More

Chicken Recipe with Coconut Milk and Curry

Chicken Recipe with Coconut Milk and Curry

Let me just say that this amazing Chicken Recipe with Coconut Milk and Curry is here to change your nights off. It’s ready in just 30 minutes. A spicy sauce of red curry paste, coconut milk, garlic, and lime juice is used to cook tender Read More

Homemade Brioche French Bread Recipe

Homemade Brioche French Bread Recipe

Are you craving buttery, soft bread that will melt in your mouth? You’re at the right place! This recipe for homemade French brioche is certain to fulfill your appetite.

And the coolest thing is that it’s easy to make; just pay close attention to the kneading and rising times. They’re vital to the end product, trust me.

I know what you’re thinking: this dish is likely not the healthiest one around. And you are correct, it is not exactly quinoa and spinach. But occasionally, it is acceptable to indulge in a small piece (or two, or three…. it’s difficult to stop at just one, isn’t it?).

Try it for yourself, and you’ll realize how incredible this French brioche is. And if you want to improve the experience even more, add this wonderful apple curd on top.

You will be astounded by how beautifully it mixes with the brioche since it is the ideal blend of sweet and salty flavors.

What is French Brioche?

This rich and flavorful French bread has been enjoyed for centuries. It is hardly surprising that this bread has endured the test of time, given its fine, sensitive crumb and buttery flavor. In fact, the term brioche was first recorded in 1404!

Despite the fact that it was initially produced with a sourdough starter and wild yeast, modern recipes frequently rely on commercial yeast for convenience.

But what makes brioche bread so exceptional?

Well, this is due to the “enriched” dough that was used to manufacture it. This type of dough contains fats and proteins, such as butter and eggs, which give French brioche its distinctive flavor and texture.

The high-fat content of enriched dough might inhibit gluten development and make the initial kneading of the dough more difficult than with ordinary bread dough.

Nevertheless, with a little patience and work, you can create a beautiful and rewarding loaf of brioche bread that can be used in both sweet and savory recipes.

If you like brioche, I am sure you will love these Italian Maraitozzi sweet buns! Or perhaps these buttery brioche cinnamon rolls

Homemade Brioche French Bread Recipe

Ingredients

For the Dough

  • ½ cup + ½ Tbsp lukewarm milk (95–105°F / 35–40°C)

  • 2 ½ tsp instant yeast (or active dry yeast)

  • 4 Tbsp granulated sugar (divided)

  • 5 cups all-purpose flour

  • 1 ½ tsp salt

  • 5 large eggs (or 6 smaller eggs), room temperature

  • 1 cup unsalted butter, room temperature, cut into cubes

For the Egg Wash

  • 1 egg

  • 1 Tbsp water


Step 1: Prepare the Dough

  1. In the bowl of a stand mixer fitted with a dough hook, whisk the warm milk with 1 Tbsp of sugar and the yeast. Let sit for 5–10 minutes, until foamy.

  2. Add the remaining sugar, eggs, flour, and salt. Mix on low speed until a sticky dough forms (about 5 minutes).

  3. Add the butter gradually, a cube or two at a time, making sure each piece fully blends before adding more.

  4. Increase speed to medium and knead for 15 minutes, until the dough is smooth, elastic, and passes the windowpane test (stretch a small piece until thin enough to see light through without tearing).


Step 2: First Rise

  1. Transfer the dough to a clean, lightly greased bowl and cover with plastic wrap or a damp towel.

  2. Let rise at room temperature until doubled in size (1 ½–2 hours).

  3. Punch down gently, reshape into a ball, and cover again. Refrigerate overnight (8–12 hours) for best flavor and easier shaping.

(Shortcut option: chill at least 2 hours if you don’t want to wait overnight.)


Step 3: Shape the Dough

  1. Remove the dough from the fridge and divide into two equal portions for standard loaves. Place each into an 8.5×4.5 inch (21×11 cm) loaf pan lined with parchment.

Shaping Variations:

  • Pull-Apart Style – Cut each portion into 8 small pieces, roll into balls, and place in the pan in two rows.

  • Braided Brioche – Divide into 3 ropes (about 10 in / 25 cm long each), braid, tuck the ends, and place in the pan.

  1. Cover and let rise in a warm spot until doubled again (about 2 hours).


Step 4: Bake

  1. Preheat the oven to 390°F (200°C).

  2. Whisk together 1 egg and 1 Tbsp water. Brush over the tops for a glossy finish.

  3. Bake for 30 minutes, covering loosely with foil after 20 minutes if the tops are browning too quickly.

  4. The brioche is done when it sounds hollow when tapped and the internal temperature reaches 190°F (88°C).


Step 5: Cool & Store

  1. Let cool in the pan for 10 minutes, then transfer to a wire rack to cool fully before slicing.

  • Store brioche at room temperature in an airtight container for up to 3 days.

  • Freeze slices or whole loaves well-wrapped for up to 2 months. Thaw at room temperature or warm gently in the oven.

If you like this recipe for French brioche bread as much as we do, share it on Pinterest with your friends and followers. Just click on the image below to add it to your board. Your followers will be grateful that you shared something so tasty. And if they’re feeling especially thankful, they might even bring you a jar of homemade jelly to go with your freshly baked bread. Bon appétit!

Homemade Brioche French Bread Recipe

Brioche dough

Brioche dough is a rich, decadent pastry dough prepared with butter and eggs, which provides its distinctive soft, airy texture. As a result of combining all of the ingredients except for the butter, the dough will be first thick and slightly sticky.

After that, the butter is added in small portions and gradually integrated into the dough. While the butter is mixed in, the dough will become even stickier and looser due to the added moisture and fat.

After all of the butter has been added, the dough must be worked, and the gluten developed. Typically, this is accomplished using a mixer with a dough hook attachment.

As the dough is kneaded, it will become shiny and sturdy, neatly separating from the bowl’s sides. This may take some time, but have patience since the dough will finally acquire the right consistency. The French brioche dough should be smooth, flexible, and somewhat sticky when it is done.

Kneading brioche by hand

Prepare to roll up your sleeves and get your hands a little dirty, as we will be hand-making some delicious brioche! This recipe demands a great deal of perseverance and some physical strength, as the dough is extremely sticky. However, we have a few suggestions to aid you through the procedure.

As you mix and knead the dough, you may start to wonder whether or not it is too sticky. Trust us; it’s definitely not. The dough should be on the wetter side regardless of the amount of butter. Therefore, however how tempting it may be, do not add additional flour.

Instead, try utilizing the “slap and fold” approach to manage the dough. Simply place the dough on a flat surface and fold it over on itself.

This helps to stretch and strengthen the gluten and distribute the butter evenly throughout the dough. Work rapidly so that the dough does not become too sticky on your hands.

With a little time and work, you will have a deliciously soft and fluffy brioche loaf that is ideal for toasting or utilizing as a base for sweet or savory sandwiches.

Don’t be frightened by the dough’s stickiness; it’s all part of the process.

Homemade Brioche French Bread Recipe

Homemade Brioche French Bread Recipe


Also, if you have any leftover Brioche bread that is about to expire, you can use it to make this fantastic Creme Brulee French toast!


Best Recipe For French Macarons

Best Recipe For French Macarons

Meringue-like, Light, airy, and delicious this recipe for French macarons have already been on my baking bucket list for a couple of years. I’ve been learning, testing, and driving myself mad in my kitchen for months, hoping to get these perfect. I’ve never been more Read More

Peanut Free Pad Thai Recipe

Peanut Free Pad Thai Recipe

This Peanut Free Pad Thai Recipe is as tasty as the version that includes peanuts. Keeping all the flavors of original Pad Thai Recipe, is a treat to all that have allergy to peanuts, as well as for those that don’t. Peanut Free Pad Thai Read More

Dairy Free Chicken Pot Pie Casserole

Dairy Free Chicken Pot Pie Casserole

This Healthy Dairy Free Chicken Pot Pie recipe goes far beyond any debate, “who cooked it best”. Because this casserole chicken pot pie is so delicious that you will forget about the competition and enjoy a healthy chicken plate.

It represents what I strive to accomplish with so most of my recipes: a healthier version of well-liked comfort food that’s just as delicious and enjoyable as the original.

I’m often asked what recipes on this blog are typically the most used, which healthy recipes I make for lunch or for supper when I’m not sure what to cook. The clear answer many of these is today’s recipe for Healthy Chicken Pot Pie.

Everyone loves this healthy pot pie since it tastes like his childhood favorite, made more grown up. I like it because it’s very easy to make and healthy. I’ve also made this recipe for a lot of my friends and new moms because it’s a fantastic freezer meal.

Actually, when I cook it for myself, I often proceed to double the recipe, freeze one, then anticipate the day I’ll find a healthy chicken pot pie frozen and primed for baking for lunch or for supper!

Dairy Free Chicken Pot Pie Casserole

The Very Best Dairy Free Chicken Pot Pie

I am aware that I’m occasionally susceptible to exaggeration, but I feel my claim with this healthy pot pie’s “best EVER Pot Pie ” has it’s merit. This Healthy Chicken Pot Pie made its recipe debut at my friend’s place after I brought it over for an unplanned dinner party. After that day a lot of my friends asked me for this recipe, and it was kind of a confirmation that is that good.

Secrets to Perfect Healthy Chicken Pot Pie

My tricks and tips for making a healthy chicken pot pie filling that’s creamy and delicious without the usage of butter or heavy cream arise from several key ingredients.

  • Unsweetened Almond Milk. It’s only about 30 calories per cup but is very creamy, so it generates a perfect base for cream sauces and fillings like this in a chicken pot pie. If you want the pie to be dairy-free and have been looking for a milk replacement for chicken pot pie, almond milk is a perfect choice.
  • Lots of Veggies. Celery, carrots, peas, and pearl onions are classic vegetables for pot pie. For the onions and peas, use frozen no need to be brave and put yourself through the preparation of peeling a large number of small onions. If you wish to accelerate the recipe, even more, you are able to swap the carrots and other veggies for a case of mixed frozen veggies, though I still advise keeping the fresh celery. Even though it’s irritating to get a whole bundle of celery when you only require a few stalks, celery has a way of making pot pie taste like the pot pie should taste.
  • Mushroom. Because of the general insufficient mushroom enthusiasm that one encounters when one posts recipes online, I realize mushrooms really are a controversial ingredient, but they are sooo amazing in HEALTHY CHICKEN POT PIE. They provide the filling an abundant, savory depth. Now when I eat pot pie, when it doesn’t contain mushrooms, I really feel they are missing.
  • Shredded Chicken. Very healthy protein! You are able to speed the recipe up by utilizing shredded store bought rotisserie chicken.
  • Fresh Thyme. Absolutely worthwhile with this pot pie recipe. You are able to swap dried, but it just won’t be as awesome, and awesome is what I’m hungry for when I crave chicken pot pie.
  • Cut the Crust. While I can’t envision a healthier chicken pot pie without crust, I discovered that not merely is sticking with the top one alone a substantial calorie savings, but I preferred the pot pie in this manner!

Pin the image below if you like this healthy pot pie recipe!

Dairy Free Chicken Pot Pie Casserole

Ingredients

  • 1 Tbsp of extra-virgin olive oil
  • 1 cup of carrots, diced
  • 1/2 cup of celery, diced
  • 1 1/2 tsp of garlic powder
  • 1/2 tsp of kosher salt
  • 1/4 tsp of black pepper
  • 1/4 cup of flour, all-purpose
  • 2 cups of almond milk, unsweetened
  • 2 cups of cooked and shredded chicken breasts — about 8 ounces or 2 small breasts, boneless
  • 1/2 cup of peas, frozen
  • 1/2 cup pearl onions, frozen
  • 1 Tbsp of chopped fresh thyme
  • 1 prepared pie crust — dairy free
  • Egg — beaten lightly with a tablespoon of water for an egg wash

Instructions

  1. Heat the oven to 430 F. and coat lightly a 9-inch pie dish using cooking spray. Leave aside.
  2. Heat a big Dutch oven or similar, heavy-bottomed pan on medium-high heat.
  3. Pour the oil in the pan and when it’s hot, add the mushrooms and cook for 7 – 8 minutes, till mushrooms are just starting to brown, stirring slowly.
  4. Add in the celery, carrots, garlic powder, pepper and salt. Cook till the mushrooms have browned more and the carrots start to soften, about 3-4 more minutes.
  5. Sprinkle the flour on the top of vegetables and cook 2-3 minutes. Pour in the almond milk slowly, adding a couple of splashes at a time, stirring continuously.
  6. Bring to a boil (low), scrape any brown bits from the bottom of the pan. Continue steadily to let bubble till it’s thickened enough, it should take about 4 to 5 minutes.
  7. Add in and stir in the chicken, onions, peas, and thyme and spoon the chicken mixture in to the previously prepared pot pie dish.
  8. Roll the dough for the pie into a circle big enough to cover the dish. Take egg wash and brush the sides of the pie, and lay the dough over the top so that it hangs on the sides of the dish. Trim the overhang to a 1/2 in bigger than edge of the dish. Slightly press the dough onto the sides of the dish such that it sticks nicely, then brush everywhere with the rest of the egg wash. Using a sharp knife, cut 3 slits on the top.
  9. Bake till hot and bubbly internally and the crust has a deep golden color, for about 25-30 minutes. Let it rest a couple of minutes and serve hot.
Texas Roadhouse Rolls With Honey and Cinnamon (Copycat)

Texas Roadhouse Rolls With Honey and Cinnamon (Copycat)

Texas Roadhouse Rolls with honey and cinnamon are buttery-sweet rolls that are loved everywhere. And for a good reason, because they’re so delicious. And now, with this copycat recipe, you are able to enjoy a fresh, warm batch in your home anytime you like. Texas Read More

Keto Chicken Wings (With Keto BBQ Sauce)

Keto Chicken Wings (With Keto BBQ Sauce)

These Keto Chicken Wings are oven-baked yet so crispy and taste as if you got them from your favorite restaurant.  I first made them for several of our friends, and these keto crispy chicken wings were gone in minutes.  I bet you and your loved Read More

Mexican One Pot Beef and Rice Casserole Recipe

Mexican One Pot Beef and Rice Casserole Recipe

Mexican One Pot Beef and Rice Casserole Recipe is a simple peasy skillet dinner full of all that cheesy goodness, even the rice gets cooked perfectly in the pan!

This is certainly one of my family’s favorite Mexican Dinners and among my favorite recipes to make. As it is bursting with lots of Mexican flavors, yet it’s everyday ingredients, like ground beef and rice, that I usually have readily available, and it is a one-pot meal that can be made on the stove surface in a single pot for fewer dishes to wash.

There’s no need to have to heat the oven or warm up the kitchen, and I do have more time and energy to spend with my loved ones|my children rather than washing the dishes.

  • 1 Tbsp of vegetable oil
  • 1/2 of chopped onion
  • 1 chopped green bell pepper
  • 2 cloves of minced garlic
  • 1 pound of ground beef
  • salt and pepper (to your liking)
  • 3 Tbsp of taco seasoning
  • 1-1/2 cups of red salsa
  • 2 Tbsp of tomato paste
  • 1 cup of drained corn
  • 1 can of drained black beans (16-ounce)
  • 4-oz can green chilies
  • 1 cup long grain uncooked white rice
  • 2 cups of beef broth
  • 2 cups of Mexican Blend Cheese, shredded

How to make Mexican One Pot Beef and Rice Casserole

  • Heat up the olive oil using a large skillet on medium high temperature.
  • Add in ground beef, garlic and onion and cook till beef has turned brown, for around 3-5 minutes, ensuring to crumble the beef cooks.
  • Add in taco seasoning and stir. Drain excess fat.
  • Stir in rice, beans, vegetable broth, Ro Tel diced tomatoes (or other brand you like to use), corn, cumin and chili powder.
  • Season with salt and pepper, to your liking.
  • Bring to a boil and cover.
  • Reduce heat and simmer until rice is cooked well, it should take about 15-18 minutes.
  • Stir in lime juice and cilantro.
  • Take away from heat and top with cheese. Cover until cheese has melted, it should take about 2 minutes.
  • Garnish with tomato, and serve right away. Enjoy!!!
Grilled Beef Kidney Recipe

Grilled Beef Kidney Recipe

The grilled Beef Kidney Recipe is one of the best meals I’ve ever made. Organ meats like Kidneys aren’t so popular in the USA for some reason, though French chef and author Jacques Pepin says that beef kidneys can be a tender and tasty cut Read More