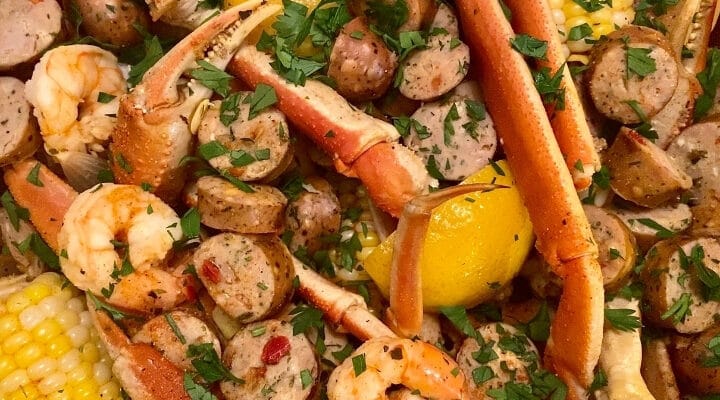
Easy and Delicious Recipes

Recent Posts

Easy Popcorn Chicken Recipe

Easy Popcorn Chicken Recipe

Craving a takeout but resenting the cost and the unhealthiness? Well, I’m here to help! Sure, it may still be more on the cheat day side of life, but my delicious and easy popcorn chicken recipe will have the whole family coming back for more. Read More

Roasted Beef Shank Recipe

Roasted Beef Shank Recipe

Fancy something different for dinner tonight? Our delectable roasted beef shank recipe, topped with a gorgeous vegetable medley, is the ideal comfort food for those looking to warm up during the week with a fragrant and flavourful meal! Whether you prefer to slow cook or Read More

How To Cook Mahi Mahi Easy Recipe

How To Cook Mahi Mahi Easy Recipe

Hey People!!! Today I’m here with another exciting recipe on how to cook Mahi Mahi perfectly suitable for the chilly winters. Mahi-Mahi is a widely famous fish found in tropical, subtropical, and temperate off-shore waters worldwide.

Its name, “Mahi-Mahi,” comes from the Hawaiian language and means “Very Strong.” The ray-finned fish is also known as common dolphinfish but don’t confuse it with the real dolphin. It’s also widely known as Dorado (its Spanish name). This golden-skinned lean fish is commonly found in the waters around Hawaii, Costa Rica, the Gulf of Mexico, and the Indian Ocean.

This fish has a strong texture and can be baked, fried, grilled, broiled, or seared. Whatever cooking method you use, this fish is perfect for all. This is a great, low-priced, fantastic fish that tastes just remarkable and gives a beautiful brownish texture.

 Buy the best mahi-mahi

Many factors determine the freshness and firmness of mahi-mahi. The most important of which is how the fish is caught. The fish selection guided by the Monterey Bay Aquarium Seafood Watch divided the fish into three basic categories depending upon their quality, firmness, and freshness.

According to this website:

  • Best – The best mahi-mahi is caught in the U.S. Northwest and Western Central Atlantic Oceans with hand lines and trolling lines.
  • Second-best – The second-best mahi-mahi is caught by the U.S Ecuadorian and Panamanian fleets or in the Eastern and Western Central Pacific oceans in the unassociated purse seine fishery. These fishes are ranked second-best because some issues are linked to overfished or at-risk species in these areas.
  • Avoid – It is recommended to avoid all other mahi-mahi imported from the Pacific, Indian, and Atlantic Oceans other than the specified areas for best mahi-mahi.

Note: Whenever you go to the market to buy mahi-mahi, keep the criteria mentioned above in mind and avoid imported mahi-mahi, as most of the mahi-mahi available in the US is imported.

Hawaiian Mahi Mahi Recipe

Well, that was some necessary information about the name of this amazing fish. Now let’s get to our amazing recipe that is super easy and gets ready in no time. Once you try this recipe, you will surely add it to your signature recipes for your family dinners and special events.

How to serve Mahi-Mahi?

This recipe of mahi-mahi is so amazing. It will give you the most delicious fish fillets ever. These mahi-mahi fillets are so delicious that you can eat them without any serving options. However, if you like, you can have it with rice, mashed potatoes, or golden bread toast.

They would be great serving partners. You can also pair it up with some green vegetables like asparagus, brussel sprouts, green beans, broccoli, and more of your choice. A salad is always the best option. To make the recipe even more Hawaiian, serve it in a pineapple bowl. Just make a pineapple boat with some coconut rice and wonderful salsa. 

How To Cook Mahi Mahi Easy Recipe

Mahi-Mahi Easy Recipe

Ok, it’s time to jump into the recipe for this delicious Mahi-Mahi. Just follow the instructions, and I promise you’ll make the best Mahi-Mahi ever. 🙂

Ingredients

  • 4 Mahi-Mahi Fillets(4 to 6-ounce)
  • 1 Lemon (Medium)
  • 1 clove of fresh Garlic (finely chopped)
  • 1¼ tsp. of Kosher Salt, plus more as needed
  • ¼ tsp. of Black Pepper (Crushed)
  • 2 tbsps. of Olive Oil
  • 4 tbsps. of cold Unsalted Butter (cut into 4 pieces)
  • 1 tbsp. of fresh Parsley (Chopped)

Instructions

  • Take a medium-sized lemon and cut it into two halves. Squeeze the juice of the first half. The total lemon juice should be 1 ½ tbsp.
  • Cut the other half of the lemon into thin slices and set them aside.
  • Now pat dry the mahi-mahi fillets with paper towels.
  • Season the fillets with 1 tsp of kosher salt and ground black pepper.
  • Now take a pan and add extra-virgin olive oil to it. Heat the pan on medium-high flame until it gets hot, and the oil gets a bit smoky.
  • Add seasoned mahi-mahi fillets into this oil and sear them until it gets fully seared from the bottom side. Remember! Do not touch or disturb the fillets until their side gets a beautiful brownish texture. It takes about 4 minutes on medium-high flame.
  • Flip the side of the fillets and keep searing all the remaining sides until the whole of the fillets are well-cooked and get the same brownish texture.
  • Now transfer these fillets to the serving platter.
  • Now in the same pan, add lemon juice and crushed garlic. Keep the flame medium-low.
  • Add a pinch or ¼ tsp. of kosher salt to the pan. Reduce the heat to medium-low. Mix all the ingredients in the pan well. Scrape up any bits of the fish fillets sickened at the bottom of the pan using a wooden spatula.
  • Now add lemon slices to the pan. And add butter pieces one by one, i.e., add a piece of butter and wait until it melts completely, and then add the next piece of butter, and so on.
  • Turn off the flame and add chopped parsley to the lemon sauce. Stir the parsley well into the sauce. The lemon sauce is ready.
  • Pour this sauce over the mahi-mahi fillets.
  • Serve it hot and enjoy.

Tips for the best Mahi-Mahi:

  1. If you want to make your mahi-mahi fillets a bit spicier, you can adjust the quantity of salt and black pepper as per your choice.
  2. Using a cast-iron pan or non-stick pan to sear the mahi-mahi fillets is recommended because the fish doesn’t stick much into these pans.
  3. The cooking time per each side of the fillet depends upon the thickness of the fillets. The average cooking time varies from 2 – 4 minutes per side. But you can adjust the time as per thickness. Thicker fillets will take more time to sear.
  4. Always remember! The fish must be dry. And the oil must be hot. A dried fish gets a beautiful crunchy texture. It will also get beautiful brown color.
Ghirardelli Brownie Mix Easy Recipe

Ghirardelli Brownie Mix Easy Recipe

Want to give a Ghirardelli chocolate twist to your Classic brownies? Then look no further! I am here with another fun and exciting recipe that will be quite special for the ones who love sweets and desserts. By the way, who doesn’t love classic brownies? Read More

Subway Bread Copycat Recipe

Subway Bread Copycat Recipe

Subway is a famous American restaurant chain that sells the best sandwiches, salads, and beverages around the globe. Their sandwiches are so good that you instantly become a fan. The good thing is you can make sandwiches like theirs at home too. But first!!! Let’s Read More

Crustless Creamy Cheesecake Recipe

Crustless Creamy Cheesecake Recipe

Hello people! Today I’m going to share another exciting recipe, and it’s Crustless Creamy Cheesecake. This recipe is not only unmatchable in taste but low on carbs as well. Because of its low-calorie content, this recipe fits best in a keto diet plan. So, if you’re following any keto diet plan, you can surely satisfy your dessert cravings with this amazing crustless cheesecake.

This recipe is unique in the way that it has no crust and is baked on a pie plate. It creates its own beautiful crust when baked in the oven. The crust is then topped with a sour cream topping. The ingredients of this recipe are plain and simple. This recipe is so easy to make that anyone without any baking experience can bake an excellent cake out of it.

The best thing about this recipe is that you can have it anytime. It’s fit for everyday and special occasions like Christmas, Thanksgiving, etc. Having this recipe on the table makes your meals even more special.

Low-Carb Crustless Creamy Cheesecake

The special thing about this recipe is that it’s a sugar-free version of cheesecake and is low on calories. It goes well with the keto diet and will surely satisfy your cravings for dessert. It does not have any crust and creates its own unique crust that’s topped with sour cream to take it to another level of taste. This recipe is best suitable for diabetic people too.

So let’s move forward to the recipe for crustless cheesecake.  

Crustless Creamy Cheesecake Recipe


Ingredients

For Cheesecake

  • 16 ounces of reduced-fat Cream Cheese (softened)
  • 4 Eggs (large)
  • 1/2 cup of Sukrin (Powdered)
  • 1/2 tsp. of Stevia Glycerite
  • 1 tbsp. of Vanilla Extract
  • 1/4 tsp. of Lemon Extract (optional)
  • 1/4 tsp. Of Orange Extract (optional)

Sour Cream Topping

  • 16 ounces of Sour Cream
  • 2 tbsp. of Sukrin (powdered)
  • 1 tsp. of vanilla Extract
  • Nutmeg powder (optional)

Instructions

  • Preheat the oven to 325°F.
  • Take a pie plate of size 9 ½ – 10 inches and spray it with baking spray.
  • Add softened, fat-reduced cream cheese into a medium mixing bowl.
  • Beat the cream with a hand mixer until it gets smooth and even.
  • Now add powdered Sukrin, stevia glycerite, and one egg. Beat it again until it gets mixed well, and the mixture gets smooth.
  • Add the remaining eggs one by one while beating the mixture consistently.
  • Add vanilla and lemon extract and mix it again until it gets smooth and puffy.
  • Add this mixture to the pie plate and bake it in the preheated oven for about 30 minutes.
  • After 30 minutes, the cream cheesecake will puff up, and the edges will get brown.
  • Remove the cake from the oven and let it cool for about half an hour.

Sour Cream Topping:

  • Take a bowl and add sour cream to it.
  • Now add powdered Sukrin and vanilla extract into the sour cream and mix it well until the Sukrin gets dissolved.
  • Your sour cream mixture is ready. Add a layer of sour cream to the top of the cheesecake.
  • Sprinkle the powdered nutmeg on top of the sour cream.
  • Now place the cake back into the oven and bake it again at 325°F for 15 – 20 minutes.
  • Take the cream cheesecake out of the oven and let it cool.
  • Place the cake into the refrigerator overnight.
  • Serve it to your loved ones and enjoy 

Some Important Tips:

  • You can use Greek yogurt for topping instead of sour cream. It also serves as the best topping.
  • You can change the texture of the cake by beating it more. A less-beaten cheesecake will have a darker color. To get a light-colored cheesecake, beat the cream cheese mixture more before baking.
  • You can add lemon extract along with the vanilla extract to give a tangy twist to the flavor. But that’s optional. You can skip it if you don’t like it.
  • If your cake gets cracks when baked in the oven, don’t worry. The sour cream topping will hide them all.
  • It’s recommended to add Stevia Glycerite as a sweetener as it is the only liquid stevia that doesn’t get bitter and works well in all baking recipes.
  • It’s better to refrigerate the cream cheesecake overnight. Because the more it sits, the better it gets.
Oven Baked Beef Jerky Easy Recipe

Oven Baked Beef Jerky Easy Recipe

Today I’m here with another delicious and mouthwatering easy recipe, and that is… Oven Baked The Beef Jerky. It’s totally different from the regular recipes and serves as the best snack for everybody. You don’t have to go to restaurants anymore to enjoy Beef Jerky. Read More

Gluten-Free Sourdough Bread Easy Recipe

Gluten-Free Sourdough Bread Easy Recipe

Today’s recipe is Gluten-Free Sourdough Bread Easy Recipe, and it’s very special, especially for the ones who are gluten-intolerant or are on a diet. Only because you can’t intake gluten, doesn’t mean you are going to miss all of your favorite foods because they have Read More

Homemade Peasant Bread Easy Recipe

Homemade Peasant Bread Easy Recipe

Hello guys! Today I’m here to share another exciting recipe with you, and that is “The Homemade Peasant Bread” recipe. This is one of the best bread recipes out there. The best thing about this recipe is that you don’t have to knead the dough to make bread out of it. And believe me! This is one of the finest bread recipes that are super easy to follow as well.

Homemade Peasant Bread

There is nothing more special than a loaf of homemade bread, as people go crazy over it. You can serve this bread any time on your table. You can present it at breakfast. This tasty peasant bread can also be best served at a dinner party.

This amazing bread will surely earn you praise from everyone on the table. If you plan to make this for a dinner party, then be ready for the questions like where did you buy this delicious bread? Or if you actually made this bread by yourself? You are going to be overwhelmed by the response 😉

No-knead Peasant Bread

The most remarkable thing about this recipe is that you don’t have to indulge in the hard work of kneading its dough to get finely baked peasant bread.

This recipe is quite simple and quick. You can even start this recipe even 3 – 4 hours before dinner and still be able to present the superbly baked tasty bread right on time.

There is no need to preheat the oven or baking pan for this recipe. You don’t even need any water spritzes or steam pans.

All you need is Pyrex bowls well-coated with butter. Using the simplest ingredients, you’ll make this soft, spongy, delicate, and delicious peasant bread with a beautiful golden crust.

Homemade Peasant Bread Easy Recipe

How to make Peasant Bread

Ingredients

  • 4 cups of unbleached All-Purpose Flour
  • 2 tsp Kosher Salt or 1&1/2 tsp of Table Salt
  • 2 tsp of Sugar
  • 2 tsp of Instant Yeast or Active-Dry Yeast
  • 2 cups of Lukewarm Water
  • About 2 tbsp of unsalted butter for greasing the pans

Instructions

  • Take a large mixing bowl. In the bowl, add flour, sugar, salt, and instant yeast. Mix them well. Now add the lukewarm water and mix it well until a nice dough is formed.
  • If you are using Active-Dry yeast, then dissolve sugar into the lukewarm water and sprinkle active-dry yeast over it. No need to mix it. Let it rest for 10 – 15 minutes. In a large bowl, mix the flour and salt and set aside. When the yeast-sugar water gets foamy, mix it well, and pour this yeast-sugar water into the flour. Mix well until the dough is formed.
  • Now cover the bowl with a dishtowel or plastic wrap and set it aside in a warm place. Let the dough rest until it gets doubled in size. This will take at least one hour for the dough to rise completely. If you place the bowl in a cool place, the dough will take almost 2 hours to rise.
  • Turn on the oven at a high temperature, like 350ºF or so, just for one minute, and then turn it off. This is a simple trick to create a slightly warm environment for the peasant bread.
  • Now preheat the baking oven to 425ºF. Take two small Pyrex bowls, about 1 qt or 1.5 qt in size. Grease them well with unsalted butter.
  • Punch down your dough and scrape it from the sides of the bowl with the help of two forks. Deflate the dough from the sides of the bowl and pull it towards the center to form a rough ball.
  • Now divide the dough into two equal parts using forks from the center. Transfer each half of the dough into the butter-coated Pyrex bowls. If the dough is too wet and sticky to handle with forks, then grease your hands with oil and transfer the two halves into the baking bowls using your hands.
  • Set the baking bowls aside on the countertop near the oven or any other warm place. Let the dough rise again for about 20 – 30 minutes. Remember not to cover the dough while leaving it to rise again. Remember, do not use the warm-oven trick for the second time. Just place the bowls near the oven or the top of it.
  • Place the bread in the preheated oven at 425ºF and bake it for 15 minutes. Then reduce the heat to 375ºF and bake it for another 17-20 minutes.
  • Now take the baking bowls out of the oven. Remove the bread loaves from the bowls and place them on the cooling rack. Bread loaves fall out on the cooling rack quickly if the baking bowls are well-greased with butter in the beginning.
  • If the bread loaves are a bit soft and pale rather than golden-brown, then place the bread loaves directly into the baking oven (without baking bowls) and bake them again for 5 minutes. Baking the bread again will give it a beautiful golden crust.
  • Take the bread loaves out of the oven and let them cool for 10 minutes before cutting.

How to store the Peasant Bread?

There are many eco-friendly methods to store the bread, but nothing seems to be better than using a ziplock bag. Ziplock bags can be used well to store the peasant bread for 3 – 4 days at room temperature. Ziplock bags keep the bread fresh, soft, and crumby as well.

If you want to store the bread for a longer period, then cut the bread as soon as it gets cooled after coming out of the baking oven. Place the bread pieces into the ziplock bags and store them in the freezer.

Although the ziplock bag stores the bread well and retains its freshness, it does not prevent the crust of bread from getting soft and losing its crispness. The best solution for this is to reheat the bread.

If you have stored the bread as slices, then the best way to reheat it is by toasting the bread slices in the toaster. But if you have stored the bread into halves or quarters, then reheat the bread loaves in the oven at 350ºF for 15 – 20 minutes.

If you liked this recipe, please check these bread recipes:

Homemade Brioche French Bread Recipe

Chocolate Banana Bread Easy Recipe

Chocolate Chip Pumpkin Bread with Vegan Version

How to make Taiyaki

How to make Taiyaki

Today I’m here with another fun and exciting recipe, and I’m going to show you how to make Taiyaki, a famous Japanese cake. This unique recipe serves as a snack as well as a dessert. You can make this recipe with your kids, and believe Read More