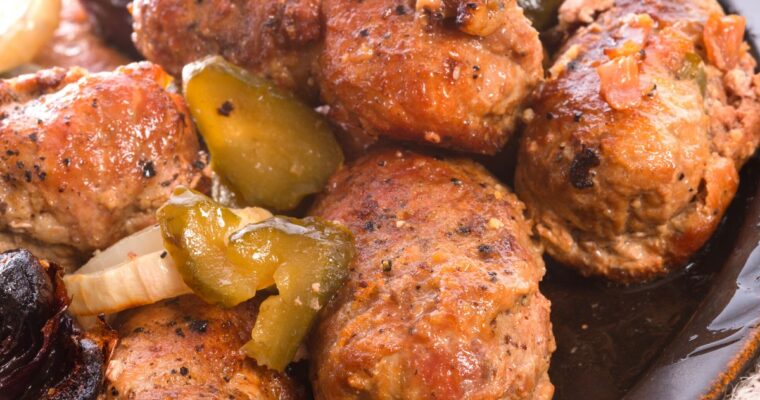
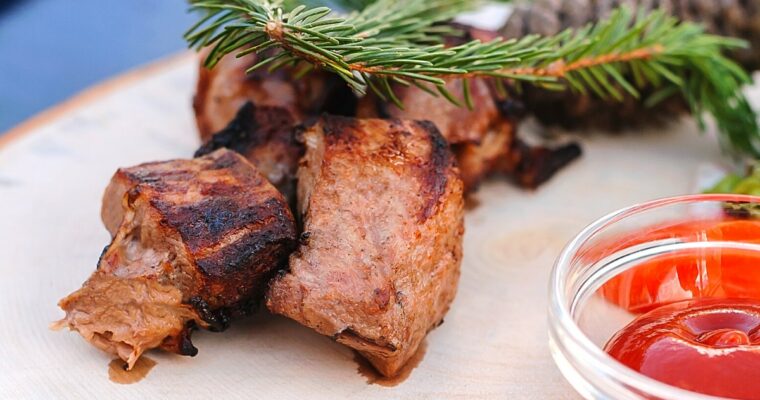
Easy and Delicious Recipes

Recent Posts

Chicken Salad Chick – Classic Carol Chicken Salad Copycat Recipe

Chicken Salad Chick – Classic Carol Chicken Salad Copycat Recipe

Have you ever tried the Classic Carol Chicken Salad from Chicken Salad Chick? Some of us are fortunate enough to live close to a Chicken Salad Chick restaurant; if one sets up in your neighborhood, I urge you to visit. But if you’re not anywhere Read More

Authentic Japanese Chicken Katsu Recipe (With Tonkatsu Sauce)

Authentic Japanese Chicken Katsu Recipe (With Tonkatsu Sauce)

Have you ever tasted a Japanese restaurant’s Chicken Katsu? This mouthwatering boneless chicken cutlet is simple to prepare at home. Make these chicken Katsu at home in a matter of minutes rather than going out to eat! And what is Chicken Katsu without the famous Read More

Lazy Chocolate Chip Cookie Bars Easy Recipe

Lazy Chocolate Chip Cookie Bars Easy Recipe

All you need is a boxed cake mix, butter, eggs, and chocolate chips to make Lazy Chocolate Chip Cookie Bars. So delicious and soft! The easiest cookies you’ll ever make are these lazy chocolate chip cookie bars!

Nothing beats a chocolate chip cookie with a glass of milk (or coffee) for dipping. I had a yearning for one the other day, but I was in a bad mood. I’m not in the mood for a long prep and bake time. I just needed that cookie, and I needed it ASAP.

My appetite was completely fulfilled by these simple cookie bars. They’re soft, gooey, and chock-full of chocolate. They also taste like classic chocolate chip cookies.

Lazy Chocolate Chip Cookie Bars

Recipe For Lazy Chocolate Chip Cookie Bars

The Lazy Cookie Bar is amazing. It is prepared with a boxed cake mix, which is one of my favorite cupboard items. So adaptable, so simple, and so delicious. There are only four ingredients, and you probably have them already in your pantry.

It isn’t a particularly thick bar. It’s more like a cookie made in a sheet pan. It’s gooey, and I’m a sucker for the edges, which are my favorite part.

Can I add Other Flavors to the Cake Mix?

The versatility of this dish is one of its best features. I’ve made them using red velvet cake mixes, chocolate cake mixes, and birthday cake mixes, and they’ve always turned out great! Plus, feel free to experiment with other varieties of chips and nuts.

When the holiday baking chips come out, I get extremely excited. You could have a lot of fun with this dish, and no one but you will realize how simple it was to prepare.

Prepare ahead of time

  • To store: These cookies can be kept at room temperature for up to a week in an airtight container or bag.
  • To freeze: Place cookies in a covered container or bag, divided by parchment paper (to prevent sticking). Freeze for a maximum of three months in advance.

Customize to Your Cravings

  • Use any type of chocolate chip you desire, including dark, milk, semi-sweet (traditional), butterscotch, peanut butter, and white. Dark is what I use.
  • Before baking, toss in some Skor pieces.
  • Toss chopped walnuts, macadamia nuts, or pecans into the batter.

Sizes of Pans Possible

A 9-inch square pan with a capacity of around 10 cups was required for the mix. As a result, all of the following pan choices will work:

  • 9″ x 9″ square
  • 9″ spring form pan
  • 10″ x 15″ jelly roll pan
  • 11″ x 7″ rectangle

It’s possible that the baking times will need to be adjusted. The first three will take around the same 30 minutes. It took 18-20 minutes on the jelly roll pan, which I used to speed things up. Even less if you thoroughly extend the dough out to the edges.

Ingredients for Lazy Chocolate Chip Cookie Bars

To Make Lazy Chocolate Chip Cookie Bars, Follow These Instructions:

Preheat the oven to 350 degrees Fahrenheit. Using nonstick cooking spray, coat a 9×13-inch baking dish. I prefer the one that contains flour (Baker’s Joy).

Combine the dry cake mix, melted butter, and beaten eggs in a mixing bowl.

Since the batter will be fairly thick, it will be simpler if you use an electric or stand mixer. Add the chocolate chips to the mix. In a greased baking dish, spread the batter.

And because the batter is so thick, I prefer to coat my hand with nonstick cooking spray and then push it about with my hand.

Place it in the oven and bake for 20-25 minutes, or until it is uniformly spread out.

It will bubble up as it cooks and turns golden brown, mostly around the edges, when finished.

And, like any delicious chocolate chip cookie, I prefer to eat these while they’re still warm, so you’ll often find me taking nibbles from this pan before it’s completely cool! This is also an excellent basis for ice cream dessert.

Share the image below to your Pinterest board if you like these lazy chocolate chip cookie bars recipe!

Lazy Chocolate Chip Cookie Bars

List of Ingredients

  • 5 tbsp melted salted butter
  • 2 large eggs, beaten
  • 12-ounce bag of semi-sweet chocolate chips
  • 25-ounce box of yellow cake mix

Directions

  1. Preheat the oven to 350 degrees Fahrenheit.
  2. Using nonstick cooking spray, coat a 9 x 13-inch baking dish. I prefer the one that contains flour.
  3. Stir the dry cake mix, melted butter, and beaten eggs in a mixing basin. Because the batter will be pretty thick, it will be simpler if you use an electric or stand mixer.
  4. Add the chocolate chips and mix well.
  5. Pour thick batter onto a prepared baking dish and spread evenly. Because the batter is so thick, I prefer to coat my hand with nonstick cooking spray and then distribute it about with my hand.
  6. Place it in the oven and bake for 20-25 minutes, or until it is uniformly spread out.
  7. It will bubble up while cooking and turn golden-brown all-around edges when finished. Allow time for cooling.

Last words

I hope this recipe for lazy chocolate chip cookie bars helped you with what is supposed to and that is to let you enjoy your laziness and make awesome cookies for you and your family. 🙂

If you have any questions about these lazy cookie bars, feel free to comment below this post, and I’ll reply. 

The Ultimate Venison Burger Recipe (With Smoked Paprika Aioli)

The Ultimate Venison Burger Recipe (With Smoked Paprika Aioli)

Depending on your preference, this venison burger meal can be made on the stovetop or the grill. I gave each of them directions. I have included cooking durations and internal temperatures to assist you in achieving your ideal level of doneness! My friend likes his venison burgers Read More

Homemade Polish Kluski Noodles Easy Recipe

Homemade Polish Kluski Noodles Easy Recipe

Kluski Noodles are a style of egg pasta popular in Poland. They’re produced with wheat flour dough that hasn’t been leavened and is blended with eggs before being boiled. This type of noodle is commonly seen in a variety of Polish soups. If you love Read More

Traditional Greek Lemon Rice Recipe (Greek Rice Pilaf)

Traditional Greek Lemon Rice Recipe (Greek Rice Pilaf)

This convenient and simple Greek Lemon Rice recipe makes four servings of delicious Greek Lemon Rice (also known as Greek Rice Pilaf). This meal is zesty, summery, and filled with flavor from sautéed onions, garlic, Mediterranean herbs, seasonings, and lemons! It’ll be ready in half an hour!

Are you fed up with the same old white rice? We were, too, which prompted me to conduct some experimentation and study unique ideas to jazz up white rice. So, which one is our personal favorite? This dish for lemon rice is fantastic and goes amazingly with this Greek gyro!

This dish is a riff on Greek rice and takes about 25-30 minutes to prepare, which is approximately the same amount of time it takes to prepare conventional rice! So, with a sprinkle of this and a smidgeon of that, you’ll have a new favorite, a quick lemon rice meal to add to your dinner rotation.

Lemon Rice in the Traditional Greek Style

By cooking it with some onion, vegetable broth, and lemon, you can turn ordinary long-grain rice into a delicious dish that can stand on its own. And if you want to improve it, add some parsley and lemon zest right before serving. Unless, of course, you’re following in the footsteps of your wise and wonderful mother and grandmother, who knew that it’s not necessary when serving it with a saucy meat dish.

Traditional Greek Lemon Rice Recipe (Greek Rice Pilaf)

Greek Lemon Rice Preparation

  • Begin by sautéing the finely chopped onion in a skillet. This is a crucial stage in the flavoring process. I use olive oil to sauté in this recipe.
  • After that, add the rice and cook until it starts to turn color.
  • Next, add the stock—I use vegetable broth for a vegetarian version, but you may also use chicken broth.
  • Cook over low heat, with the lid on, until the water has been soaked up and the rice has softened.
  • Allow it to sit for a couple of minutes before fluffing it with a fork. Combine the lemon juice and freshly ground pepper in a mixing bowl.
  • Garnish with chopped parsley and lemon zest if desired, and serve hot or at room temp.

Ingredients for Greek Lemon Rice

  • Onion: For this dish, I prefer white onion since it is relatively mild and adds sweetness to the rice.
  • Rice: Because you don’t want a sticky consistency in this Greek rice dish, you should use plain long-grain rice. Additionally, I prefer plain rice rather than basmati or Jasmine rice, which have a distinct flavor.
  • Broth: I use vegetarian broth, but chicken broth can also be used. Keep in mind that many ready-made broths contain salt, so keep that in mind when adding salt to taste.
  • Lemon: It’s critical to utilize fresh lemon juice rather than bottled lemon juice. This dish relies heavily on lemon, which must be used fresh.
  • Herbs: As previously said, the broth and whichever sauce you choose to put in the accompanying meal give flavor to this sort of rice. If you’re not going to serve it with a sauce, go ahead and add the herbs.
  • Olive Oil: For this dish, I used olive oil because of its clear health advantages and taste.

Frequently Asked Questions

What is rice pilaf, exactly?

Rice pilaf is a kind of rice, including this Greek rice. Rice pilaf is made by heating rice with sautéed onion and garlic, then simmering the rice in broth. This is the most basic sort of pilaf; it often includes meat, such as chicken or beef, as well as a variety of spices and herbs.

Can I make Greek Lemon Rice in a rice cooker?

It’s not something I’d suggest. The rice should be prepared on the stovetop since it will be sautéed with onion and garlic.

Could I use brown rice instead?

You can try but bear in mind that it will take longer to prepare and may necessitate additional liquid. Check the rice package directions for detailed information on the optimal rice-to-liquid ratio.

Share the image below to your Pinterest board if you like this Greek Lemon Rice Recipe!

Traditional Greek Lemon Rice

List of Ingredients

  • Fresh ground pepper for serving
  • Salt to taste
  • 1 ½ tbsp. chopped parsley (optional)
  • 2 tbsp Extra virgin olive oil
  • 3 tbsp fresh lemon juice
  • Lemon zest from half a lemon (optional)
  • 1 small white onion (finely chopped)
  • 1 cup uncooked plain white long-grain rice
  • 2 cups (500 ml) water or vegetable broth

Directions

  1. On medium heat, heat the olive oil. For about five min, sauté the onion until it is tender and transparent.
  2. Throw in the rice and continue to cook, constantly stirring, until it becomes golden, approximately 1 minute.
  3. Pour in the broth, close with the lid, and reduce the heat to a gentle simmer. Cook for 10-15 minutes (depending on the type of rice you used), or until the rice is cooked and most of the liquid has been soaked up.
  4. Remove the pan from the heat and cover the rice for 10 minutes.
  5. Toss in the lemon juice and freshly ground pepper with a fork.
  6. Season with salt to taste.
  7. Garnish with chopped parsley and lemon zest, if desired.
  8. Serve at room temperature or hot.

Tips

It would be best if you used plain long-grain rice because this Greek rice dish doesn’t want a tacky consistency. I don’t advocate basmati or Jasmine rice because they taste differently.

Last words

Well, I hope you’ve enjoyed making this recipe. This Greek dish is refreshing, full of flavors, and ideal for summertime, although I sometimes make it during the winter months to get a bit of nostalgia for the summer. 🙂 That being said, if you’re going to Greece on holiday, please try this dish and let me know if there’s any difference. By the way, the restaurant I tried this dish while on vacation in Santorini, Greece, is called Anogi

If you have any questions or suggestions for this Lemon Rice recipe, please write them down in the comments section, and as always, I will reply. Oh, I almost forgot; please share this Greek recipe on your social media pages; it would mean a lot to me. 

The Best London Broil Easy Recipe

The Best London Broil Easy Recipe

After being marinated in a liquid combination with spices and seasoning, London Broil is a wonderfully soft piece of beef that is broiled in the oven. A sumptuous supper that’s simple to prepare! London Broil is a quick, budget-friendly, hands-off supper that’s excellent for weekday Read More

The Best California Burritos with Carne Asada

The Best California Burritos with Carne Asada

Are you ready for one of the best burritos ever? California Burritos with Spicy Mexican French Fries, carne asada, and all the other ingredients are in my top 10 street foods list! California Burritos is undoubtedly one the best burritos anywhere in the world. These Read More

The Best Authentic Meat Jelly Recipe (aka Aspic)

The Best Authentic Meat Jelly Recipe (aka Aspic)

Today we’re making a meat jelly recipe, yay! In our household, the holiday season, particularly Christmas, are a time to bring the entire extended family around the table and enjoy delectable seasonal foods. One of them, in my opinion, is the best meat jelly recipe.

What is Meat Jelly? 

Meat jelly, technically known as Aspic, is high in minerals and amino acids. It’s a natural source of collagen that promotes, tooth, bone, and joint mobility. It follows the Whole30, Keto, Paleo, and GAPS diets naturally.

Jello History

Meat jelly has been around since the 1300s, when the first and precise Aspic recipe emerged in Le Viandier, a compendium of the finest renowned Middle-Ages recipes.

In 1897, a cough medicine company in LeRoy, New York invented a cough treatment that included a laxative and flavorings from the fruit, which we now know as Jell-O, without the cough reliever and laxative, or perhaps not. Pearl Wait, a LeRoy resident, attempted but failed to commercialize his results

He made $450 selling his formula 2 years later. Jell-O is presently the most popular dessert in the world and is well-known all over the world.

Aspic or Meat Jelly reminds me of a luxurious bone broth. It makes sense because the method and ingredients needed to make bone broth are comparable to those used to make aspic. Just with a lot more meat.

Aspic was used to preserve vegetables, eggs and meat in the Le Viandier recipe. We don’t need to “preserve” veggies in pork gelatin anymore, thanks to modern refrigeration.

The Best Authentic Meat Jelly Recipe

Is Meat Jelly Healthy?

The best thing about this recipe is how nutritious it is. While you cook bones for a long time, the collagen, a protein present in bone, cartilage, marrow and ligaments, is broken down, resulting in gelatin. Gelatin aids in protein absorption while also calming the stomach lining.

That’s why, while you’re experiencing a virus, Meat Soup is so good for your gut. Bone broth or aspic, which contains gelatin/collagen, can help make your skin flexible and decrease cellulite. An additional advantage of bone broth is that it has healing capabilities in the form of amino acids.

Meat Jelly Recipe

Because my mother typically cooked in huge quantities, usually 10-15 servings, this recipe is normally prepared throughout the winter and, more specifically, for Christmas or New Year’s Eve. It’s not a difficult recipe; it just takes a while to cook and requires some attention to detail, but I guarantee you’ll end up with a delicious dinner.

As you may know, aspic is a gelatin substance made by boiling pig components such as the ears, head, skin, and trotters for an extended period of time until the collagen is released.

The Best Authentic Meat Jelly Recipe

Ingredients for Meat Jelly Recipe

Because this recipe is a must-have for the Christmas table, I began gathering the essential meat in advance. Thus I purchased a complete half of pork and set aside half the head with the whole ear, two trotters, and the pigtail for the jelly. I also used roughly 10 oz of pork skin for added collagen, but if you can’t get it, you may skip it.

This sort of ingredient can be found at Eastern European markets or butchers; if you are not able to find all of them, combine several trotters with a pork shank. For this meat jelly recipe, I also included 1.4 kg of turkey wings (approximately two pieces) to the list of ingredients, which will provide a fair amount of collagen to the meat jelly.

Turkey drumsticks, which contain both gelatin and a considerable amount of meat, are another option.

Numerous recipes call for aspic to be made entirely of meat, but I prefer to use veggies. I’ll use about 5-6 carrots, a handful of leeks, a few bunches of celery stalks (about 4 oz), and one one whole garlic to finish it up.

How to make Meat Jelly Recipe

We’ll need a large pot for soups, normally between 300 oz capacity, because we’ll be making a lot of pork jelly, and we’ll have a lot of bone-in meat.

We put the pork on the bottom of the pot, then the turkey meat on top of the pork. You don’t need to bother portioning the pork head because it fit in the pot whole. The vegetables were piled on top of the meat, which I had left untouched.

Sprinkle with four tablespoons of salt, a tablespoon of peppercorns, and two bay leaves (in that order). Fill the pot halfway with cold water, which should be much higher than the level of the ingredients, and set it on fire. 

Turn the heat to high until it begins to boil, then reduce it to medium to low for around 30 minutes or a bit more, scooping the foam that forms on top with a spoon during this time.

This is necessary in order to obtain a clear pork jelly. After around 30 mins, reduce to low heat and continue to cook for a minimum of 3 hours, or until the meat falls off the bone and also the bones and skin produce gelatin.

I used a method to avoid spending too much time in the kitchen; I put the pot in the oven at 250F before going to sleep and left it there until practically dawn, almost 6 hours and meat jelly was ready when I awakened.

The Best Authentic Meat Jelly Recipe

Aspic is being split.

Allow the pot to settle and cool so you can work with the ingredients more effectively. Take all of the solids from the soup pot, place the meat in a bowl with the bones, and divide the veggies.

We may now perform a test to see if we were successful in making the meat jelly. Put a small plate with some of the liquid from the pot in the fridge for 10 min. If it hardens, it’s done; if it doesn’t, we’ll need to add more food gelatin. For me, it worked out great!

We’ll strain the remaining meat and vegetable liquid through a strainer into which we’ll throw one head of crushed garlic. This sieve has two purposes: first, to keep all of the remains in the pot, and second, to flavor the meat jelly with garlic cloves.

I’ll remove all the bone from the meat, which is a fairly difficult job that involves removing all of the bones, even the tiny ones. Depending on the number of servings or the amount of storage space, we prepare appropriate containers to store the meat jelly in, you could use plastic bowls or even more bottomless plates.

To keep things in the fridge without taking up too much room, I used several square plastic dishes with covers. In these dishes, equally, distribute the boned meat, then pour over the gelatin-rich stock. Some people add cooked veggies or even a boiled egg, but I like to leave solely the meat since cooked vegetables deteriorate more quickly.

Next, we just need to cap the containers, set them aside in a cool area (like the fridge), and wait for the meat jelly to solidify. That’s it, we’ve created the ultimate homemade meat jelly recipe, a delectable Christmas dinner meal that we can be proud to serve.

Share the image below to your Pinterest board and save this meat jelly recipe!

The Best Authentic Meat Jelly Recipe

Ingredients

  • 24 oz of pork trotters
  • ½ of pork head
  • 10 oz of pork rind
  • 8 oz of pork tail 1 piece
  • 10 oz of turkey wings
  • 14 oz carrots
  • 1 piece leek
  • 5 oz of celery stalks
  • 4 TBSP of sea salt kosher
  • 1 TBSP of peppercorns black
  • 2 pieces of bay leaves
  • Whole garlic

Directions

  • Take out your pork and put it in the pot’s bottom, then the turkey meat on top of the pork.
  • Over the meat, which I kept whole, arrange the veggies. To season the dish, add salt bay leaves and peppercorns.
  • Pour the cold water into the pot halfway, should be much higher than the level of the ingredients.
  • Set the heat to high until it begins to boil, then lower it to medium-low for approximately 30 mins, skimming the foam off the top using a spoon.
  • After 30 mins, reduce to low heat and continue to cook for a minimum of 3 hours, or until the meat falls from the bone and the bones and skin release gelatin.
  • Allow the pot to cool before removing all of the firm contents, separating the meat from the bones in a bowl, and separating the veggies.
    Strain the remaining liquid through a strainer into which you’ll add garlic.
  • Remove all of the bones, including the little ones, from all of the meat, which is a slightly complicated job.
  • Divide the boned beef evenly among the plastic bowls, then pour in the gelatin-rich stock. Wait for the meat jelly to harden in a cold area, like the fridge.
  • If some of your dishes contain too much fat, you can remove part or all of the fat layer from the top if needed. Serve chilled, cut the meat jelly into cubes sliced in half and Hungarian sweet paprika sprinkled on top.
  • Serve with lemon juice and chopped red onions on top.
Motor City Pizza Costco Instructions (Effortless in 3 Ways)

Motor City Pizza Costco Instructions (Effortless in 3 Ways)

Today I will explain how to cook Motor City Pizza Costco in the oven, air fryer, and microwave. Together with the directions, I will go over some suggestions and tricks to guarantee you get that great pizza with a crispy crust. To use the air Read More