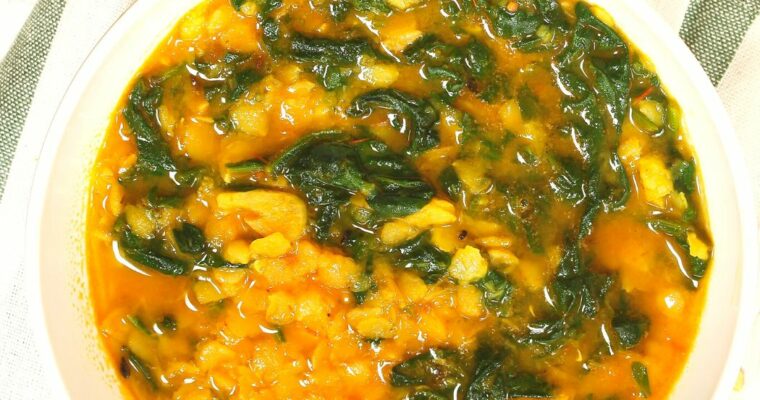
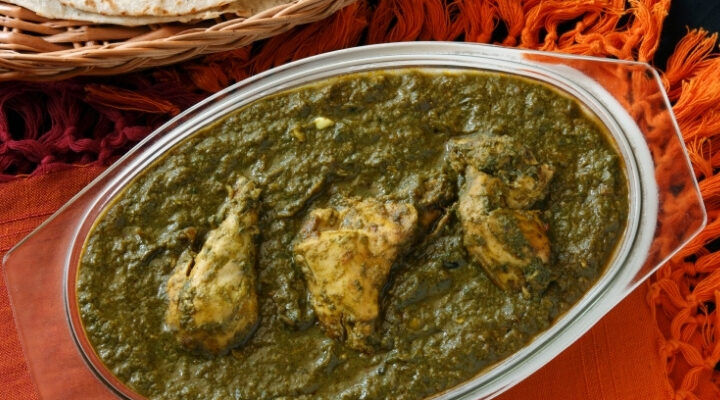
Easy and Delicious Recipes

Recent Posts

Mexican One Pot Beef and Rice Casserole Recipe

Mexican One Pot Beef and Rice Casserole Recipe

Mexican One Pot Beef and Rice Casserole Recipe is a simple peasy skillet dinner full of all that cheesy goodness, even the rice gets cooked perfectly in the pan! This is certainly one of my family’s favorite Mexican Dinners and among my favorite recipes to make. Read More

Grilled Beef Kidney Recipe

Grilled Beef Kidney Recipe

The grilled Beef Kidney Recipe is one of the best meals I’ve ever made. Organ meats like Kidneys aren’t so popular in the USA for some reason, though French chef and author Jacques Pepin says that beef kidneys can be a tender and tasty cut Read More

Garlic Butter Steak Bites With Spicy Marinade

Garlic Butter Steak Bites With Spicy Marinade

Today I’m going to share Garlic Butter Steak Bites With the Spicy Marinade recipe. The beef bites are very tender and juicy and take only 10-15 minutes to make. They go perfectly well with potatoes for lunch and dinner!

Garlic butter steak bites are simple to make and delicious. It’s great for a busy weeknight dinner whenever you feel full course dinner is a lot to handle in the kitchen.

It’s super easy to make these marinated steak bites since it takes only about 10 minutes. The first thing you do is cut the sirloin steak into cubes ( bite-sized) and season them with salt, black pepper and smoked paprika.

The next phase is warming up a cast-iron skillet and cooking the steak bites with butter and garlic. To bring up the taste, I really like adding my homemade dry rub before serving. The results are tender, juicy, and so flavorful beef bites that everyone will enjoy!

Ingredients

  • 1 lb top sirloin steak, cut into bite-sized cubes

  • 1 teaspoon smoked paprika

  • ½ teaspoon kosher salt

  • Freshly ground black pepper, to taste

  • 4 tablespoons unsalted butter, room temperature

  • 12 garlic cloves, peeled

  • ½ tablespoon Italian seasoning

  • 1 teaspoon homemade dry rub (or your favorite steak seasoning)

  • 1 tablespoon fresh Italian parsley, chopped

  • Juice of ½ lemon (or about 4 small squirts)


Instructions

1. Marinate the Steak

Place the steak cubes in a bowl. Season with smoked paprika, kosher salt, and black pepper. Toss to coat and let sit while you prep the skillet.

2. Cook the Garlic

Heat a large skillet over high heat. Add the butter, and once melted, add the garlic cloves. Stir for a minute until fragrant and lightly golden.

3. Sear the Steak Bites

Add the steak cubes to the skillet with the garlic. Cook for about 3–4 minutes, stirring and tossing so the steak sears on all sides. Sprinkle in the Italian seasoning and dry rub, mixing well to coat.

4. Finish and Serve

Once the steak is cooked to your liking, stir in the fresh parsley. Remove from the heat, drizzle with lemon juice, and serve immediately.


Tips & Notes

  • Steak options: Ribeye or New York strip also work great for this recipe.

  • Garlic tip: Leave cloves whole for a mellow flavor, or smash them slightly for more punch.

  • Cooking level: For medium-rare bites, aim for about 3 minutes total; cook a bit longer if you prefer medium.

Pin the image below if you like this Garlic Butter Steak Bites Recipe!

Garlic Butter Steak Bites With Spicy Marinade


Check out our most popular Garlic butter recipe so far here: Garlic Butter Juicy Pork Chops Recipe

Chocolate Truffle Tart Recipe

Chocolate Truffle Tart Recipe

This Chocolate Truffle Tart Recipe is simple yet elegant. For every chocolate lover’s dessert for any special occasion, anytime of year.  It’s decadent and so rich, but easy to create, and easily transformed into gluten free or diary free versions that are equally good. This Read More

Almond Joy Candy Bars Recipe (Copycat)

Almond Joy Candy Bars Recipe (Copycat)

The best part about these Almond Joy candy bars recipe is that you simply don’t need any special pan. These are just a coconut mixture formed into shape, frozen for a short time, before dipped in chocolate. Almond Joy Candy Bars Ocho coconut bars taste Read More

Homemade Hostess Cupcake Recipe

Homemade Hostess Cupcake Recipe

Homemade Hostess Cupcake Recipe is creamy in the middle, an extra moist cake with a nice fudge ganache and the classic crisp vanilla swirl on the top. This isn’t one of my easiest recipes, considering there are many delicious components that make this delicious masterpiece. However, with a couple of shortcuts, this cake is easy to create.

Prepare Ahead Options For Hostess Cupcake Recipe:

  • Create the swirl icing and cream filling and store them in an airtight container for up to five days ahead of time.
  • Store the chopped chocolate in a sealed ziplock bag.
  • Mix all dry ingredients (not the espresso) for the cake and store in an airtight container.

If you haven’t stuffed a cupcake before, it’s straightforward, no worries. There are a couple of ways you can do it. You can stick the piping bag ( with a metal tip) directly into the whole cake. Or, you could take away the tops of cupcakes by creating a cone shape, and add the filling, then replace the tops with some of the cake removed from the top.

Homemade Hostess Cupcake Recipe 2 1


Hostess Cupcake Recipe

For the Chocolate Cake

  • 2 cups of flour, all-purpose
  • 2 cups of sugar, granulated
  • 1 cup of cocoa powder
  • 2 tsp of baking powder
  • 1 tsp of baking soda
  • 1 tsp of salt
  • 2 heaped tsp of espresso powder
  • 1 cup of milk
  • 1/2 cup of vegetable oil
  • 2 whole eggs
  • 2 tsp of vanilla
  • 1 cup boiling water, filtered

For the Cream Filling

  • 2 cups of marshmallow creme
  • 1/2 cup of stick butter
  • 1 cup of sugar, powdered
  • splash heavy cream

For the Chocolate Glaze

  • 5 ounces of chopped Bittersweet chocolate
  • 1/2 cups of heavy cream

For the Swirl Icing

  • 1/4 cup of room-temperature butter
  • 1 cup of sugar, powdered
  • 1 Tbsp of heavy cream
  • 1/2 tsp of vanilla extract

Instructions

  1. Preheat Oven & Prep Pans:

    • Heat your oven to 325º F (163º C).
    • Line a muffin tin with cake liners.
  2. Mix Dry Ingredients:

    • In a large bowl of a stand mixer, combine the following:
      • Flour
      • Cocoa powder
      • Sugar
      • Baking powder
      • Baking soda
      • Salt
    • Use the paddle attachment to mix until well combined.
  3. Add Wet Ingredients:

    • To the dry mixture, add:
      • Milk
      • Egg
      • Vegetable oil
      • Vanilla extract
    • Blend on medium speed until the mixture is well combined.
  4. Prepare Espresso Water:

    • Boil water in a microwave-safe glass.
    • Remove from the microwave and stir in espresso powder until dissolved.
  5. Combine Espresso Water with Batter:

    • With the mixer on low speed, slowly add the boiling espresso water to the batter.
    • Increase the speed and mix for about one minute to aerate the batter.
  6. Bake:

    • Fill each cupcake liner about 3/4 full with batter.
    • Bake for 12-15 minutes or until a toothpick inserted in the center comes out clean.
    • Remove from the oven and allow the cupcakes to cool completely.

Creme Filling:

  1. Mix Ingredients:

    • In a mixing bowl, beat together butter and marshmallow creme on medium speed until fluffy.
    • Reduce speed to low and gradually add powdered sugar.
    • Once combined, increase the speed to medium-high and beat for 1-2 minutes until light and airy.
  2. Prepare for Piping:

    • Transfer the filling to a piping bag fitted with a large, round tip.
    • Refrigerate until ready to use.

Chocolate Glaze:

  1. Prepare Chocolate:

    • Place chopped chocolate in a round bowl.
  2. Heat Cream:

    • Microwave heavy cream until it simmers.
    • Pour the hot cream over the chopped chocolate and let it sit for a moment.
  3. Create Ganache:

    • Whisk the cream and chocolate until smooth.
    • Let it sit for about 5 minutes to thicken.

Swirl Icing:

  1. Mix Icing:
    • Beat all icing ingredients on medium speed until well combined and creamy.
    • Transfer to a piping bag with a small writing tip and set aside.

Assemble the Cupcakes:

  1. Fill Cupcakes:

    • Cut a cone-shaped piece out of the top of each cupcake.
    • Pipe the creme filling into the holes.
    • Replace the cone top and press down to seal.
  2. Add Chocolate Glaze:

    • Stir the ganache to ensure smoothness. Heat for 5 seconds if needed.
    • Dip the top of each cupcake into the ganache.
    • Allow excess to drip off and place on a cooling rack.
  3. Chill:

    • Refrigerate the cupcakes for 15-16 minutes to set the ganache.
  4. Decorate with Swirl Icing:

    • Pipe swirls across each cupcake with the prepared swirl icing.

Pin the image below if you like these Homemade Hostess Cupcakes!

Homemade Hostess Cupcakes


Pumpkin Tres Leches Cake With Spicy Cream

Pumpkin Tres Leches Cake With Spicy Cream

Pumpkin Tres Leches Cake! A lightweight and delicious pumpkin spice cake soaked with 3 milks and amaretto, then topped with cinnamon amaretto cream. A deliciously tasty cake that will heat you up on a cool winter night. Pumpkin Tres Leches Cake Now for a fast Read More

Cheesecake Factory Nashville Hot Chicken Nuggets (Copycat)

Cheesecake Factory Nashville Hot Chicken Nuggets (Copycat)

And now it’s time to make these Cheesecake Factory Nashville hot Chicken Nuggets. Extra spicy and perfectly crisp chicken breast nuggets with a touch of sweetness, this copycat recipe is perfect for any occasion. Cheesecake Factory Nashville Hot Chicken Nuggets If you’ve been to the Read More

Burgerville Fried Asparagus with Garlic Aioli (Copycat)

Burgerville Fried Asparagus with Garlic Aioli (Copycat)

Discover the irresistible taste of this Crunchy Burgerville Fried Asparagus with Garlic Aioli. This deliciously addicting dish from Burgerville has a crunch that will keep you coming back for more and a flavor that stays with you long after the last bite. It tastes so good that it will win over even the pickiest eaters.

Just like In-N-Out Burger has a cult following, so does the fast food sensation from the Northwest, Burgerville. What’s their claim to fame? A commitment to using locally-sourced ingredients that give their food authentic touch.

Let the different flavors of their seasonal menu take you away, from the tangy sweetness of the Marionberry Shake to the crisp satisfaction of the Walla Walla Onion Rings and the comfort of the Yukon Gold Waffle Fries, and more. The best part is that this symphony of flavors can be enjoyed from the convenience of a drive-thru.

The asparagus at Burgerville is an irresistible treat. It is delicately deep-fried to get that dreamy golden crispness while staying light and airy on the inside. The magic doesn’t end there, though. Each piece is then lovingly covered in a velvety homemade garlic aioli.

Burgerville Fried Asparagus with Garlic Aioli (Copycat)

Longhorn Steakhouse Crispy Brussel Sprouts

Popeyes chicken sandwich recipe

KFC Chicken Littles recipe (Copycat)

McDonald’s Chicken McGriddles (Copycat)

Chick-Fil-A Chicken Minis

Ingredients

For the Crispy Fried Asparagus

  • 2 bundles asparagus, trimmed

  • ½ cup self-rising flour

  • ½ cup cornstarch

  • 1 cup filtered water

  • ½ teaspoon sugar

  • ½ teaspoon salt

  • Neutral frying oil (vegetable or canola)

For the Garlic Aioli

  • ¾ cup good-quality mayonnaise

  • 3 garlic cloves, grated

  • 2½ tablespoons fresh lemon juice

  • ¾ teaspoon salt

  • ½ teaspoon ground black pepper


Instructions

1. Prepare the Aioli

  1. In a small bowl, whisk together mayonnaise, garlic, lemon juice, salt, and pepper.

  2. Cover and refrigerate for at least 30 minutes to let the flavors develop.

2. Make the Batter

  1. In a medium bowl, whisk together flour, cornstarch, sugar, and salt.

  2. Slowly add water, whisking until smooth. The batter should be light and slightly thin.

3. Fry the Asparagus

  1. Heat oil in a heavy pot or deep fryer to 375°F (190°C).

  2. Dip asparagus spears into the batter, coating evenly.

  3. Fry in batches for 4–5 minutes, until golden and crisp.

  4. Use a spider/skimmer to move spears around so they don’t stick.

  5. Transfer to a paper towel–lined rack to drain.

4. Serve

Serve the fried asparagus hot with chilled garlic aioli for dipping.


Tips & Notes

  • Batter tip: Keep the batter cold for extra crispiness.

  • Avoid overcrowding: Fry in small batches so the oil stays hot.

  • Cleanup trick: Skim off floating batter bits to prevent burning.


Make-Ahead & Storage

  • Aioli: Can be made up to 2 days ahead and stored in the fridge.

  • Asparagus: Best enjoyed immediately. Leftovers lose their crunch quickly, but you can re-crisp them in a 400°F (200°C) oven for 5–7 minutes.


Serving Suggestions

  • Serve as an appetizer with aioli or ranch.

  • Pair with burgers, grilled chicken, or steak for a restaurant-style meal.

  • Sprinkle with Parmesan or red chili flakes for extra flavor.

Tap the “pin” button and share the image below if you like this Burgerville Fried Asparagus Recipe. Remember, a pin a day keeps food cravings away. 🙂

Burgerville Fried Asparagus with Garlic Aioli (Copycat)

Important Tips for the Best Results

How to Pick Asparagus: When buying asparagus, look for spears that are firm, bright green, and have tips that are tightly closed. This will help you make sure you start with the freshest ingredients.

Trimming the Ends: Before you start, be sure to cut off the tough, woody ends of the asparagus. You don’t want your food to have any unpleasant crunches.

Oil Temperature: When frying, keeping the oil at the right temperature is essential. If it’s too cold, the asparagus will soak up too much oil and get greasy. If it’s too hot, it might burn. That’s why keeping an eye on things with a thermometer is essential.

Consistency of the Batter: You want a batter that coats the back of a spoon well and runs off slowly. It shouldn’t be too thick or too thin.

Post-Fry Seasoning: After frying, try a quick sprinkle of sea salt or a squeeze of lemon. This can bring out the flavors and cut the richness of the fried batter.

Serving Right Away: Fried asparagus tastes best when it is served right away. It loses its crispiness as it sits, so eat it as soon as it comes out of the fryer.

Can I make it in an Air-Fryer?

Yes, you can use an air fryer to make this recipe. The most important difference between deep frying and air frying is how much oil is used and how the food turns out.

For deep frying, food is completely submerged in hot oil, giving it a crispy, evenly browned exterior. However, it has more calories because it is fried in oil.

On the other hand, air frying uses a hot air flow to cook the food. It needs much less oil, usually just a light spritz, making it a healthier alternative. Even though it’s not as crispy as deep-frying, you can still get a satisfying crunch and tasty result.

To make asparagus in an air fryer:

Follow the same steps to prep and batter your asparagus.

  • Heat your air fryer to 375 F.
  • Place the battered asparagus in the air fryer basket in a single layer, ensuring they aren’t touching or overlapping. Depending on your air fryer’s size, this may mean cooking in more than one batch at a time.
  • Air fry for about 8–10 minutes, or until golden brown and crispy, turning them halfway through the cooking time.
  • Serve immediately with the garlic aioli.
Low Carb Banana Cocoa Muffin

Low Carb Banana Cocoa Muffin

These Low Carb Banana Cocoa Muffins are a perfect little treat when you want something sweet without the sugar overload. I’ve been cutting back on carbs lately, focusing on more protein, veggies, and natural ingredients — and these muffins have been one of my favorite Read More