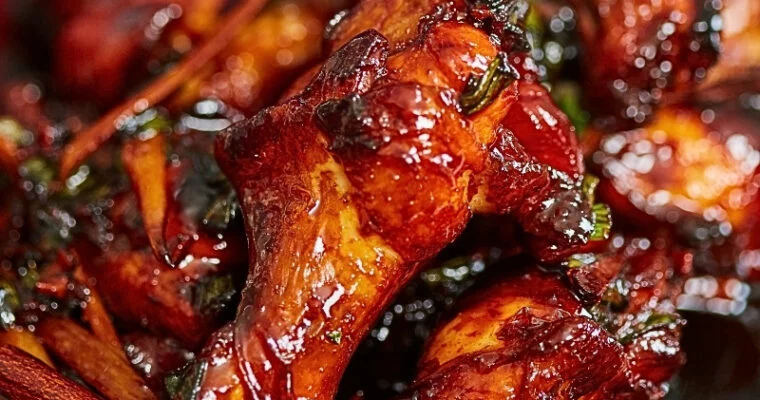
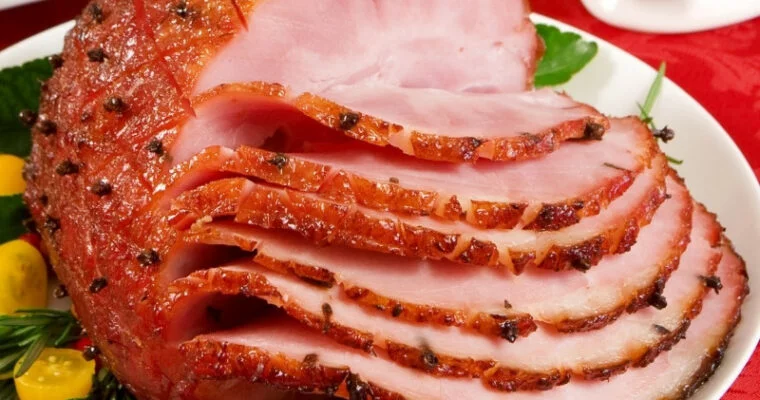
Easy and Delicious Recipes

Author: Sarah Berthold

Stuffed Sauerkraut Cabbage Rolls (Serbian Sarma)

Stuffed Sauerkraut Cabbage Rolls (Serbian Sarma)

If you’re looking for the ultimate comfort food, you can’t go wrong with Sarma—Serbian-style stuffed sauerkraut rolls. This slow-cooked dish is rich, hearty, and packed with deep, smoky flavors. Some say Sarma has Croatian origins, but I’ve only tried the Serbian version, and let me Read More

Peri Peri Chicken Skewers with Lemon Butter Sauce (Air Fryer Recipe)

Peri Peri Chicken Skewers with Lemon Butter Sauce (Air Fryer Recipe)

One of the best ways to elevate chicken is with a bold and zesty peri peri marinade. This version is blended with roasted red pepper, garlic, lemon juice, and spices, then finished with a rich lemon butter sauce for a perfect balance of heat and Read More

Perfectly Seared T-Bone Steak Recipe (A Steakhouse-Quality Dish at Home)

Perfectly Seared T-Bone Steak Recipe (A Steakhouse-Quality Dish at Home)

There’s something truly magical about a perfectly seared T-bone steak—the sizzling sound as it hits the pan, the rich aroma of butter and herbs, and the deep, golden crust that forms on the outside. Whether you’re cooking for a special occasion or just treating yourself to a restaurant-quality meal, this recipe will guide you through every step to achieve steak perfection.

No fancy equipment required—just a solid pan, a little patience, and a love for great food. Stick with me, and by the end of this recipe, you’ll be confident enough to cook a T-bone steak that rivals your favorite steakhouse.

Perfectly Seared T Bone Steak Recipe A Steakhouse Quality Dish at Home

Ingredients (Serves 1–2)

For the Steak:

  • 1 T-bone steak (1–1.5 lbs, at least 1 inch thick, up to 2 inches)

  • Kosher salt, to taste

  • Freshly ground black pepper, to taste

  • 1 tbsp olive oil

  • 1 tbsp unsalted butter

  • Optional: 3 garlic cloves, smashed, 2 sprigs fresh rosemary, 1 sprig fresh thyme

For Garlic Herb Butter (Optional):

  • 4 tbsp unsalted butter, softened

  • 1 garlic clove, minced

  • 1 tsp fresh parsley, finely chopped

  • ½ tsp fresh rosemary, finely chopped

  • ½ tsp thyme, finely chopped

  • Pinch of salt

  • Freshly ground black pepper


Instructions

1. Prepare the Steak

  • Remove the steak from the fridge at least 30 minutes before cooking.

  • Pat dry thoroughly with paper towels — a dry surface ensures a perfect sear.


2. Make Garlic Herb Butter (Optional)

  • In a small bowl, mix softened butter, garlic, parsley, rosemary, thyme, salt, and pepper until smooth.

  • Place on parchment paper, roll into a log, and refrigerate until firm.


3. Season the Steak

  • Generously season the steak on both sides with kosher salt and black pepper.

  • Set aside while your pan heats.


4. Preheat Your Pan

  • Place a cast-iron skillet or heavy-bottomed pan over medium-high heat.

  • Heat for 2–3 minutes, then add olive oil and butter.

  • When the butter starts to sizzle but not smoke, you’re ready to sear.


5. Sear the Steak

  • Carefully place the steak in the hot skillet.

  • Cook undisturbed for 4–5 minutes per side for medium-rare, or slightly longer for more doneness.

  • For a 1.5–2 inch steak, add 1–2 extra minutes per side.


6. Add Aromatics & Baste

  • During the last few minutes of cooking, add the garlic, rosemary, and thyme to the pan.

  • Tilt the skillet slightly and use a spoon to baste the steak repeatedly with the hot, melted butter and pan drippings for rich, infused flavor.


7. Check Temperature

Use an instant-read thermometer for perfect doneness:

  • Rare: 125°F (52°C)

  • Medium-rare: 135°F (57°C)

  • Medium: 145°F (63°C)

  • Medium-well: 150°F (66°C)

  • Well-done: 160°F (71°C)

Remember, the steak will rise about 5°F while resting.


8. Rest and Finish

  • Transfer steak to a cutting board and tent loosely with foil.

  • Let rest for 10 minutes to allow the juices to redistribute.

  • For extra indulgence, slice off a coin of garlic herb butter and place it on top of the hot steak to melt.


9. Slice & Serve

  • Slice against the grain into thick strips.

  • Drizzle with pan juices and serve immediately.


Pairing Suggestions

Serve with creamy mashed potatoes, roasted vegetables, crispy fries, or a simple arugula salad for a complete meal.


Timing

  • Prep Time: 10 minutes

  • Cook Time: 10–15 minutes

  • Rest Time: 10 minutes

  • Total Time: ~30–35 minutes

If you enjoyed this recipe, why not spread the joy? Save the image below and pin it to your favorite Pinterest board—it’s a great way to keep this mouthwatering T-bone steak recipe handy and share it with friends who love a good homemade steak!

Perfectly Seared T Bone Steak Recipe A Steakhouse Quality Dish at Home 2

Tips & Variations

Get That Steakhouse Crust

For an extra-crispy crust, make sure your steak is completely dry before seasoning. You can also sprinkle a tiny bit of cornstarch on the surface—it helps create a beautiful sear.

Experiment with Seasonings

While salt and pepper are classic, don’t be afraid to experiment. Try a dry rub with smoked paprika, garlic powder, and a touch of cayenne for a little heat.

The Reverse Sear Method

If you love a thick steak but don’t want a charred exterior with a raw center, try the reverse sear. Cook the steak at 250°F (120°C) in the oven until it reaches about 10 degrees below your desired doneness, then sear it in a screaming hot pan for a minute per side.

Butter Makes Everything Better

Enhance your butter basting by adding a compound butter—mix softened butter with garlic, fresh herbs, and a squeeze of lemon juice for a steakhouse-worthy finish.

Let It Rest, No Exceptions

It’s tempting to slice right into your steak, but patience pays off! Letting it rest allows the juices to redistribute so every bite is juicy and flavorful.

Air Fryer Bang Bang Chicken Breast Recipe

Air Fryer Bang Bang Chicken Breast Recipe

There’s something incredibly satisfying about a meal that combines simplicity with a burst of flavor. When I first tried this Bang Bang Chicken Breast made in my air fryer, I was surprised at how effortlessly the creamy, spicy sauce elevated the tender chicken to a Read More

Air Fryer Breaded Chicken Skewers

Air Fryer Breaded Chicken Skewers

Craving a quick, comforting meal without drowning in leftovers? These small-batch Air Fryer Breaded Chicken Skewers are the answer. Each tender piece is marinated for extra flavor, then coated in crisp breadcrumbs that turn golden and irresistible after just a few minutes in the air Read More

Air Fryer Ground Beef Kebabs with Bacon Recipe

Air Fryer Ground Beef Kebabs with Bacon Recipe

Tired of the same old dinner ideas? Switch things up with these air fryer ground beef and bacon kebabs. With the perfect blend of smoky bacon and well-seasoned ground beef, each bite is packed with flavor. These kebabs are simple to make, making them a great option whether you’re cooking for yourself or hosting friends. Let’s jump into how to make these tasty kebabs.

Air Fryer Ground Beef Kebabs with Bacon Recipe 2

Air Fryer Ground Beef Kebabs Recipe

Ingredients

  • 1 lb (450g) ground beef (preferably 80/20 for juicier kebabs)
  • 4 strips of bacon, chopped into small pieces
  • 1 small onion, finely diced
  • 2 cloves garlic, minced
  • 2 tbsp fresh parsley, chopped (or 1 tbsp dried parsley)
  • 1 tsp paprika
  • 1 tsp cumin
  • ½ tsp chili powder (optional for a slight kick)
  • Salt and black pepper to taste
  • Wooden or metal skewers (soaked in water for 30 minutes if wooden)

Instructions

  1. Preheat the air fryer to 375°F (190°C).
  2. Prepare the mixture: In a large mixing bowl, combine the ground beef, chopped bacon, onion, garlic, parsley, paprika, cumin, chili powder, salt, and black pepper. Mix until all ingredients are evenly distributed but be careful not to overmix as it can make the kebabs tough.
  3. Shape the kebabs: Divide the mixture into 6-8 equal portions. Shape each portion around a skewer, pressing firmly to ensure the meat mixture holds its shape. Make sure each kebab is about 4-5 inches in length.
  4. Arrange in the air fryer: Place the kebabs in a single layer in the air fryer basket, ensuring they don’t touch for even cooking.
  5. Cook: Air fry for 10-12 minutes, flipping halfway through. The bacon will add a smoky, crispy layer while the ground beef stays juicy. Cook until the internal temperature reaches 160°F (71°C).
  6. Serve: Remove the kebabs from the air fryer and let them rest for a couple of minutes. Serve with a side of tzatziki sauce, fresh salad, or warm pita bread.

Loving these ground beef kebabs? Pin the image below to your Pinterest board and share the deliciousness!

Air Fryer Ground Beef Kebabs with Bacon Recipe 3

Tips for Perfect Kebabs

  • Avoid overmixing: It’s crucial to mix just enough to combine the ingredients. Overmixing can lead to dry, dense kebabs.
  • Use cold ingredients: Chilling the meat mixture for 10 minutes before shaping can help it hold together better during cooking.
  • Soak wooden skewers: If using wooden skewers, soaking them for at least 30 minutes prevents them from burning.

Recipe Variations

  • Cheesy Kebabs: Add shredded mozzarella or cheddar to the mixture for a cheesy surprise.
  • Spicy Kebabs: Incorporate red chili flakes or finely diced jalapeños for extra heat.
  • Mediterranean Kebabs: Mix in crumbled feta, chopped olives, and a touch of oregano.
  • Herb Kebabs: Replace parsley with a combination of fresh dill, cilantro, or mint for a unique flavor.
  • Sweet and Savory: Add a drizzle of honey or a teaspoon of brown sugar to balance the smoky bacon with a hint of sweetness.
  • Vegetable Combo: Skewer chunks of bell pepper, zucchini, or cherry tomatoes alongside the meat for added texture and flavor.
Parmesan Crusted Air Fryer Pork Chops

Parmesan Crusted Air Fryer Pork Chops

If you’re looking for a meal that’s both easy to make and bursting with flavor, these Parmesan Crusted Air Fryer Pork Chops are just the ticket. The air fryer gives the pork chops a perfectly crispy crust while keeping the meat tender and juicy inside. Read More

Beef and Broccoli Stir-Fry with Sauce (Crispy & Tender)

Beef and Broccoli Stir-Fry with Sauce (Crispy & Tender)

There’s a special place in my heart for meals that are both comforting and bursting with flavor. This Beef and Broccoli Stir-Fry with Garlic Sesame Glaze is one such dish that never fails to delight. I remember the first time I whipped it up on Read More

Blackened Shrimp Recipe with Zesty Remoulade Sauce

Blackened Shrimp Recipe with Zesty Remoulade Sauce

I’ve always loved the bold flavors of blackened shrimp, so I set out to create a blackened shrimp recipe that’s both delicious and easy to make. I started by marinating the shrimp in a mixture of olive oil, garlic, and lemon juice to keep them tender and flavorful.

Then, I crafted a special spice blend with paprika, cayenne, and herbs to give that perfect smoky kick. To top it all off, I whipped up a creamy remoulade sauce that complements the spicy shrimp perfectly. This blackened shrimp recipe not only tastes amazing but also looks impressive on any plate, making it perfect for both weeknight dinners and entertaining guests.

Blackened Shrimp Recipe 2

Blackened Shrimp Recipe

Ingredients

For the Shrimp Marinade

  • 1 pound large shrimp, peeled and deveined
  • 2 tablespoons olive oil
  • 3 cloves garlic, minced
  • Juice of 1 lemon
  • Salt and pepper, to taste

For the Blackening Seasoning

  • 2 teaspoons paprika
  • 1 teaspoon cayenne pepper (adjust to taste)
  • 1 teaspoon garlic powder
  • 1 teaspoon onion powder
  • 1 teaspoon dried thyme
  • 1 teaspoon dried oregano
  • 1/2 teaspoon salt
  • 1/2 teaspoon black pepper

For the Remoulade Sauce

  • 1/2 cup mayonnaise
  • 1 tablespoon Dijon mustard
  • 1 tablespoon lemon juice
  • 1 tablespoon capers, finely chopped
  • 1 tablespoon pickles, finely chopped
  • 1 clove garlic, minced
  • Salt and pepper, to taste

Optional Garnishes

  • Fresh parsley or cilantro, chopped
  • Lemon wedges
  • Chopped green onions

Instructions

1. Marinate the Shrimp

  1. Prepare the Marinade: In a large bowl, combine the olive oil, minced garlic, lemon juice, salt, and pepper.
  2. Marinate: Add the peeled and deveined shrimp to the bowl, tossing to ensure they are evenly coated. Cover and refrigerate for at least 15 minutes to allow the flavors to penetrate the shrimp.

2. Prepare the Blackening Seasoning

  1. Mix the Spices: In a small bowl, combine paprika, cayenne pepper, garlic powder, onion powder, dried thyme, dried oregano, salt, and black pepper.
  2. Set Aside: Stir the seasoning blend until well mixed and set aside.

3. Make the Remoulade Sauce

  1. Combine Ingredients: In a separate bowl, mix together mayonnaise, Dijon mustard, lemon juice, chopped capers, chopped pickles, and minced garlic.
  2. Season: Add salt and pepper to taste. Adjust the flavors as needed.
  3. Refrigerate: Cover and refrigerate the sauce until ready to use.

4. Cook the Shrimp

  1. Preheat the Skillet: Heat a large cast-iron skillet over high heat until it’s smoking hot. This is crucial for achieving that perfect blackened crust.
  2. Season the Shrimp: Remove the shrimp from the marinade and pat them dry with paper towels. Generously coat each shrimp with the blackening seasoning on both sides.
  3. Sear the Shrimp: Add a small amount of olive oil to the hot skillet. Place the seasoned shrimp in the skillet in a single layer, being careful not to overcrowd the pan. Cook for about 2 minutes on each side, or until the shrimp are opaque and have a crispy, blackened exterior.
  4. Remove and Rest: Transfer the cooked shrimp to a plate and let them rest for a minute.

5. Serve

  1. Plate the Shrimp: Arrange the blackened shrimp on a serving platter or individual plates.
  2. Add the Sauce: Drizzle the creamy remoulade sauce over the shrimp or serve it on the side for dipping.
  3. Garnish: Sprinkle with fresh parsley or cilantro, and add lemon wedges and chopped green onions for an extra burst of flavor and color.
  4. Enjoy: Serve immediately while the shrimp are hot and juicy.

Enjoyed this blackened shrimp? Pin the image below to your Pinterest board to keep the recipe handy and share the deliciousness with others!

Blackened Shrimp Recipe 3

Tips for the Perfect Blackened Shrimp

  • High Heat is Key: Ensure your skillet is very hot before adding the shrimp to achieve that signature blackened crust without overcooking the shrimp.
  • Don’t Overcrowd the Pan: Cook the shrimp in batches if necessary to maintain high heat and ensure even cooking.
  • Customize the Heat: Adjust the amount of cayenne pepper in the seasoning blend to suit your spice preference.
  • Fresh Ingredients: Use the freshest shrimp possible for the best flavor and texture.

Serving Suggestions

  • With Grains: Serve the blackened shrimp over cilantro-lime rice, quinoa, or creamy polenta for a hearty meal.
  • Tacos: Use the shrimp as a filling for soft tacos, topped with avocado slices, shredded lettuce, and a squeeze of lime.
  • Salad: Add the shrimp to a fresh green salad with cherry tomatoes, cucumber, and a light vinaigrette for a lighter option.
  • Appetizer: Serve the shrimp as an appetizer with toothpicks and extra remoulade sauce for dipping.

Creamy Tuscan Orzo Chicken Recipe (One-Pan)

Creamy Tuscan Orzo Chicken Recipe (One-Pan)

After a long day, nothing beats coming home to the smell of something warm and comforting in the oven. This Tuscan Orzo Chicken Bake is exactly what you need—quick to prepare, with only one pan to clean, and ready to serve in no time. Imagine Read More