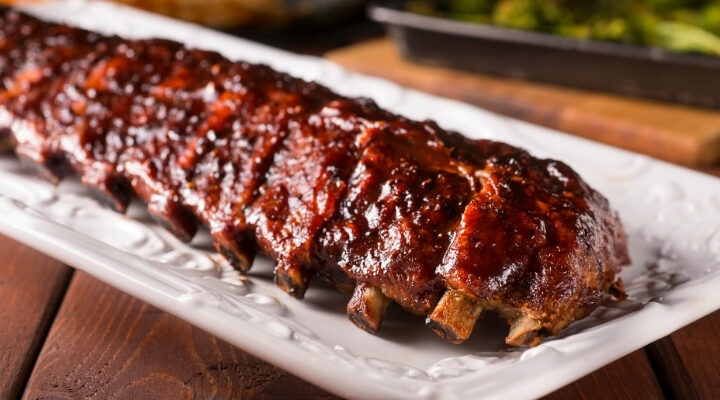
Easy and Delicious Recipes

Recent Posts

Homemade Chick-fil-A Sauce Copycat Recipe

Homemade Chick-fil-A Sauce Copycat Recipe

Time for another Chick-fil-A recipe, yay! 🥳 The Chick-fil-A sauce is a unique creamy, thick, and slightly sweet sauce you can find only at Chick-fil-a restaurants. Mostly used as a dipping sauce along with chicken nuggets and dipping fries. The popularity of Chick-Fil-A Copycat recipes Read More

Homemade Greek Dolmades Easy Recipe

Homemade Greek Dolmades Easy Recipe

It’s been a while since I posted a Greek recipe. Today, I want to share a deliciously nutritious recipe for Greek dolmades (stuffed vine/grape leaves). I discovered this recipe on a recent trip to the beautiful island of Santorini, Greece (perhaps the most beautiful island Read More

Original Polish Paczki Recipe

Original Polish Paczki Recipe

If you haven’t had the opportunity to celebrate Polish Fat Thursday or, as it is also known, Paczki Day, then you are missing out! Paczki are a type of Polish donut that only comes around once per year and are a must-have treat for those who love sweets. No worries, this Polish Paczki Recipe will allow you to have “Paczki Day” every day if you want to. 

What is Polish Paczki?

Polish Paczki is almost the same as donuts. They are made from fried dough and filled with different fruits or custard fillings. Then they are coated with sugar.

Paczki is made with a rich dough that contains yeast, eggs, sugar, and fats. So, they are thicker and heavier than regular donuts, which reflects its taste and texture.

You can fill your Packzi with your favorite fruit or cream fillings. You can glaze them or cover them with granulated sugar or powdered.

The most popular fillings in Poland are stewed plum jam and wild rosehip jelly, but you can also use other fillings such as cranberry, blueberry, strawberry, prune, or simply use custard.

Original Polish Paczki Recipe

Polish Paczki Recipe

Our Polish Paczki Recipe gives you all of the information you need to make these delicious treats.

I love to make them because they are so easy and you can make them in advance and freeze them.  Once you thaw them, you can stick them in the refrigerator and they will be ready to eat when your guests arrive.  So if you are looking for a tasty treat for Fat Thursday, these are a must! 

FAQs about Paczki

Is Paczki the same as a Donut?

The basic ingredients used in donuts are flour, eggs and milk. The closest to this recipe is a jelly donut, but this Polish Paczki is so much more.

Yeast is used along with butter and eggs in the making of paczki, so they are thicker and therefore, richer than regular donuts. 

When is Paczki eaten traditionally? 

In Poland, on the last Thursday before Lent, paczki are eaten. This tradition came to be in Poland because they want to use up all the ingredients, like sugar, eggs, and fruit, and enjoy good and a bit unhealthy food before the beginning of the fast. 

In America, they are available on Fat Tuesday. It is also enjoyed as a dessert among Polish folk who are keeping up with the tradition.

Which fruit filling is best for Paczki?

You can use any filling you like but are recommendations include lemon curd, strawberry jam, blueberry jam, sweet cream or plum jam.

Original Polish Paczki Recipe

Can I bake Paczki?

Yes, you may bake them but fried paczki are better in taste. Bake them at 350 F for 10 – 12 minutes.

Is it appropriate to freeze paczki?

If you want the best taste, eat them fresh. If you want to freeze them, use an airtight box lined with butter paper between layers. Storage life is three months. Before you serve them later, reheat them.

We hope you enjoyed the recipe. Please leave us a comment and let us know how you liked this Paczki recipe.

Share the image below to your Pinterest board if you like this Polish Paczki Recipe!

Original Polish Paczki Recipe

Original Polish Paczki Recipe

Preparation Time: 25 minutes

Cooking Time: 30 minutes

Servings: 12 paczki

Ingredients

  • Instant Yeast – 4 1/2 tsp
  • Whole milk – 1 cup
  • Egg yolks – 2
  • Granulated White Sugar – ¼ cup
  • Melted Butter – 2 tbsp
  • Vanilla – ½ tsp
  • Salt – ½ tsp
  • All-purpose flour – 3 to 3 ½ cups
  • Oil for frying
  • White Granulated Sugar – For dusting after frying
  • Jam or custard – for filling

Instructions

  1. Prepare the Yeast Mixture:
    • Heat milk in a saucepan until it’s warm, not boiling.
    • In a bowl, dissolve yeast in lukewarm milk, add a cup of flour, and mix. Let it sit for 30 minutes until bubbly.
  2. Make the Dough:
    • Beat egg yolks separately.
    • In the yeast mixture, stir in butter, sugar, salt, and vanilla extract. Add beaten egg yolks.
    • Gradually add flour, mixing until a soft, non-sticky dough forms.
    • Knead the dough on a countertop, form a ball, place it in a greased bowl, cover, and let it rise in a warm place for over an hour.
  3. Shape and Proof Paczki:
    • Roll out the dough on a cutting board.
    • Cut out circles using a 3-inch cookie cutter and place them on a baking sheet.
    • Cover and let them rise for 30 minutes.
  4. Cooking:
    • Heat oil in a frying pan to 360°F.
    • Fry paczki in batches (3 at a time) until golden on all sides.
    • Transfer to a cooling rack, dust with sugar, and allow to cool.
  5. Filling:
    • Once cooled, make a small hole in each paczki.
    • Fill with jelly or custard using a pastry bag.

Air-Fryer Method

To adapt the Polish Paczki recipe for an air fryer, follow these steps after preparing the dough as per the recipe:

  1. Preheat your air fryer to 350°F (175°C).
  2. Place the prepared dough balls in the air fryer basket. Ensure they are not touching to allow even cooking.
  3. Cook for about 5-6 minutes, then gently turn each paczki and continue cooking for another 5-6 minutes or until they are golden brown and cooked through.
  4. Once done, remove from the air fryer and let them cool slightly.
  5. Proceed with the coating or filling as per the original recipe instructions.

Tips & Tricks

  • Paczki with granulated sugar dustings are perfect to go. I prefer the sugary crunches but you may try icing sugar and milk. You can enjoy it either way, they are delicious.
  • Fresh paczki are perfect to eat on the same day but if you want, you can freeze them. No deep fryer is needed. If you are using a deep fryer then keep checking the temperature and stay careful. In case, the temperature is high, the Paczki will not cook from inside and if the temperature is low, it will absorb more oil.
  • Coat granulated sugar when paczki are hot, so it sticks to the sugar. If you are using icing sugar, then let them cool more. It is because icing sugar may dissolve, so add before serving.
  • Using a deep fryer and controlling the temperature is tiresome. It may create a mess.

Nutrition Values

Per each paczki, you will get 190 kcal of calories, 33 grams of carbs, 1 gram of fiber, and 1.8 mg of iron. 

Conclusion

I hope you’ve liked this Polish Paczki recipe! You know I love making Polish recipes, so I highly recommend you try this Polish Cabbage Pierogi. Oh and if you have any questions or suggestions about this Paczki Recipe, feel free to comment down below. Thank you!

Authentic New Mexican Sopapillas Recipe

Authentic New Mexican Sopapillas Recipe

Authentic New Mexican Sopapillas Recipe – Sopapillas are a traditional dessert in the USA. These fried pastries are a tasty treat to end a meal. These are a fun treat to make with the kids, and are great for parties, especially in the summer when Read More

Homemade German Bierocks Recipe

Homemade German Bierocks Recipe

Are you tired of making the same boring sandwiches again and again? Don’t worry. Today we are going to share the German stuffed Bierocks recipe. This particular recipe will teach you how to make Bierocks from scratch, so they’ll be more delicious than any store-bought Read More

Homemade Brazilian Picanha Steak Recipe

Homemade Brazilian Picanha Steak Recipe

Brazilian Picanha Steak – This triangularly shaped steak that comes from the rump cap muscle is not very easy to grill to perfection at home. This doesn’t mean that it’s impossible, but you need to know a couple of tricks to get it right. We’ll look at one of the best steak recipes to make at home – the Picanha Steak recipe.

I had an enormous craving for Picanha Steak, which is a cut of meat from the beef rump cap muscle. It’s a cheap cut of meat, but the results are so worth it and offer a great value for the buck. I first had this meat cut at a Texas de Brazil restaurant.

They make the meat at the table and it just melts in your mouth. It’s absolutely delicious. If you have a craving for a good steak, I highly recommend you try this cut of meat. The best thing about this steak is that you can make it at home with just four ingredients.

What is Picanha?

Picanha is a Brazilian steak. It is one of the most popular cuts of meat in Brazil. Picanha is well known for its amazing flavor and tenderness. If you are looking for a new steak to add to your repertoire of cooking, Picanha is a perfect choice.

The name of the steak comes from the word Picão. The word Picão is used to describe a large meat tenderizer hammer. In Brazil, there is a technique used to make this cut of meat. It involves using a large meat tenderizer hammer to pound the meat.

This technique makes the meat tender and increases the flavor. It also has the added benefit of making the cut of meat easier to cook.

According to different studies, the cuts of this beef have a fat content of about 60%, which makes it one of the most appreciated in Brazil.

Because of its fat content, the Picanha is considered by many as the most delicate of the bovines and the one that gives more pleasure to the palate.

Homemade Brazilian Picanha Steak Recipe

Brazilian Picanha Steak Recipe

Ingredients

  • 4 pounds Picanha cut sirloin cap
  • Black pepper (to taste)
  • Rock salt (to taste)
  • Oil for greasing the grill

Instructions

  1. Prepare the Steak:
    • Place the Picanha with the fat side facing up.
    • Carefully score the fat in a cross-hatch pattern, being careful not to cut into the meat itself.
  2. Seasoning:
    • Rub rock salt thoroughly into the scored fat.
    • Season with ground black pepper.
  3. Cut and Skewer:
    • Cut the Picanha lengthwise into three equal parts.
    • Roll each piece into a ‘C’ shape.
    • Thread each piece onto metal skewers.
    • Sprinkle salt and pepper on the sides that are not yet seasoned.
  4. Grilling:
    • Lightly oil the grill using a paper towel or brush.
    • Place the skewered steak on the grill.
    • Grill for about 15-20 minutes.
    • Rotate the skewers every 5-6 minutes for even cooking.
  5. Check for Doneness:
    • Use an instant-read thermometer to check the internal temperature of the steak.
    • For medium rare, remove the steak when it reaches 130 °F.
  6. Rest and Serve:
    • Allow the steak to rest for 5-10 minutes after removing from the grill.
    • Remove the skewers.
    • Slice the steak and serve.

Note for Marinade (Optional):

  • These steps can also be applied to marinate the Picanha before grilling. Simply prepare the marinade and let the meat absorb the flavors before proceeding with the grilling steps.

If you’re a fan of this Picanha Steak Recipe, pin the image below to your Pinterest board to spread the word! 😊📌

Homemade Brazilian Picanha Steak Recipe 1

Why should you try Picanha Steak?

There are many reasons to love Brazilian food, especially Picanha. The Picanha steak is a traditional Brazilian dish and is very popular among Brazilian people. If you are a food lover, you have probably tried Picanha at least once in your life.

The Picanha steak is delicious, but it is also very healthy and it can be a good alternative to more unhealthy dishes.

Can I cook Picanha Steak on the stove?

If you don’t have a fire pit or a grill,  you can still cook Picanha on your stove. If you follow these easy steps, you’ll have Picanha steaks to rival the ones you’ve had in Brazil.

  • We recommend using cast iron for good results.
  • Season the Picanha with salt and pepper and melt the butter.
  • Place skewered pieces in the pan – don’t overcrowd for even cooking.
  • If the internal temperature of the steak reaches 130 °F, remove them from the pan.

What to serve with?

Although Picanha is a very popular cut of meat, not everybody knows how to serve it properly. The best way to serve Picanha is to leave the cut in its natural state, with all the fat and meat. The fat is where the flavor is, so it’s a must.

The traditional way to serve Picanha is to serve it like a roast accompanied by rice, beans, and farofa. Picanha is extremely flavorful, so it can be served as is without any additional seasoning.

In this article, we’ll go over how to prepare amazing Picanha steak, and we’ll also discuss two popular ways (on the grill and in a pan)  you can enjoy it. 

So, what are you waiting for? Put your apron on and start making the delicious Picanha Steak with us.


Tips & Tricks

  • If your Picanha cut has been refrigerated, take it out and leave it at room temperature for at least 1 hour.
  • Use rock salt for authentic recipe results. 
  • Don’t forget to rest the steak after removing it from the grill. It will allow the juices to absorb in the meat and you will get a flavorful, tender, and juicy steak.
  • Instead of pepper and salt, you can use any steak or beef seasoning on your Picanha cut.
  • To make your steak more delicious, don’t forget to buy sirloin with the fat cap attached.
  • If you can’t find the Picanha, you can use the sirloin flap, but it won’t be quite as tender or flavorful.
  • The most important thing to remember when cooking a Picanha Steak is to pay attention to the heat of your grill. If you cook it on too high of heat, it will burn the outside and leave the inside medium-rare. The best way to cook a Picanha Steak is to slowly grill it on low heat until it reaches your desired temperature.
  • You can also cook Picanha steak using a Blackstone griddle; check our tips on Blackstone recipes here

Let’s Sum Up

If you’re in the mood for some delicious steak and you want to try something different, you really should try Picanha steak. This Brazilian cut of steak is delicious, simple to prepare, and affordable.

We hope you enjoyed this article about Picanha Steak.  If you have any questions on this Picanha Steak recipe, or you have any suggestions for our recipes, feel free to comment below. Thank you! 🙂

Yellowtail Sashimi With Soy Citrus Yuzu Ponzu Sauce

Yellowtail Sashimi With Soy Citrus Yuzu Ponzu Sauce

Yellowtail Sashimi – When it comes to eating raw fish, you’re probably familiar with the more common sushi choices: tuna, salmon, and shrimp. But did you know that the freshest, most delicious raw fish of all comes from Yellowtail? I’ve really enjoyed making seafood delicacies Read More

Peanut Butter Skrewball Whiskey Cocktail Recipe

Peanut Butter Skrewball Whiskey Cocktail Recipe

We have a Peanut Butter Skrewball Whiskey Cocktail recipe so that you can enjoy a nice whiskey cocktail with your friends or during the holiday season. If you’re looking for some new cocktail recipes, this peanut butter whiskey and chocolate liqueur are perfect for you. Read More

Homemade Polish Cabbage Pierogi Recipe

Homemade Polish Cabbage Pierogi Recipe

I have a love affair going on with pierogi. Actually, I have a love affair going on with anything dumpling, but these Cabbage Pierogi are one of my favorites. I don’t know what it is about them, but I always feel like it’s a better day when I eat a pierogi. 

The first dish I learned to make was pierogi. My grandma used to make them all the time when I was growing up, and I always loved helping her in the kitchen. I had no idea what I was doing, but I loved every minute of it.

Cabbage pierogi are a traditional Polish dish and a great way to use up extra cabbage. This version replaces the traditional potatoes in a pierogi with cabbage, adding a subtle tanginess to this tasty dish.

Making pierogi is a great way to get the family involved in the kitchen and also a great way to get creative with food. This cabbage pierogi recipe is a great way to get creative with classic comfort food.

The family can even help out with the preparation of the dish by cutting the cabbage, slicing the onions, and mixing the ingredients together.

Moreover, It is very easy to make, and one of the things I love about pierogi is that you can use any ingredients you want, so you can change this meal up very easily. My kids love this meal and we make it all the time. Hope you enjoy this recipe.

What is Polish Pierogi?

Pierogi are traditional Polish dumplings that are stuffed with a variety of fillings. Since the mid-1990s, pierogi have become popular in other areas of the U.S. and Canada, especially areas with a significant Polish population. They are often available frozen in supermarkets in areas where they are not traditionally served.

Pierogi can be found in grocery stores, usually frozen in a multi-pack, in Polish specialty stores, and in some mainstream supermarkets, fresh or frozen. They can be purchased boiled, fried, or baked. You can make them at home as well. 

Homemade Polish Cabbage Pierogi Recipe

What to serve with Cabbage Pierogi?

You can serve friend onions, Melted butter, Sour cream, Maggi seasoning sauce, and Skwarki (left from making homemade lard). If you have any other options, share them in the comments section below. 

How to know that your dough is ready to roll out?

Pinch the dough with your fingers; if it sticks, knead more flour into the dough. If it doesn’t stick to your finger, it’s ready to roll out. Cover it with plastic wrap and set it aside while you are making the filling. 

Polish Cabbage Pierogi

Can I griddle or pan-fry my cabbage pierogi?

Yes, you can! Take a large saucepan or Blackstone griddle and melt butter in it over medium heat. Place pierogies in a single layer and cover them with a lid. Let it cook until you get golden brown crispiness. Flip and cook the other side. 

How to Freeze Cabbage Pierogi?

Cabbage Pierogi is a great food to have in the freezer because they are easy to freeze and they are great to eat in the wintertime when it is cold outside and you want something warm and hearty.

Pierogi can be frozen either raw or cooked. The raw pierogi will freeze much better than the cooked pierogi. To freeze the cooked pierogi, put them in a container and spread plastic wrap over them before placing another layer.

This will help keep the pierogi from sticking together. If you don’t do this, you will probably end up with a big frozen lump of pierogi. If you freeze the raw pierogi, you don’t have to worry about them sticking together. When you throw them in the water, they will be separated. 

Serving: 30 Pierogi

Preparation Time: 30 Minutes

Cooking Time: 1 Hour

Total Time: 1 Hour and 30 Minutes

Pin the image below if you like this Cabbage Pierogi Recipe!

Homemade Polish Cabbage Pierogi Recipe

Ingredients

For Dough

  • 3 cups all-purpose flour
  • 1 egg (at room temperature)
  • ½ tsp salt (to taste)
  • 4 tbsp oil or butter (at room temperature)
  • 1 ⅓ cups lukewarm water

For Filling

  • 1 large cabbage
  • 1 big onion
  • 2-3 tbsp butter/oil
  • Salt (to taste)
  • Pepper (to taste)

Instructions 

For Making the Dough:

  • Take a bowl and put the egg, oil, flour, and salt into it. Mix the ingredients with your hands. You can also whisk it with a dough hook attachment. 
  • Now add water slowly and knead the dough until all ingredients are mixed and no lump is left. 

For Cabbage Filling:

  • Wash the cabbage and onions and finely chop them. 
  • Take a pan and put the cabbage in it. Add 2 cups of water and cook the cabbage until soft. 
  • When the cabbage is soft, drain extra water. 
  • Melt butter in the pan and fry the onion in it until soft and caramelized. 
  • Mix onions and cabbage and season with pepper and salt. 

For Making Mold Cabbage Pierogi

  • Divide your dough into 3 or 4 pieces. Spread some flour on the countertop and thinly roll each dough piece over it. 
  • Cut circles from the dough by using a round cookie cutter. 
  • Put 2-3 tbsp of cabbage filling in the center of the circles. 
  • Pull the edges together to form pierogi. To save your pierogi from breaking, pinch tightly and don’t leave any free space while sealing.
  • Repeat the same process until all the dough and filling is utilized. 

For cooking pierogi

  • Take a big pot add water, and salt in it. Let it boil.
  • Throw your pierogies into the boiling water one by one. Let them boil for 1 minute. 
  • When the pierogies start floating on the top, take them out with the help of a slotted spoon. 
  • Your Cabbage Pierogi are ready. Pour the lard or melted butter on the top and serve hot. 

Nutrition Value (per serving)

  • Total calories: 377
  • Fate: 15g
  • Carbs: 51g
  • Sugar: 2g
  • Protein: 8g

Tips & Tricks

  • You can adjust the amount of filling according to your liking. But don’t overstuff the Pierogi. Otherwise, it will fall apart while cooking. 
  • Don’t waste the remaining dough after cutting the circles. Collect and put it to the other dough and roll again. 
  • To avoid sticking, arrange the cooked pierogi on the plate in this way that they are not on top of each other. 
  • The quality cabbage is seasonal, so it is recommended to try this recipe in the summertime. 
  • To create a more beautiful look, press the fork around the edges. 
  • Arrange them so they are not on top of each other so they won’t stick.
  • If you’d like a lighter version, fill the pierogi with some mashed potatoes, but leave out the cabbage.

Let’s Sum Up

We hope you enjoyed our cabbage pierogi recipe. We have had a lot of fun writing this blog post and learning more about cabbage pierogi. It was a pleasure to share this cabbage pierogi recipe with you, and we hope you will share this recipe with your friends and family who are looking for a quick, delicious, and easy dinner idea.

You may also want to check this Instant Pot Corned Beef with Cabbage

Authentic Arby’s Jamocha Shake Copycat Recipe

Authentic Arby’s Jamocha Shake Copycat Recipe

It’s time for another copycat recipe from Arby’s menu! After Arby’s Bronco Berry Sauce and Arby’s Beef and Cheddar Sandwich is time for Arby’s Jamocha shake.  A few months ago, I was at Arby’s and noticed they had a Jamocha Shake. I had never tried this popular Read More