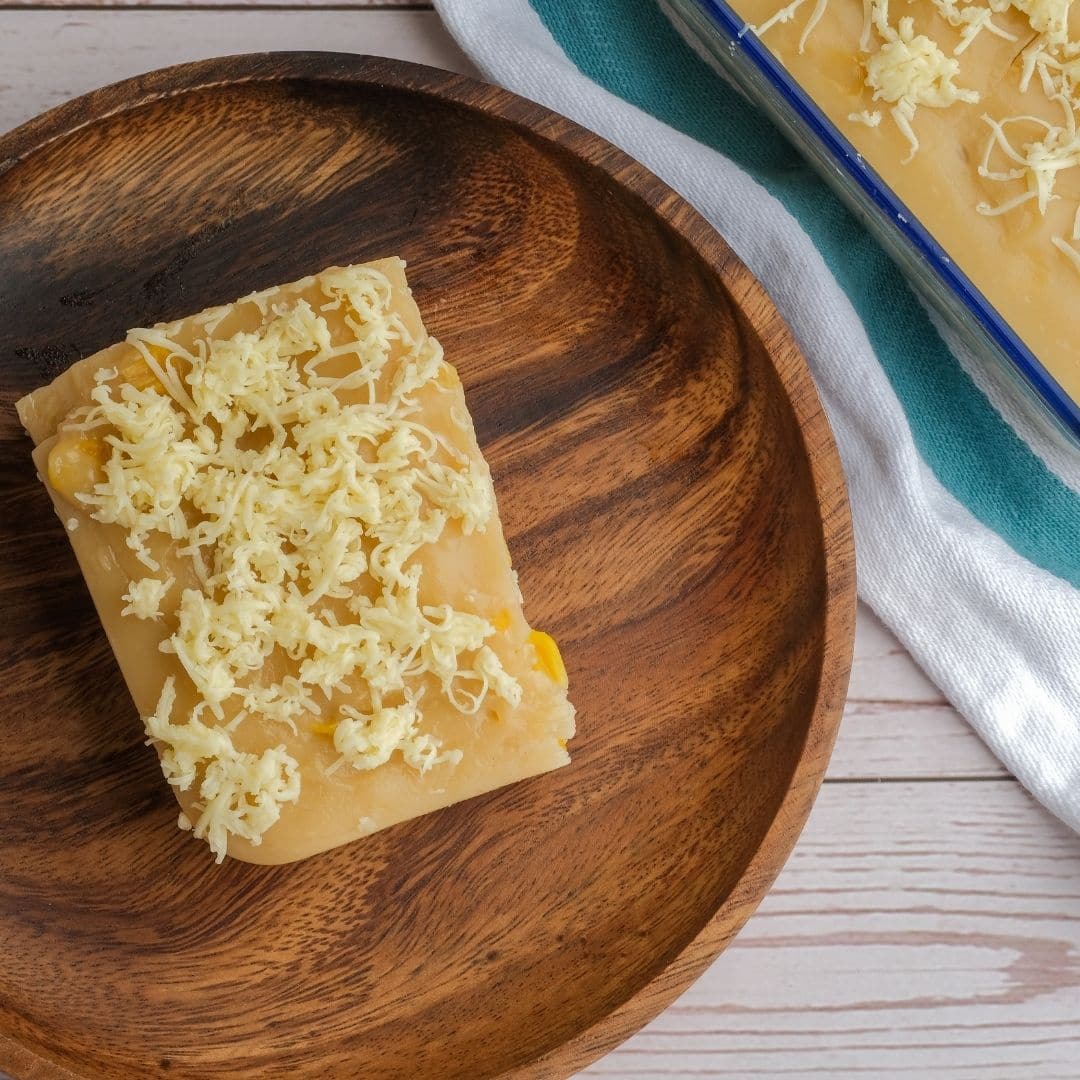
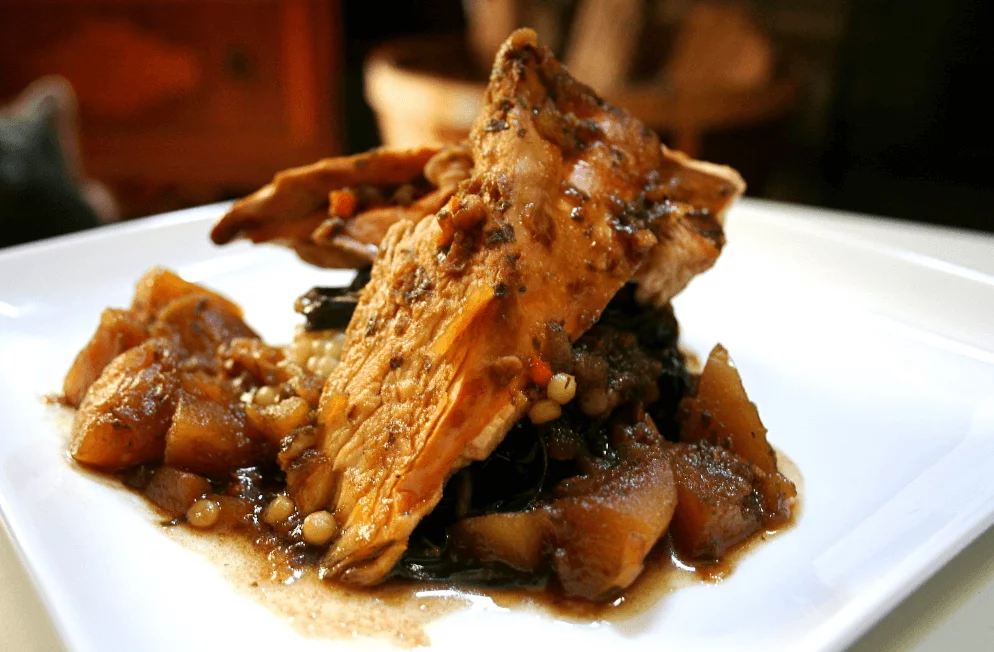
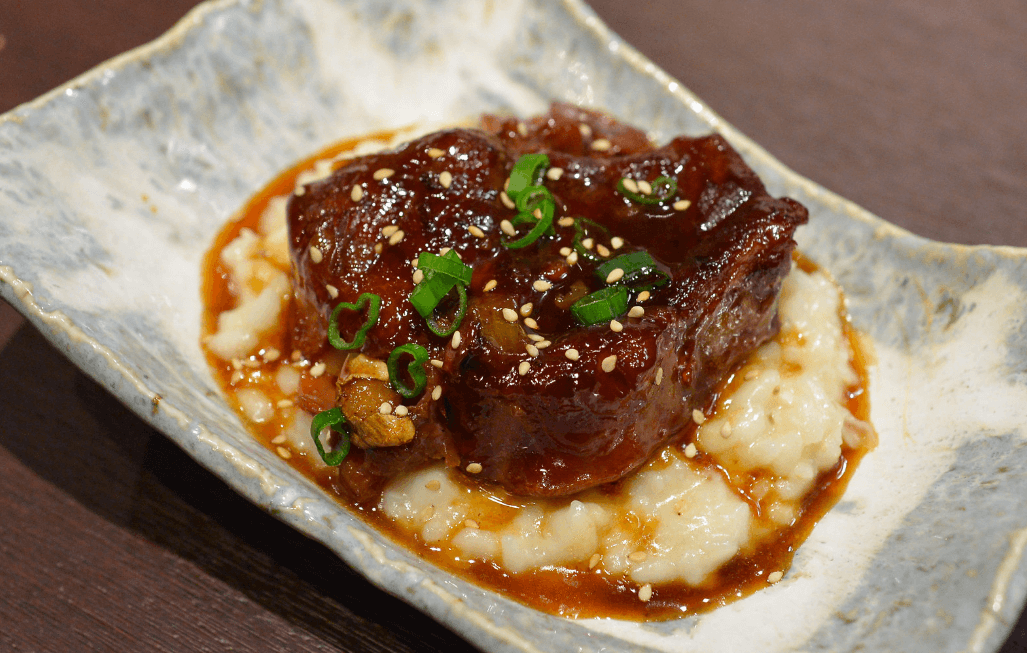
Easy and Delicious Recipes

Author: Sarah Berthold

Homemade Carrabba’s Chicken Bryan

Homemade Carrabba’s Chicken Bryan

“Carrabba’s Chicken Bryan” is one of my all-time favorite restaurant dishes. I simply enjoy the chicken bits smothered in a zesty lemony basil sauce with a bit of goat cheese added on top. I like having this with mashed potatoes on the side because I Read More

Chicken of the Woods Recipe

Chicken of the Woods Recipe

Are you looking to venture into our Chicken of the Woods recipe? Well, if you enjoy delicious wild mushrooms that have a similar texture and taste to chicken, then this is a recipe worth digging your teeth into during the coming week!   Chicken of Read More

Easy Popcorn Chicken Recipe

Easy Popcorn Chicken Recipe

Craving a takeout but resenting the cost and the unhealthiness? Well, I’m here to help! Sure, it may still be more on the cheat day side of life, but my delicious and easy popcorn chicken recipe will have the whole family coming back for more.

With a crispy exterior coating the succulent chicken, this KFC-style popcorn chicken is an easy family staple that can be served with Crockpot mac and cheese, pasta salad, or any of your favorite sides to create a wholesome and enjoyable meal.

Easy Popcorn Chicken, Tell me More!

A family favorite from our local fast-food chains brought to your kitchen! A surprisingly simple recipe that involves only a few ingredients that you probably already have lying in your cupboards and spice racks. Whether you do this for dinner or as an addition to a meal or salad – it is a highly versatile addition to any dish.

Also if you only have certain types of breading in your cupboards (panko, etc), this dish can be easily adapted to use those ingredients so you can create a delicious dish based on what you already have.

This same premise applies when it comes to deciding on a complimentary sauce to liven up the serving, whether you use cilantro ranch dressing, BBQ sauce, or fry sauce – any of your favorite dressings will truly complement our fantastic popcorn chicken.

Easy Popcorn Chicken Recipe

Prepping the Popcorn Chicken

  • Cutting the Chicken: When it comes to cutting the perfect bite-sized chicken pieces, the key is to use half frozen breasts and a sharpened knife to ensure that you can take advantage of the relatively un-slimy and solidified chicken to create clean diced pieces of a similar size range.
  • Marinating: If you have time on your side, I strongly recommend that you marinate your chicken thoroughly in buttermilk for over one hour as a minimum – however, avoid crossing the twelve-hour mark or your chicken will likely have become too absorbent and may not retain its beautiful flakiness when fried.
  • Don’t be afraid of seasoning: So many people are under the impression that seasoning won’t contribute much to a fried dish – however, this is wrong! Incorporating beautiful spice blends of cayenne pepper, paprika, chipotle flakes, red chili flakes, and so forth, is an ideal way to elevate the flavor factor of your dish.

Popcorn Chicken Recipe

Ingredients

  • 2 boneless skinless chicken breasts (cubed).
  • 2 tbsp flour.
  • 1 tsp garlic salt.
  • 1 cup buttermilk.
  • 1 cup panko crumbs.
  • Pepper or other preferred seasonings.
  • Vegetable oil.

Instructions

  1. Prepare the Frying Pan: Pour 1-2 inches of oil into a medium-sized pan. Heat it over medium heat.
  2. Set Up Your Coating Station: Arrange three bowls in a row.
    • In Bowl 1: Mix flour and garlic salt.
    • In Bowl 2: Pour buttermilk.
    • In Bowl 3: Add panko bread crumbs.
  3. Coat the Chicken:
    • Dip each chicken piece in the flour mixture, ensuring all sides are covered.
    • Next, dip it into the buttermilk.
    • Finally, coat it with panko bread crumbs.
    • For extra crunchiness, double-dip by repeating the buttermilk and breadcrumb steps. No need to double-dip in the flour.
  4. Prepare for Frying: Place a plate lined with paper towels near your cooking area. This will be used to drain excess oil from the fried chicken.
  5. Frying the Chicken:
    • Fry the chicken in batches. Avoid overcrowding the pan.
    • Cook each piece for 3-4 minutes per side until golden brown.
    • Carefully remove the chicken from the oil using tongs and place them on the paper towel-lined plate.
  6. Serving: Once all the chicken is cooked and drained, serve hot with your favorite dipping sauces.

Share the image below to your Pinterest board if you like this Popcorn Chicken recipe!

Easy Popcorn Chicken Recipe

Oven-Baked Popcorn Chicken:

  • Sometimes the calories in the oil and frying technique can be extortionate! So for those of you looking to save some calories, preheat your oven to 400°F, baking the batch for 8-10 minutes prior to flipping and leaving them for a similar time. Then finish these off under the broiler for a maximized crunch!

Air Fryer Popcorn Chicken:

  • Another fantastic alternative is that can thoroughly cook your popcorn chicken with less oil. With a temperature set at 400°F, ensure that you spray a small amount of oil within the fryer and arrange your first batch of popcorn chicken so that they do not directly touch one another. Cooking the chicken for approximately 8-10 minutes, with an interim turn of the meat at the halfway mark, provides gorgeously cooked popcorn chicken. However, if you want some extra crunch, spray a small amount of oil on each piece, creating a gorgeously crunchy exterior. Following this, cook each batch in the same manner.

Cooking Popcorn Chicken Ahead of Time

Believe it or not, you can actually cook this popcorn chicken in advance and safely freeze them for up to four months! These should be stored in an airtight freezer container and you can then reheat them in the oven. However, if you know a busy day is ahead, preparing the raw chicken pieces before sealing them in the fridge ready for later frying ensures that you can have a quick and easy dinner the next day without the hassle of prep.

Now you’re ready to go and create this delicious, quick, and easy meal that is better than KFC Famous Bowls and is guaranteed to become a family favorite!

Roasted Beef Shank Recipe

Roasted Beef Shank Recipe

Fancy something different for dinner tonight? Our delectable roasted beef shank recipe, topped with a gorgeous vegetable medley, is the ideal comfort food for those looking to warm up during the week with a fragrant and flavourful meal! Whether you prefer to slow cook or Read More

How To Cook Mahi Mahi Easy Recipe

How To Cook Mahi Mahi Easy Recipe

Hey People!!! Today I’m here with another exciting recipe on how to cook Mahi Mahi perfectly suitable for the chilly winters. Mahi-Mahi is a widely famous fish found in tropical, subtropical, and temperate off-shore waters worldwide. Its name, “Mahi-Mahi,” comes from the Hawaiian language and Read More

Ghirardelli Brownie Mix Easy Recipe

Ghirardelli Brownie Mix Easy Recipe

Want to give a Ghirardelli chocolate twist to your Classic brownies? Then look no further! I am here with another fun and exciting recipe that will be quite special for the ones who love sweets and desserts. By the way, who doesn’t love classic brownies?

Everyone loves to have those soft, tasty, and fudgy brownies with a nice crackled top. This recipe is gonna give your classic brownies an enriched flavor of Ghirardelli chocolate and take it to the next level of taste and chocolaty richness.

This Ghirardelli Brownie Mix Recipe can be a game-changer for you. Once you try it, you are surely gonna fall in love with them. This recipe is going to replace all of your previous brownie recipes. These brownies are best for casual events, holidays, and for special events like Christmas as well. Your kids will become a fan of these soft, chocolaty brownies in no time.

These brownies have everything you want, chocolaty richness, great flavor, and beautiful chocolaty texture. You can make them crunchy by adding chopped walnuts to the batter. So make these recipes to earn appreciation from everyone and be ready to be asked for the recipe.

Ghirardelli Brownie Mix Easy Recipe

Ghirardelli Brownies (with Bonus Cookie Variation!)

Ingredients (Brownies)

  • 1 box Ghirardelli brownie mix (any variety)

  • Pinch of salt

  • 1 tsp instant espresso powder

  • 1 large egg

  • ⅓ cup oil or melted unsalted butter

  • ¼ cup water

  • 2 tsp vanilla extract

  • ¾ cup walnut chunks (optional)

  • 1 cup chocolate chips (optional)

  • Ghirardelli chocolate squares for topping (optional)


Instructions (Brownies)

  1. Preheat & Prep

    • Heat oven to 325°F (163°C).

    • Grease a 9×9-inch brownie pan or line with parchment paper.

  2. Mix Wet Ingredients

    • In a medium mixing bowl, whisk together egg, oil (or butter), water, vanilla, and espresso powder until smooth.

  3. Add Dry Ingredients

    • Stir in brownie mix, salt, and optional chocolate chips or walnuts until fully combined. Do not overmix.

  4. Bake

    • Spread batter evenly in prepared pan.

    • Bake according to package instructions (usually 40–45 minutes) or until a toothpick inserted comes out with moist crumbs.

  5. Cool & Serve

    • Let brownies cool before slicing into squares.

    • Top with chocolate squares for extra indulgence, or serve with powdered sugar, whipped cream, berries, or ice cream.


Bonus: Ghirardelli Brownie Cookies

Ingredients (Cookies)

  • 1 box Ghirardelli brownie mix

  • 3 tbsp all-purpose flour

  • 2 large eggs

  • ⅓ cup oil

  • 1 cup chocolate chips or butterscotch chips

Instructions (Cookies)

  1. Preheat oven to 350°F (175°C).

  2. In a bowl, mix flour, eggs, oil, and chips until thick cookie dough forms.

  3. Line a baking sheet with parchment paper. Drop spoonfuls of dough 2 inches apart.

  4. Bake for 9–11 minutes, until edges are set but centers are slightly soft.

  5. Cool on a wire rack and enjoy warm or at room temperature.

Ghirardelli Brownie Mix Easy Recipe

Some Important Tips for Ghirardelli Chocolate brownies:

  • The brownies are best baked in a 9×9 pan. You can also use an 8 × 8 pan. It also gives you the best brownies.
  • You can make brownies in a 9 × 9 pan but the brownies would be a bit. The Baking time of brownies in a 9×13 pan is about 30 – 35 mins.
  • To check if your brownies are done, pierce them with a toothpick. If it comes out clean, the brownies are done. But if it comes out a little moist, bake the brownies for 3 – 5 more minutes and check again.
  • To make the brownies even better, you can make their double batch in a 9×9 pan. A double batch of brownies gets more caky, soft, and delicious.
  • If you’re making a double batch of brownies, you will have to add 2 – 3 eggs into the batter instead of only one.
  • You can also top up the brownies with Ghirardelli chocolate squares to make them even more chocolaty.
  • You can also add chocolate chips into the batter if your brownie mix doesn’t have them already.
  • The best Ghirardelli mixes the double or the triple chocolate mix. They are loaded with small chocolate chunks. So you don’t have to add chocolate chips separately.
  • You can add one more egg into the brownie batter to make it more fudgy and caky
  • Top up the brownies with some fun topping, like berries, ice cream, whipped cream, candy chunks, chocolate syrup, or any other topping you like, to enhance their flavor.
  •  You can also mix M&Ms into the brownie batter to take them to another level of taste and chocolaty richness.


How to store Ghirardelli Chocolate brownies?

To store the brownies overnight, just wrap them up in aluminum foil, butter paper, or place them in an airtight container. If they are not properly covered, they will lose their moisture and will become hard. You can store them in a zip lock bag as well.

Subway Bread Copycat Recipe

Subway Bread Copycat Recipe

Subway is a famous American restaurant chain that sells the best sandwiches, salads, and beverages around the globe. Their sandwiches are so good that you instantly become a fan. The good thing is you can make sandwiches like theirs at home too. But first!!! Let’s Read More

Crustless Creamy Cheesecake Recipe

Crustless Creamy Cheesecake Recipe

Hello people! Today I’m going to share another exciting recipe, and it’s Crustless Creamy Cheesecake. This recipe is not only unmatchable in taste but low on carbs as well. Because of its low-calorie content, this recipe fits best in a keto diet plan. So, if Read More

Oven Baked Beef Jerky Easy Recipe

Oven Baked Beef Jerky Easy Recipe

Today I’m here with another delicious and mouthwatering easy recipe, and that is… Oven Baked The Beef Jerky. It’s totally different from the regular recipes and serves as the best snack for everybody. 

What is Beef Jerky?

Beef Jerky is basically dried lean beef strips packed with the flavors of multiple spices. Its name, “Jerky,” comes from the Quechua word “Ch’arki,” which means “Dried Salted Meat.” The best thing about his recipe is that it’s Keto, Paleo, and Gluten-free. Plus, it doesn’t contain any sugar. So, even if you’re dieting, you can still enjoy this amazing protein-packed snack without disturbing your diet plan.

You may have tried many beef recipes throughout your life: sweet beef, spicy beef, and many more. But beef jerky serves the best as a snack. It’s flavorful, spicy, and healthy as well.

Oven Baked Beef Jerky Easy Recipe

Homemade Beef Jerky Recipe

This beef jerky is smoky, savory, and full of bold flavors — and you can make it right in your oven with no dehydrator required.


Ingredients

  • 3 lbs beef of your choice (top round, flank steak, or sirloin work best)

  • ¾ cup gluten-free soy sauce

  • ¼ cup Worcestershire sauce

  • 1 ½ tsp salt

  • 2 tsp ground black pepper

  • 1 ½ tsp liquid smoke

  • 1 ½ tsp garlic powder

  • 1 ½ tsp onion powder

  • 1 ½ tsp ancho chile powder

  • 1 ½ tsp smoked paprika

  • 1 tbsp dried oregano


Instructions

  1. Prep the Meat

    • Trim all visible fat from the beef. This helps the jerky last longer without spoiling.

    • Freeze the meat for 30–45 minutes — firm on the outside but still soft in the center. This makes it much easier to slice thinly.

  2. Slice

    • Using a sharp knife, cut the beef into thin strips, about 0.5 cm (⅛–¼ inch) thick.

  3. Marinate

    • Place the beef strips in a large zip-top bag.

    • Add all remaining ingredients to the bag, seal, and shake well to coat the meat.

    • Massage the marinade into the strips so they’re evenly covered.

    • Refrigerate for at least 2–4 hours, or ideally 12–16 hours for maximum flavor.

  4. Bake

    • Preheat oven to 175°F (80°C).

    • Line 2–3 large baking sheets with aluminum foil and set wire racks on top.

    • Drain excess marinade from the beef and arrange strips in a single layer on the racks.

    • Bake for 3–4 hours, checking after 3 hours. The jerky should be firm and dry but still slightly pliable.

  5. Cool & Store

    • Let jerky cool completely before storing.

    • Keep in an airtight container at room temperature for up to 1 week, or refrigerate for longer storage.


Tips for the Best Jerky

  • The longer you marinate, the deeper the flavor — overnight is best.

  • Removing all fat is essential for shelf life.

  • Freezing the beef slightly before slicing gives cleaner, thinner cuts.

  • Using a rack allows air to circulate, helping the jerky dry evenly.

Oven Baked Beef Jerky Easy Recipe

Oven baked Beef Jerky

If you’re following some sort of diet plan, it can be quite challenging for you to find the recipes that fit best for your plan. Most of the healthy foods are quite boring and you have to compromise on taste. There are only a few recipes that are tasty and healthy simultaneously. But beef Jerky is one recipe that promises a great flavor and texture and doesn’t interrupt your fitness goals.

Can you make Jerky in Food Dehydrator?

Food Dehydrators give you the best results when it comes to drying up fresh fruits. But they don’t work well when you use them for making Jerky. The results are not satisfactory and you get really disappointed after so many hours of waiting.

Beef Jerky in Oven

The oven will never disappoint you while you’re making the Jerky. It will give you impressive results and will make you the best Jerky at home.

The oven at its lowest heat is still hotter than a food dehydrator. It dries up the meat quickly without altering its flavor.

The basic ingredients of the Beef Jerky

There are many meat cuts and spices used to make beef Jerky. But I would recommend only a few that give out the best jerky.

  1. Beef

One of the best beef cuts for Jerky is silverside. It’s a lean cut with little fat and is less likely to spoil. Other good cuts I would recommend are Sirloin and the Beef Eye of the round.

  1. Soy Sauce

Use gluten-free soy sauce. But if you are following a Paleo diet plan, use coconut aminos instead.

  1. Worcestershire Sauce

Worcestershire sauce enhances the flavor of the beef.

  1. Liquid Smoke

Liquid smoke will give a smoky flavor to your jerky just like the real wood smoke.

  1. Spices

You can add spices according to your taste. But I would recommend salt, black pepper, garlic powder, onion powder, ancho chili powder, oregano, and smoked paprika to give a great flavor.

Cooking Method for Beef Jerky:

  1. First of all, trim the fat and freeze the meat for 30 minutes. Once the meat gets frozen, finely slice it into thin strips of about 0.5cm thickness. Add these strips into a ziplock bag.
  2. Add all the spices and ingredients into the ziplock bag. Mix them well and coat the strips well with the ingredients. Leave them in the fridge for 4-12 hours so that they get marinated properly.
  3. Once they are marinated thoroughly, preheat the oven to 175°F—Line the baking sheets with aluminum foils. Place the rack on top of it. Drain off the remaining marinade mixture. Place the strips onto the rack placed over the baking sheets.
  4. Bake the strips in the oven for 3 − 4 hours. Check after three hours to see if the jerky’s got your desired texture.

When the meat is done, take them out of the oven and let them cool. When cooled, you can store them in an airtight container.


Gluten-Free Sourdough Bread Easy Recipe

Gluten-Free Sourdough Bread Easy Recipe

Today’s recipe is Gluten-Free Sourdough Bread Easy Recipe, and it’s very special, especially for the ones who are gluten-intolerant or are on a diet. Only because you can’t intake gluten, doesn’t mean you are going to miss all of your favorite foods because they have Read More