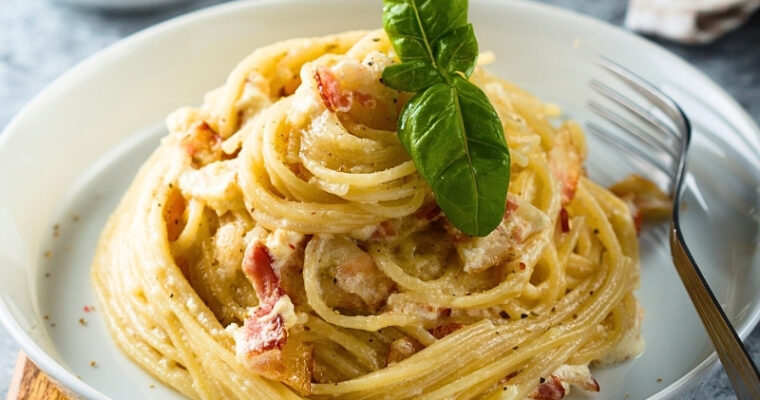
Easy and Delicious Recipes

Recent Posts

Taco Creamy Salad Recipe

Taco Creamy Salad Recipe

This creamy taco salad is loaded with seasoned ground beef, crisp lettuce, beans, olives, tomatoes, cheese, and crunchy tortilla pieces, all tossed with a creamy salsa dressing. It is fresh, hearty, and easy enough for a casual weeknight dinner, but still fun enough to serve Read More

Buffalo Chicken Dip Best Recipe

Buffalo Chicken Dip Best Recipe

This Buffalo Chicken Dip is the best! Filled with tender chopped chicken, sour cream, three types of delicious cheeses, and McCormick Buffalo Seasoning mix, which has a spicy hot sauce everyone loves! This Buffalo chicken is a perfect example of the presentation of New York. Read More

Pumpkin Cheesecake with Caramel Sauce Recipe

Pumpkin Cheesecake with Caramel Sauce Recipe

This incredible pumpkin cheesecake with caramel sauce will certainly be your dessert of choice in autumn! Beautiful crust cover, a layer of pumpkin cheesecake finished with nice cream and caramel sauce.

Ingredients

For the Crust

  • 10 oz gingersnap cookies, ground into fine crumbs (about 2 cups)

  • ¼ cup granulated sugar

  • 6–7 tbsp unsalted butter, melted


For the Cheesecake Filling

  • 8 oz cream cheese, softened

  • 1 cup granulated sugar

  • 1 tsp vanilla extract

  • 1 cup canned pumpkin puree

  • 3 large eggs

  • 1½ tsp ground cinnamon

  • ½ tsp ground ginger

  • ¼ tsp ground cloves

  • ¼ tsp ground nutmeg


For Topping

  • Whipped cream

  • Caramel sauce (homemade or store-bought)


Instructions

1. Prepare the Crust

  • Preheat your oven to 350°F (175°C).

  • In a food processor, pulse the gingersnap cookies into fine crumbs.

  • In a medium bowl, combine the cookie crumbs, sugar, and melted butter, mixing until evenly coated.

  • Wrap the outside of an 8-inch springform pan tightly with foil to prevent leaks.

  • Press the crumb mixture firmly into the bottom and about halfway up the sides of the pan.

  • Bake for 5 minutes, then set aside to cool while preparing the filling.


2. Make the Cheesecake Filling

  • In a large mixing bowl, beat the cream cheese, sugar, and vanilla extract with an electric mixer until smooth and creamy.

  • Add the pumpkin puree, eggs, cinnamon, ginger, cloves, and nutmeg. Mix just until combined — avoid overmixing to prevent cracks during baking.

  • Pour the filling evenly into the prepared crust.


3. Bake in a Water Bath

  • Place the springform pan inside a larger roasting pan.

  • Pour hot water into the roasting pan until it reaches about halfway up the sides of the springform pan.

  • Bake at 350°F (175°C) for about 55–60 minutes, or until the center is mostly set but still slightly jiggly.


4. Cool and Chill

  • Carefully remove the cheesecake from the water bath and peel away the foil.

  • Let it cool to room temperature, then cover with plastic wrap and refrigerate for at least 4 hours, or overnight for best results.


5. Serve

  • Once fully chilled, run a dull knife around the edges of the pan to release the cheesecake and remove the springform ring.

  • Top with whipped cream and drizzle generously with caramel sauce before slicing and serving.


Tips for Best Results

  • Room temperature ingredients create a smoother, lump-free filling.

  • Avoid overmixing to prevent cracks.

  • Chill completely before slicing for the cleanest cuts.


Timing

  • Prep Time: 20 minutes

  • Cook Time: 1 hour

  • Chill Time: 4 hours

  • Total Time: ~5 hours 20 minutes

Slow Cooker Swedish Meatballs Best Recipe

Slow Cooker Swedish Meatballs Best Recipe

Slow Cooker Swedish meatballs recipe soaked in a delicious and flavorful sauce. The mix of tender pork, ground beef, and spices makes a comfy and satisfying meal. It serves as a light appetizer or an enjoyable meal, and it goes perfectly with egg noodles or Read More

Classic Deviled Eggs Best Recipe

Classic Deviled Eggs Best Recipe

Classic Devil’s eggs are the best choice for festive celebrations and parties. Simple and perfect, this traditional recipe for deviled eggs the best. I promise that this will be your favorite recipe for deviled eggs. Also they will be favored by your family and anyone Read More

Parmesan Baked Hash Browns Recipe

Parmesan Baked Hash Browns Recipe

If you love crispy hash browns, this baked Parmesan version is an easy way to make them even better. Fresh shredded potatoes are mixed with onion, Parmesan, chives, olive oil, and seasonings, then baked until golden on the outside and tender in the middle. They are simple, flavorful, and perfect for breakfast, brunch, or even as a side dish.

What makes these especially good is the Parmesan. It adds a deeper savory flavor and helps the edges turn beautifully crisp in the oven. Instead of standing over the stove, you can bake the whole batch at once and get hash browns that are golden, cheesy, and easy to serve.

Ingredients

  • 1 1/2 pounds potatoes, peeled and shredded
  • 1 cup grated Parmesan cheese
  • 1 yellow onion, finely shredded or grated
  • 2 tablespoons minced chives
  • 2 tablespoons garlic herb seasoning
  • 1 teaspoon freshly ground black pepper
  • 1/4 cup extra virgin olive oil

Instructions

  1. Preheat the oven to 400°F. Lightly grease a large baking sheet, muffin pan, or baking dish depending on how you want to shape the hash browns.
  2. Shred the potatoes and onion.
    Peel the potatoes and shred them using a box grater or food processor. Shred or finely grate the onion as well.
  3. Rinse the potatoes.
    Place the shredded potatoes in a bowl of cold water and rinse them well to remove excess starch. Drain, then squeeze out as much moisture as possible using a clean kitchen towel or paper towels. This step helps them bake up crisp instead of soggy.
  4. Mix everything together.
    In a large bowl, combine the shredded potatoes, onion, Parmesan, chives, garlic herb seasoning, black pepper, and olive oil. Mix well until everything is evenly coated.
  5. Shape the hash browns.
    For larger portions, spread the mixture into mounds on a baking sheet and flatten them slightly. For smaller portions, divide the mixture into a muffin pan or shape into smaller patties.
  6. Bake until golden.
    Bake for 30 to 40 minutes, depending on the size and thickness, until the hash browns are golden brown and crisp around the edges. Smaller portions may bake faster.
  7. Serve hot.
    Let them cool for a few minutes, then serve while still hot and crisp.

Tips for the Best Baked Parmesan Hash Browns

  • Squeeze the potatoes well: This is the key to getting crisp edges.
  • Use a larger pan for crispier hash browns: Spreading them out helps them brown better.
  • Do not pack them too thick: Thinner portions bake up crispier.
  • Grate your own Parmesan if possible: It melts better and gives a stronger flavor.

Easy Variations

These baked hash browns are great as they are, but you can change them up in a few easy ways:

  • Swap the Parmesan for cheddar, Gruyère, or Pepper Jack
  • Add cooked chopped bacon for extra flavor
  • Make them in muffin tins and crack an egg into the center near the end of baking
  • Sauté the onion in a little butter first if you want a milder onion flavor

Notes

If you are sensitive to strong onion flavor, you do not need to reduce the amount. Just cook the onion briefly in a little butter, let it cool, and then mix it in. You will still get the flavor, but it will taste sweeter and softer.

These hash browns are best served fresh from the oven while the edges are still crisp.

If you enjoyed these Parmesan baked hash browns, save the image below to your Pinterest board so you can make them again later.

Slow Cooker Thai Peanut Chicken Recipe

Slow Cooker Thai Peanut Chicken Recipe

This Slow Cooker Thai peanut chicken recipe is the best buttery peanut-flavored chicken that is served over thick, rich noodles I have ever made. It’s easy to do; this is just a small walk-through to add all the ingredients together, leaving a slow cooker to Read More

Creamy Mushroom Chicken With Cheese

Creamy Mushroom Chicken With Cheese

Creamy mushroom chicken with cheese has melted cheese that covers soft chicken breasts with delicious mushroom sauce to help its amazing taste. When the cheese melts and mixes the taste of mushrooms and chicken together, making the meal a unique experience for your mouth. Preparing Read More

Garlic Butter Juicy Pork Chops Recipe

Garlic Butter Juicy Pork Chops Recipe

The garlic butter juicy pork chops recipe, buttered with garlic, is so tasty because of the incredible butter sauce. It will take only 15-20 minutes for you to make these pork chops with this recipe.

You will amaze your guests, and they will enjoy this delicious pork chop with butter garlic flavor, as this recipe is one of the best recipes of pork chops I’ve cooked. This roast pork chop is so delicious, thanks to the buttery sauce.

You will use this recipe repeatedly because it is the simplest way to make pork chops in the oven. In just 5 minutes, you prepare everything you need, and in 20 minutes, these pork chops will be on your plate. The butter sauce is straightforward to make.

When melting butter in a microwave oven, just add ground garlic and chopped thyme and mix it well. After that, pour butter sauce over the pork chops and bake them. 

This wafer of white butter is the secret of this roast recipe of pork chops, as it will help keep the pork so juicy and moist.

The best part of this recipe is that it requires a few essential ingredients, but it is so tasty.


Ingredients

  • 3 sprigs fresh thyme

  • 4 cloves garlic, minced

  • 2 tbsp grass-fed butter, melted (plus extra for basting, if desired)

  • 2 medium-sized pork chops, heritage breed preferred

  • Salt and freshly ground black pepper, to taste

  • 1 tbsp olive oil


Instructions

1. Preheat the Oven

  • Preheat your oven to 380°F (193°C).


2. Season the Pork Chops

  • Pat the pork chops dry with paper towels.

  • Season generously with salt and freshly ground black pepper on both sides.


3. Make the Garlic Butter

  • In a small saucepan or microwave-safe dish, melt the butter.

  • Stir in the minced garlic and thyme, mixing well. Set aside.


4. Sear the Pork Chops

  • Heat a cast iron skillet over medium heat and add the olive oil.

  • Once the pan is hot, place the pork chops in the skillet.

  • Sear for about 4 minutes per side, until golden brown.


5. Roast in the Oven

  • Pour the garlic butter mixture evenly over the pork chops.

  • Transfer the skillet to the preheated oven.

  • Roast until the internal temperature reaches 145°F (medium) to 150°F (medium-well), about 6–8 minutes depending on thickness.


6. Rest and Serve

  • Remove the skillet from the oven.

  • Spoon the pan juices over the pork chops to baste them before serving.

  • Let rest for 3–5 minutes to allow the juices to redistribute.

  • Serve with roasted vegetables, mashed potatoes, or a fresh green salad.


Make-Ahead and Storage

  • Make Ahead: This recipe is best cooked fresh for the juiciest results.

  • Storage: Leftovers can be refrigerated in an airtight container for up to 3 days. Reheat gently in a skillet over low heat or in the oven at 300°F to avoid drying out.


Timing

  • Prep Time: 5 minutes

  • Cook Time: 20 minutes

  • Total Time: ~25 minutes

Share the image below on your Pinterest board if you like these pork chops!!!


Garlic Butter Juicy Pork Chops Recipe

See more pork recipes:

Easy Instant Pot Pulled Pork

Brown Sugar Pork Chops with Garlic and Herbs

Pork Tenderloin With Balsamic And Thyme

Classic French Croissants With Cheese Recipe

Classic French Croissants With Cheese Recipe

The classic French Croissants With Cheese recipe is the best I’ve ever made. I have no words to describe it other than, just try this recipe and judge for yourself. Ingredients For the Dough 8 cups all-purpose flour, approximately (about 2.2 lb / 1 kg) Read More