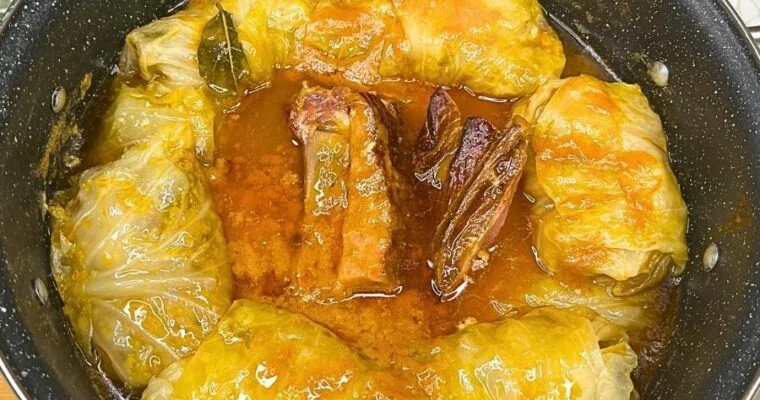
Easy and Delicious Recipes

Recent Posts

Peri Peri Chicken Skewers with Lemon Butter Sauce (Air Fryer Recipe)

Peri Peri Chicken Skewers with Lemon Butter Sauce (Air Fryer Recipe)

One of the best ways to elevate chicken is with a bold and zesty peri peri marinade. This version is blended with roasted red pepper, garlic, lemon juice, and spices, then finished with a rich lemon butter sauce for a perfect balance of heat and Read More

Perfectly Seared T-Bone Steak Recipe (A Steakhouse-Quality Dish at Home)

Perfectly Seared T-Bone Steak Recipe (A Steakhouse-Quality Dish at Home)

There’s something truly magical about a perfectly seared T-bone steak—the sizzling sound as it hits the pan, the rich aroma of butter and herbs, and the deep, golden crust that forms on the outside. Whether you’re cooking for a special occasion or just treating yourself Read More

Air Fryer Bang Bang Chicken Breast Recipe

Air Fryer Bang Bang Chicken Breast Recipe

There’s something incredibly satisfying about a meal that combines simplicity with a burst of flavor. When I first tried this Bang Bang Chicken Breast made in my air fryer, I was surprised at how effortlessly the creamy, spicy sauce elevated the tender chicken to a whole new level. It’s a dish that transforms an ordinary weeknight dinner into something truly memorable—perfect for those evenings when you want a little culinary excitement without spending hours in the kitchen.

Air Fryer Bang Bang Chicken Breast Recipe 2

Air Fryer Bang Bang Chicken Breast Recipe

Ingredients

For the Chicken:

  • 2 boneless, skinless chicken breasts (about 1–1.5 lbs each)
  • 1 tablespoon extra virgin olive oil
  • 1 teaspoon paprika
  • 1 teaspoon garlic powder
  • 1 teaspoon onion powder
  • 1 teaspoon kosher salt
  • ½ teaspoon freshly ground black pepper

For the Bang Bang Sauce:

  • 1 ¼ cups mayonnaise
  • ⅔ cup Thai sweet chili sauce
  • 2 teaspoons Sriracha (adjust to taste)
  • 1 tablespoon honey
  • 1 teaspoon lime juice
  • 2 teaspoons lime zest

Optional Garnish:

  • Sliced green onions
  • Sesame seeds
  • Lime wedges

Instructions

  1. Season the Chicken:
    • Pat the chicken breasts dry with paper towels. Rub both sides with olive oil.
    • Sprinkle paprika, garlic powder, onion powder, kosher salt, and black pepper evenly over the chicken. Let the seasoned breasts sit for 10–15 minutes at room temperature to help the flavors meld.
  2. Prepare the Bang Bang Sauce:
    • In a medium bowl, whisk together the mayonnaise, Thai sweet chili sauce, Sriracha, honey, lime juice, and lime zest until smooth.
    • Divide the sauce into two portions: one half for brushing on the chicken during cooking, and the other half to drizzle over the finished dish.
  3. Preheat Your Air Fryer:
    • Set your air fryer to 400°F and allow it to preheat for about 3–5 minutes.
  4. Cook the Chicken:
    • Place the seasoned chicken breasts in the air fryer basket, ensuring they do not overlap.
    • Generously brush the top of each breast with half of the prepared Bang Bang sauce.
    • Air fry at 400°F for 15 minutes, flipping halfway through the cooking time. When you flip, brush the other side with more sauce.
    • Check that the internal temperature of the chicken reaches 165°F before removing it from the air fryer.
  5. Finish and Serve:
    • Transfer the cooked chicken breasts to a serving plate.
    • Drizzle with the remaining Bang Bang sauce and, if you like, garnish with sliced green onions, sesame seeds, and a squeeze of fresh lime juice from a lime wedge.
    • Serve alongside your favorite sides—steamed rice or a crisp salad work wonderfully.

Enjoyed making this dish? Spread the love and pin it to your Pinterest board so everyone can savor the flavor!

Air Fryer Bang Bang Chicken Breast Recipe 3

Tips & Variations

Enhance your Air Fryer Bang Bang Chicken Breast experience with these practical tips and creative variations. Whether you’re fine-tuning the flavors or seeking ways to simplify your cooking process, these suggestions can help you perfect the dish every time.

Adjusting the Heat

  • Customize Your Spice: If you prefer a milder taste, reduce the amount of Sriracha in the sauce or swap it for a gentler hot sauce. For those who enjoy more heat, feel free to add extra Sriracha or a pinch of red pepper flakes to intensify the flavor.
  • Layered Flavors: For an extra burst of complexity, consider adding a dash of smoked paprika or a sprinkle of chili powder when seasoning the chicken.

Marinating Ideas

  • Extra Tender Chicken: Marinate the chicken breasts in a mixture of lime juice, minced garlic, and a touch of soy sauce for about 30 minutes before applying the Bang Bang seasoning. This not only enhances the flavor but also helps to tenderize the meat.
  • Herbal Twist: Experiment by adding fresh herbs such as cilantro or basil into your marinade for a refreshing herbal note that complements the tangy sauce.

Air Fryer Best Practices

  • Preheat for Perfection: Always preheat your air fryer to 400°F to ensure even cooking and a crisp exterior.
  • Avoid Overcrowding: Arrange the chicken breasts in a single layer with ample space between them. Proper spacing allows hot air to circulate freely, ensuring the meat cooks evenly.
  • Temperature Matters: Use a meat thermometer to confirm that the chicken reaches an internal temperature of 165°F. This step is key for both safety and flavor.

Sauce Customizations

  • Experiment with Citrus: Try substituting lime juice with lemon juice for a slightly different tang, or add a splash of orange juice for a hint of sweetness.
  • Add a Zing: Incorporate a bit of grated ginger into the sauce for a zesty twist that pairs well with the creamy base.

Serving Suggestions

  • Complementary Sides: Pair your Bang Bang Chicken Breast with steamed jasmine rice, a crisp garden salad, or even a bowl of quinoa for a balanced meal.
  • Garnish Creatively: Enhance the presentation by topping the dish with sliced green onions, sesame seeds, and a squeeze of fresh lime juice.
Air Fryer Breaded Chicken Skewers

Air Fryer Breaded Chicken Skewers

Craving a quick, comforting meal without drowning in leftovers? These small-batch Air Fryer Breaded Chicken Skewers are the answer. Each tender piece is marinated for extra flavor, then coated in crisp breadcrumbs that turn golden and irresistible after just a few minutes in the air Read More

Air Fryer Ground Beef Kebabs with Bacon Recipe

Air Fryer Ground Beef Kebabs with Bacon Recipe

Tired of the same old dinner ideas? Switch things up with these air fryer ground beef and bacon kebabs. With the perfect blend of smoky bacon and well-seasoned ground beef, each bite is packed with flavor. These kebabs are simple to make, making them a Read More

Parmesan Crusted Air Fryer Pork Chops

Parmesan Crusted Air Fryer Pork Chops

If you’re looking for a meal that’s both easy to make and bursting with flavor, these Parmesan Crusted Air Fryer Pork Chops are just the ticket. The air fryer gives the pork chops a perfectly crispy crust while keeping the meat tender and juicy inside. Coated with a savory blend of Parmesan cheese and herbs, this recipe takes simple ingredients and turns them into a dish that’s sure to become a family favorite.

Parmesan Crusted Air Fryer Pork Chops 2

Parmesan Crusted Air Fryer Pork Chops Recipe

Ingredients

  • 4 boneless pork chops (approximately 1-inch thick)
  • 1/2 cup grated Parmesan cheese
  • 1/2 cup breadcrumbs (panko or traditional)
  • 1 Tablespoon finely chopped fresh sage (or 1 teaspoon dry sage)
  • 1 teaspoon garlic powder
  • 1/2 teaspoon paprika
  • Salt and freshly ground black pepper to taste
  • 1 large egg
  • Cooking spray or a light brush of olive oil

Instructions

1. Preheat Your Air Fryer

Begin by preheating your air fryer to 400°F (200°C) for about 5 minutes. This ensures the pork chops cook evenly and achieve that perfect crispiness.

2. Prepare the Flavorful Breading

In a shallow dish, mix together:

  • Parmesan cheese
  • Breadcrumbs
  • Sage
  • Garlic powder
  • Paprika
  • Salt and pepper

Stir until all the ingredients are well combined, distributing the sage and spices evenly throughout the mixture.

3. Whisk the Egg

In a separate bowl, beat the egg thoroughly. This will act as the adhesive for the breading, helping it stick to the pork chops.

4. Bread the Pork Chops

  • Dip each pork chop into the beaten egg, making sure it’s fully coated. Allow any excess egg to drip off.
  • Press the pork chop into the breadcrumb mixture, coating both sides generously. Ensure the breading adheres well for maximum flavor and crunch.
  • Shake off any excess breading gently.

5. Cook in the Air Fryer

  • Lightly grease the air fryer basket with cooking spray or a brush of olive oil to prevent sticking.
  • Arrange the breaded pork chops in the basket in a single layer. Make sure there’s space between them for air to circulate.
  • Air fry at 400°F (200°C) for 12-15 minutes. Flip the pork chops halfway through the cooking time to ensure even crisping.
  • Check for doneness: The pork chops should be golden brown and have an internal temperature of 145°F (63°C) when done.

6. Rest and Serve

Allow the pork chops to rest for a few minutes after cooking. This helps the juices redistribute, making for a juicier bite. Serve them alongside your favorite sides like steamed vegetables, roasted potatoes, or a crisp garden salad.

Enjoyed these delicious Air Fryer Parmesan Pork Chops? We’d be thrilled if you shared the image below on your Pinterest board to spread the love. 🙂

Parmesan Crusted Air Fryer Pork Chops 3

Tips and Tricks for the Best Parmesan Crusted Air Fryer Pork Chops

  • Choose the Right Pork Chops: For the juiciest results, opt for thicker, boneless pork chops—about 1 inch thick. They cook more evenly and are less likely to dry out in the air fryer.
  • Even Breading for Maximum Crisp: To achieve an evenly crispy crust, make sure the pork chops are fully coated in the egg mixture before dipping them into the Parmesan and breadcrumb blend. Press the breading gently onto the chops to help it adhere better.
  • Don’t Overcrowd the Air Fryer Basket: Arrange the pork chops in a single layer with space between them. Overcrowding can prevent proper air circulation, resulting in less crispy chops. If necessary, cook in batches.
  • Preheat the Air Fryer: Preheating your air fryer for about 5 minutes before adding the pork chops helps them cook more evenly and develop a crispier crust.
  • Use a Meat Thermometer: To ensure perfectly cooked pork that are juicy and tender, use a meat thermometer. The internal temperature should reach 145°F (63°C) for safe consumption. Overcooking can lead to dry pork chops, so keep an eye on the temperature.
  • Let Them Rest: After cooking, allow the pork chops to rest for a few minutes. This step lets the juices redistribute throughout the meat, ensuring a more flavorful and tender bite.
  • Customize the Herb Blend: While sage adds great flavor, feel free to experiment with other herbs like rosemary, thyme, or a mix of Italian herbs. You can also use fresh herbs for a brighter taste, but remember to adjust the quantity accordingly (1 tsp dried = 1 tbsp fresh).
  • Add Extra Cheese for Flavor: For an extra cheesy crust, try incorporating some shredded mozzarella or a sprinkle of shredded cheddar into the Parmesan and breadcrumb mixture. This will give the chops an even richer flavor and texture.
  • Spray Lightly with Oil: For an extra crispy finish, lightly spray the breaded pork chops with cooking spray or olive oil before air frying. This helps the crust turn golden brown without adding too much extra fat.
  • Reheating Leftovers: To reheat leftovers without losing the crispy crust, pop the pork chops back into the air fryer at 350°F (175°C) for about 5 minutes. This method revives the crunch much better than microwaving.
  • Gluten-Free or Low-Carb Options: For a gluten-free version, use gluten-free breadcrumbs. For a lower-carb option, substitute the breadcrumbs with crushed pork rinds or almond flour—both work great for adding crunch.
  • Double Dredging for Extra Crunch: If you love an extra-thick and crunchy crust, you can double-dredge the pork chops. Dip them in egg and breadcrumbs twice before air frying, just make sure to shake off excess each time.

Beef and Broccoli Stir-Fry with Sauce (Crispy & Tender)

Beef and Broccoli Stir-Fry with Sauce (Crispy & Tender)

There’s a special place in my heart for meals that are both comforting and bursting with flavor. This Beef and Broccoli Stir-Fry with Garlic Sesame Glaze is one such dish that never fails to delight. I remember the first time I whipped it up on Read More

Blackened Shrimp Recipe with Zesty Remoulade Sauce

Blackened Shrimp Recipe with Zesty Remoulade Sauce

I’ve always loved the bold flavors of blackened shrimp, so I set out to create a blackened shrimp recipe that’s both delicious and easy to make. I started by marinating the shrimp in a mixture of olive oil, garlic, and lemon juice to keep them Read More

Creamy Tuscan Orzo Chicken Recipe (One-Pan)

Creamy Tuscan Orzo Chicken Recipe (One-Pan)

After a long day, nothing beats coming home to the smell of something warm and comforting in the oven. This Tuscan Orzo Chicken Bake is exactly what you need—quick to prepare, with only one pan to clean, and ready to serve in no time.

Imagine juicy cherry tomatoes bursting with sweetness, mixed with the brightness of fresh lemon juice. The orzo pasta soaks up all the rich, creamy goodness, while sharp Parmesan adds just the right amount of bite. It’s a dish that feels like a hug, simple to make but full of flavor, and one that you’ll find yourself turning to again and again.

Why This Recipe Will Become Your New Favorite

  • Effortless Prep: With just 10 minutes of prep time, this Tuscan Chicken Bake is as low-maintenance as it gets. It’s perfect for those nights when you want a homemade meal without the hassle—simply toss everything together and let the oven do the work.
  • No-Fuss Cooking: Say goodbye to a sink full of dishes. This recipe is truly a one-pan wonder—just mix, bake, and serve. No extra bowls, no unnecessary steps, just straightforward, delicious cooking.
  • Perfect for Busy Days: When life gets hectic, and takeout seems like the only option, this dish swoops in to save the day. It’s as easy as “dump and bake,” but with all the comfort and satisfaction of a meal made from scratch.
  • Even Better the Next Day: This bake doesn’t just make dinner easy; it’s also a great option for leftovers. The flavors deepen overnight, making it even more delicious when reheated. Just add a splash of chicken broth, and you’re ready to enjoy it all over again.

Creamy Tuscan Orzo Chicken Recipe One Pan 2

Tuscan Orzo Chicken Recipe

Ingredients

  • 16 oz. dry orzo
  • 2 cups cooked chicken (rotisserie or sautéed, diced)
  • 3 cups unsalted chicken stock
  • 1 cup heavy cream
  • 5 garlic cloves, minced
  • 2/3 cup Parmesan cheese, grated or shredded
  • 1.5 cups mozzarella cheese, shredded
  • 3 cups loosely packed fresh basil leaves, roughly chopped
  • 1 pint cherry tomatoes, whole or halved
  • Juice of 1 lemon
  • 1 teaspoon Italian seasoning
  • 1/2 teaspoon salt, or more to taste
  • 1 teaspoon freshly cracked pepper
  • Optional: 1/2 teaspoon garlic powder (if not using fresh garlic)

Instructions

  1. Preheat the Oven:
    Begin by preheating your oven to 375°F (190°C). Lightly spray the sides of a 9×13-inch casserole dish with non-stick cooking spray to ensure easy cleanup later.
  2. Assemble the Ingredients: In the prepared casserole dish, combine the following: dry orzo, cooked chicken, chicken stock, heavy cream, minced garlic, chopped basil, cherry tomatoes, lemon juice, Italian seasoning, salt, and pepper.
    • Tip: If using garlic powder instead of fresh garlic, add it in at this stage.
      Mix everything together thoroughly so the ingredients are evenly distributed and the orzo is submerged in the liquid.
  3. Add the Cheese: Stir in half of the grated Parmesan and shredded mozzarella into the casserole dish. This ensures that some of the cheese melts throughout the dish while baking, adding a rich, creamy texture.
  4. Top and Bake: Sprinkle the remaining Parmesan and mozzarella evenly over the top of the dish. Place the casserole dish in the preheated oven and bake for 40 minutes, or until the orzo is tender and the cheese on top is golden and bubbly.
  5. Rest Before Serving: Once baked, remove the casserole from the oven and let it sit for about 10 minutes. This allows the juices to be absorbed and the dish to set, which helps prevent it from being too liquidy.
  6. Final Stir and Serve: After resting, give the dish a good stir with a large serving spoon to redistribute the ingredients and ensure every bite is packed with flavor. Serve the Tuscan Chicken Bake hot, paired with a fresh salad or your favorite side dish. Enjoy!

Don’t let this culinary gem slip away! Save the Creamy Tuscan Orzo Chicken recipe by pinning the image below to your Pinterest board, and share the flavorful adventure with your friends.

Tuscan Orzo Chicken Recipe

Recipe Variations

One of the best things about this Tuscan Chicken Bake is how adaptable it is. Here are a few variations to suit different tastes, dietary needs, and ingredient availability:

  1. Vegetarian Option:
    Skip the chicken and add more veggies for a hearty, vegetarian version. Consider adding sliced mushrooms, zucchini, or bell peppers to the mix. You could also substitute the chicken with a can of drained and rinsed chickpeas for added protein.
  2. Seafood Twist:
    Swap out the chicken for cooked shrimp or chunks of firm white fish, such as cod or halibut. The seafood will absorb the flavors beautifully, adding a coastal flair to the dish.
  3. Spicy Kick:
    If you enjoy a bit of heat, stir in some crushed red pepper flakes or a diced jalapeño. You can also use spicy Italian sausage in place of the chicken for a more intense flavor profile.
  4. Low-Carb Version:
    Replace the orzo with cauliflower rice for a low-carb alternative. Keep in mind that cauliflower rice cooks much faster, so reduce the baking time to avoid overcooking.
  5. Dairy-Free:
    Make this dish dairy-free by using coconut milk or a plant-based cream substitute instead of heavy cream. Opt for dairy-free cheese alternatives, which are widely available, to maintain that cheesy goodness.
  6. Herb Variations:
    While basil is the star in this version, you can easily switch it up with other herbs depending on your preference. Fresh thyme, rosemary, or even a mix of Italian herbs can bring different nuances to the dish.
  7. Pasta Alternatives:
    If you don’t have orzo on hand, try this recipe with another type of small pasta like couscous, ditalini, or even quinoa for a different texture.
  8. Extra Creamy:
    For an even creamier version, double the amount of heavy cream and add a touch more cheese. This creates a richer, more indulgent dish that’s perfect for those who love extra creaminess.
  9. Add Some Greens:
    While this recipe already includes basil, you can bulk it up with other greens like kale, arugula, or even Swiss chard. Just make sure to chop them finely and mix them in well.
  10. Gluten-Free:
    Substitute the orzo with a gluten-free pasta option, and ensure that all other ingredients, like the chicken stock and seasonings, are certified gluten-free.

Perfectly Caramelized Onions (A Detailed Guide)

Perfectly Caramelized Onions (A Detailed Guide)

Welcome to a world where simple onions transform into a culinary delight! Caramelized onions are a game-changer, adding a rich, sweet depth to your dishes. The process is straightforward but requires patience, allowing the natural sugars in the onions to develop into a beautiful golden Read More