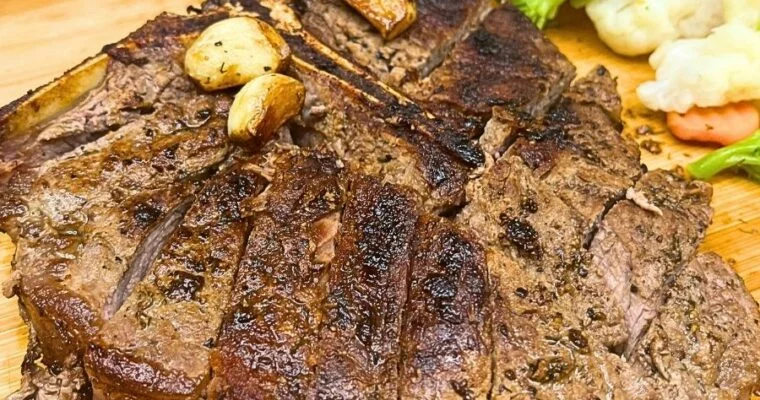
Easy and Delicious Recipes

Recent Posts

Delicious Cheese Balls with Sausage Recipe

Delicious Cheese Balls with Sausage Recipe

Add a touch of gourmet flair to your festive meals with these savory cheese balls, inspired by Marijana’s recipe, now featuring sausage, for an extra layer of flavor. Perfect for spreading on bread or crackers, these cheese balls can also be enjoyed as a standalone Read More

Crispiest Air Fryer Buffalo Chicken Wings

Crispiest Air Fryer Buffalo Chicken Wings

Are you on the hunt for a dish that’s both effortless to make and bursting with flavor? Our Air Fryer Buffalo Chicken Wings are exactly what you need. This recipe isn’t just another wing recipe; it’s a revelation in the world of home-cooked comfort food. Read More

Honey Garlic Chicken Breast Recipe

Honey Garlic Chicken Breast Recipe

Ready to upgrade your weeknight dinners without spending hours in the kitchen? Honey Garlic Chicken Breast is your answer! This delightful dish takes less than 15 minutes to prepare, yet it packs a punch of flavor that will have everyone thinking you’ve been cooking all day.

Perfect for those busy evenings, it’s a delectable blend of simplicity and gourmet taste, all thanks to a magical 5-ingredient sauce.

The Secret: Honey Garlic Sauce

One of the main attractions of this recipe is the Honey Garlic Sauce. It’s a versatile marvel that can transform simple ingredients into a culinary masterpiece. The beauty of this sauce lies in its simplicity, using pantry staples to create a rich, syrupy glaze that perfectly complements the chicken.

Honey Garlic Chicken Breast Recipe 2

Honey Garlic Chicken Breast Recipe

Ingredients:

  • Chicken Breast: 1lb (about 500g), boneless and skinless,
  • Seasonings: Salt and pepper to taste,
  • For Coating: 1/4 cup of flour,
  • Cooking Fat: 3 1/2 tablespoons unsalted butter or 2 1/2 tablespoons olive oil,
  • Aromatics: 2 garlic cloves, minced,
  • Acidity: 1 1/2 tablespoons apple cider vinegar,
  • Umami: 1 tablespoon soy sauce,
  • Sweetness: 1/3 cup honey,
  • Additional Flavor: 1 tablespoon rosemary,

Instructions

  1. Prepare the Chicken: Cut the chicken breasts horizontally to create 4 thin steaks. Season each side with salt and pepper.
  2. Flour Coating: Place flour in a shallow dish. Lightly coat the chicken in flour, tapping off any excess.
  3. Sear the Chicken: Heat most of the butter in a large skillet over high heat. Reserve about 1 teaspoon for later use. Sear the chicken for 2-3 minutes until golden brown, then flip and cook for another minute.
  4. Create the Sauce: Reduce the heat to medium-high. Make space in the pan, add the minced garlic and the remaining butter. Stir briefly once the butter melts.
  5. Develop the Flavor: Add the vinegar, soy sauce, honey, and rosemary. Stir the mixture, bringing the sauce to a simmer. Continue simmering for about 1 minute or until the sauce thickens slightly.
  6. Coat the Chicken: Turn the chicken in the pan to coat it evenly with the sauce. If the sauce thickens too much, add a little water and stir.
  7. Serve: Remove the skillet from heat. Plate the chicken and generously drizzle it with the remaining sauce.

Found this Honey Garlic Chicken Breast recipe irresistible? Save it to your Pinterest board for easy access and to share the culinary love with your friends!

Honey Garlic Chicken Breast Recipe 3

Serving Suggestions: Elevating Your Honey Garlic Chicken Breast

Transform your Honey Garlic Chicken Breast into a complete, balanced meal with these creative and delicious serving suggestions. Each option complements the rich flavors of the chicken while adding nutritional value and variety to your dinner plate.

1. Cauliflower Rice with a Twist

  • A healthier alternative to traditional rice, cauliflower rice is light and pairs excellently with the chicken. Enhance it with a squeeze of fresh lemon juice, chopped parsley, and a pinch of salt and pepper. This not only adds freshness but also a zesty contrast to the sweet and savory chicken.

2. Nutritious Green Salad

  • Pair with a vibrant green salad consisting of mixed lettuce, spinach, or arugula. Toss in some cherry tomatoes, sliced cucumbers, and red onions for a colorful and refreshing side. Drizzle with a light vinaigrette or lemon dressing to complement the honey garlic sauce.

3. Roasted Vegetables

  • Roast a medley of vegetables like brussel sprouts, broccoli, carrots, and bell peppers seasoned with herbs and olive oil. Roasting brings out their natural sweetness, making them a hearty and healthy addition to your meal.

4. Savory Quinoa

  • Serve alongside quinoa for a high-protein, gluten-free grain option. Cook the quinoa in chicken or vegetable broth for added flavor, and stir in some finely chopped herbs for a fresh touch.

5. Asian-Inspired Fried Rice

  • For a more filling option, pair with fried rice. You can incorporate vegetables like peas, carrots, and green onions, along with a scrambled egg for an Asian-inspired twist that harmonizes with the honey garlic flavors.

6. Creamy Mashed Potatoes

  • Mashed potatoes make a comforting side dish. Their creamy texture balances the tangy and sweet notes of the chicken. For a healthier version, try mashing cauliflower or a mix of potatoes and turnips.

7. Steamed or Sautéed Greens

  • Lightly steamed or sautéed greens like spinach, kale, or Swiss chard add a pop of color and a dose of healthy nutrients. A simple seasoning of garlic, salt, and a squeeze of lemon juice can elevate these greens.

8. Pasta or Noodles

  • If you’re in the mood for Italian or Asian flavors, serve the chicken over a bed of pasta or noodles. Choose a light sauce or a simple olive oil dressing to allow the honey garlic chicken to shine.

9. Crusty Bread or Dinner Rolls

  • Serve with a side of crusty bread or warm dinner rolls to soak up the delicious sauce. This simple addition is perfect for those who love a bit of carb indulgence.

10. Refreshing Fruit Salad

  • End on a fresh note with a fruit salad. Mix fruits like pineapple, mango, and berries for a sweet and tangy finish that cleanses the palate.

Each of these suggestions not only adds to the meal’s flavor profile but also ensures a well-rounded and satisfying dining experience. Feel free to mix and match these sides based on your dietary preferences and the occasion. Happy cooking!

Marinated Air-Fryer Pork Tenderloin With Garlic Butter

Marinated Air-Fryer Pork Tenderloin With Garlic Butter

This air-fryer pork tenderloin recipe is all about bringing a rich, savory flavor to your table with minimal effort. Whether you’re a beginner in the kitchen or a seasoned cook, you’ll find this recipe a breeze. In just 30 minutes, you can transform a simple Read More

How To Make Italian Dressing (+ Recipe Variations)

How To Make Italian Dressing (+ Recipe Variations)

Discover the simple pleasure of creating your own Italian dressing. Fresh, customizable, and free from preservatives, this recipe is a delightful twist to your meals, offering a healthier and tastier alternative to store-bought versions. This recipe is crafted for those who cherish the essence of Read More

Original Cici’s Brownies Recipe

Original Cici’s Brownies Recipe

Are you crazy about brownies? If so, you’re in for a treat! Today, I’m excited to share a special secret: the beloved Cici’s Brownies Recipe. Along with this mouth-watering recipe, I’ll be offering some handy tips and insights that all brownie lovers will appreciate. Stay tuned for a delightful twist on your brownie experience!

What Are Cici’s Brownies?

Originating in Coppell, Texas, Cici’s has made a name for itself as an American buffet restaurant chain, primarily known for its pizza since its inception in 1985. The franchise began spreading its wings in 1988, bringing a unique dining experience to many.

At Cici’s, the menu is a delightful mix, featuring items like Wings, Pizza, Pasta, Salad, and a variety of Desserts and Beverages. Among these, their brownies have garnered a special place in the hearts of dessert lovers.

Prepared with rich Milk Chocolate Brownie Mix, fresh Eggs, Vegetable Oil, luscious Chocolate Syrup, Semi-Sweet Chocolate Chips, and finished with a dusting of Powdered Sugar, Cici’s Brownies are a treat for the senses.

The simplicity of the recipe, requiring just seven key ingredients and some basic kitchen tools, adds to its charm. Below, I’ve broken down the steps for you, making it super easy to bring Cici’s fudge brownies to your own kitchen.

Cici’s Brownies Recipe

Ingredients

  • 1 family-size box of Pillsbury’s Milk Chocolate Brownie Mix
  • 2 large eggs
  • 1/3 cup of vegetable oil
  • 1/4 cup of chocolate syrup
  • 1 cup of semi-sweet chocolate chips, melted
  • Powdered sugar for dusting (optional)

Instructions

  1. Preparation: Start by preheating your oven to 350°F (175°C). This ensures your oven is at the right temperature when the batter is ready.
  2. Mixing the Batter: In a medium-sized bowl, whisk together the eggs and oil until they’re well combined. Begin adding the brownie mix in two halves, stirring gently after each addition. This technique prevents the batter from becoming overmixed and helps maintain a fudgy texture.
  3. Adding the Chocolate: Now, pour in the chocolate syrup and the melted semi-sweet chocolate chips. Blend these in until just mixed. The chocolate syrup enhances the richness, while the melted chips contribute to the gooey texture Cici’s brownies are known for.
  4. Preparing the Pan: Line a 13×9 inch metal baking pan with parchment paper or grease it thoroughly with cooking spray or butter. This step is crucial for easy removal of the brownies later.
  5. Baking: Gently pour the batter into the prepared pan, spreading it evenly. Bake in the preheated oven for 21-24 minutes. Start checking at around the 15-minute mark by inserting a toothpick into the center. When it comes out with a few moist crumbs (not wet batter), they’re done.
  6. Cooling: Immediately after taking them out of the oven, place the pan in the fridge or freezer. This rapid cooling process is essential; it prevents the brownies from continuing to cook in the hot pan, which can cause hard edges and a dry center.
  7. Cutting and Serving: Once completely cooled, cut the brownies into your desired size. A plastic knife is recommended for cleaner cuts. For that authentic Cici’s touch, lightly dust the brownies with powdered sugar before serving.

Loved recreating the classic Cici’s Fudge Brownies at home? Share the love! Pin the image below to your Pinterest board. By sharing, you’ll not only spread the joy of this delightful recipe but also help others discover the magic of baking these irresistible treats. Plus, you’ll always have this recipe handy for your next baking adventure!

Original Cicis Brownies Recipe 2

Tips for The Best Cici’s Brownies Copycat Recipe

  1. Quality Ingredients: Use high-quality chocolate chips and chocolate syrup for a richer, more decadent flavor. The better the chocolate, the more delicious your brownies will be.
  2. Room Temperature Eggs: Make sure your eggs are at room temperature before mixing. This helps them blend more easily into the batter, resulting in a smoother texture.
  3. Don’t Overmix: When combining your ingredients, mix just until they’re incorporated. Overmixing can lead to a cake-like texture, while we’re aiming for fudgy and dense brownies.
  4. Even Baking: To ensure even baking, spread the batter uniformly in the pan. Also, rotate the pan halfway through baking to account for any hot spots in the oven.
  5. Checking for Doneness: Use the toothpick test as mentioned, but remember, a few moist crumbs are what you’re looking for, not completely clean. This is the secret to moist, fudgy brownies.
  6. Cooling is Key: The rapid cooling in the fridge or freezer isn’t just about ease of cutting; it’s also about texture. This step ensures the brownies have that signature fudginess.
  7. Cutting Technique: If you’re having trouble cutting your brownies cleanly, dip your knife (or plastic knife) in hot water, wipe it dry, and then cut. The warm knife glides through the brownies more easily.
  8. Storage: Store leftover brownies in an airtight container to keep them moist and fudgy. They can be kept at room temperature for a few days or frozen for longer storage.
  9. Serving Suggestion: For an extra special treat, serve your brownies warm with a scoop of vanilla ice cream on top.
Wingstop’s Hot Honey Rub Wings Copycat Recipe

Wingstop’s Hot Honey Rub Wings Copycat Recipe

Craving the unmistakable taste of Wingstop’s Hot Honey Wings but don’t feel like dining out? You’re in luck! This recipe brings the unique flavor of Wingstop’s popular wings into your home kitchen. It’s perfect for spice enthusiasts and sweet-toothed foodies alike. We’ll guide you through Read More

Wingstop’s Atomic Sauce Recipe

Wingstop’s Atomic Sauce Recipe

Are you eager to boost your meals with a burst of bold flavors? This recipe guide unlocks the secrets to creating a homemade version of Wingstop’s famous Atomic Sauce. Known for its perfect harmony of spicy, sweet, and smoky notes, this sauce transforms ordinary dishes Read More

Air Fryer Chocolate Lava Cake with Hazelnuts (+Recipe Variations)

Air Fryer Chocolate Lava Cake with Hazelnuts (+Recipe Variations)

Hey there! Ready to whip up something that’ll make your taste buds dance? Let’s talk about turning your air fryer into your secret weapon for an incredible dessert. Our air fryer chocolate lava cake is not just another recipe; it’s your ticket to an ooey-gooey, chocolate-packed delight that’s surprisingly easy to make.

Forget spending hours in the kitchen – in just a few steps, you’ll be biting into a dessert that looks like it took all day to create. Plus, we’ve got some twists up our sleeve for when you’re feeling adventurous. So, grab your air fryer, and let’s get that amazing chocolate magic happening in your kitchen tonight!

Air Fryer Chocolate Lava Cake with Hazelnuts 2

Air Fryer Chocolate Lava Cake Recipe

Prep Time: 15 minutes
Cook Time: 7-8 minutes
Total Time: 22-23 minutes
Servings: 4 cakes

Ingredients

Cake:

  • 1 cup semi-sweet chocolate chips
  • 1/2 cup unsalted butter
  • 2 large eggs
  • 2 large egg yolks
  • 1/4 cup sugar
  • 1/8 teaspoon salt
  • 2 tablespoons all-purpose flour
  • 1/2 teaspoon vanilla extract
  • 1/4 cup finely ground hazelnuts

For Serving (optional):

  • Powdered sugar
  • Fresh berries
  • Whipped cream

Instructions

  1. Prepare Cake Batter:
    • Melt your chocolate chips and butter together until smooth. You can do this in a microwave or over a double boiler.
    • Whisk the eggs, egg yolks, sugar, and salt using a separate bowl until light and fluffy.
    •  Fold in the flour gently, vanilla extract, and ground hazelnuts into the egg mixture.
    • Combine with the melted chocolate mixture.
  2. Prep Ramekins:
    • Grease four small ramekins that can fit in your air fryer. Dust them lightly with flour.
  3. Fill Ramekins:
    • Divide the batter evenly in your prepared ramekins.
  4. Air Fry:
    • Preheat your air fryer to 360°F (180°C).
    • Place the ramekins in the air fryer basket, ensuring they do not touch each other. Depending on the size of your air fryer, you might need to cook them in batches.
    • Cook for 7-8 minutes. The edges should be set, but the center should remain slightly jiggly.
  5. Serve:
    • Let the cakes cool for about a minute.
    • Run a knife around the edges of each cake and invert onto a plate.
    • Serve immediately with a dusting of powdered sugar, fresh berries, ice cream, and whipped cream, if desired.

Notes

  • Ramekin Size: Ensure the ramekins fit in your air fryer. Smaller air fryers may require smaller ramekins or cooking in batches.
  • Cooking Time: Air fryer models may vary in temperature. Check the cakes at 8 minutes and adjust cooking time as needed.
  • Serving: These cakes are best served immediately to enjoy the gooey, molten center.

Whipped up this air fryer chocolate lava cake and it’s a hit? Share the love on Pinterest! Show your followers how to rock the kitchen with minimal effort and maximum chocolate – because let’s face it, who doesn’t want to be the hero of dessert time?

Chocolate Lava Cake with Hazelnuts

Air Fryer Chocolate Lava Cake Recipe Variations

1. White Chocolate Raspberry Lava Cake:

  • Swap the semi-sweet chocolate chips for white chocolate chips.
  • Add a tablespoon of raspberry puree into the center of each cake before baking for a fruity twist.

2. Mocha Lava Cake:

  • Add 1 tsp of instant coffee or espresso powder to the chocolate mixture for a mocha flavor.
  • Serve with a sprinkle of cocoa powder for extra richness.

3. Nutty Almond Delight:

  • Replace ground hazelnuts with ground almonds.
  • Add a few drops of almond extract to improve the nutty flavor.

4. Spicy Cinnamon Lava Cake:

  • Add a pinch of cinnamon and cayenne pepper to the batter for a spicy kick.
  • This pairs well with a dollop of cinnamon whipped cream on top.

5. Vegan and Gluten-Free Option:

  • Use vegan chocolate chips and a plant-based butter substitute.
  • Swap the eggs with a vegan egg substitute and use gluten-free flour.

6. Salted Caramel Lava Cake:

  • Place a small piece of soft caramel candy in the center of each cake before baking.
  • Sprinkle a little sea salt on top of the batter for a salty-sweet contrast.

7. Peppermint Holiday Lava Cake:

  • Add a few drops of peppermint extract to the chocolate mixture.
  • Garnish with crushed peppermint candies for a festive touch.

8. Peanut Butter Lava Cake:

  • Add a spoonful of peanut butter in the center of each ramekin before adding the batter.
  • The peanut butter will melt into a gooey center as the cake cooks.

9. Orange Zest Lava Cake:

  • Stir in the zest of one orange into the batter for a citrusy note.
  • Serve with a small scoop of orange-flavored sorbet for a refreshing twist.

10. Boozy Lava Cake:

  • Add a tablespoon of your favorite liqueur (like Baileys, Kahlua, or Grand Marnier) to the chocolate mixture.
  • This variation is perfect for adult gatherings and adds a sophisticated flavor.
Air-Fryer Apple Crisp with Recipe Variations

Air-Fryer Apple Crisp with Recipe Variations

Hey there! If you’re looking to spice up your dessert game, you’ve come to the right place. We’re tackling a delicious apple crisp that’s not only easy to whip up in an air fryer but also leaves room for your own creative twists. This recipe Read More