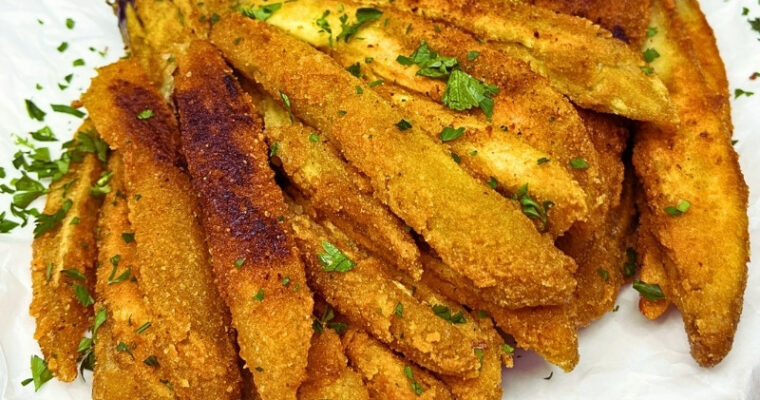
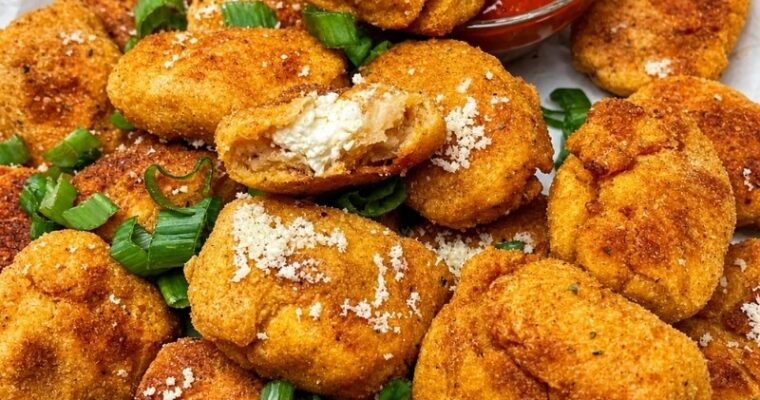
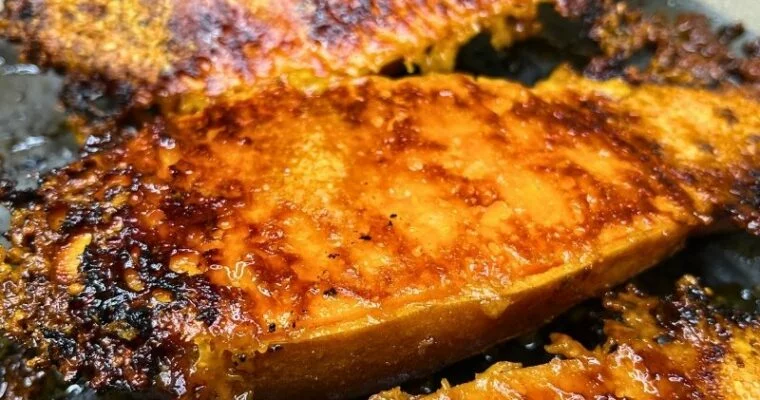
Easy and Delicious Recipes

Recent Posts

Fall-Apart Braised Chuck Roast Recipe

Fall-Apart Braised Chuck Roast Recipe

A braised chuck roast is the kind of dinner that makes the whole home feel cozy. This Dutch oven pot roast simmers low and slow with onions, carrots, garlic, and a handful of fresh herbs until the beef turns fork-tender and the pan sauce becomes Read More

Apricot Honey Glazed Ham Recipe

Apricot Honey Glazed Ham Recipe

A good holiday ham should be tender, glossy, and impossible to walk past without sneaking a slice. This apricot honey glazed ham checks every box. It starts with a fully cooked spiral ham and a quick stovetop glaze—apricot preserves, honey, brown sugar, Dijon, and butter—that Read More

Classic Green Bean Casserole Recipe

Classic Green Bean Casserole Recipe

If you’re looking for a classic green bean casserole that tastes just like the one you grew up with, this recipe has you covered. It’s creamy, cozy, and layered with all the familiar flavors that make it a must-have holiday side dish for Thanksgiving or Christmas dinner.

Tender green beans are folded into a rich, savory sauce, then topped with crispy fried onions that turn perfectly golden in the oven. The result is a simple, satisfying casserole that pairs beautifully with turkey, ham, or roasted chicken.

You don’t need any special ingredients or complicated steps — just a few pantry staples and about half an hour. It’s comfort food at its best: nostalgic, reliable, and always one of the first dishes to disappear from the table.

Classic Green Bean Casserole Recipe 2

Ingredients

  • 1 can (10.5 oz) cream of mushroom soup (cream of celery works too)

  • ½ cup 2% milk

  • 1 teaspoon soy sauce

  • 4 cups cooked green beans, cut into bite-size pieces

  • 1⅓ cups crispy fried onions, divided

Fresh or frozen beans are both fine. Just make sure they’re tender before mixing.


Instructions

Step 1
Preheat your oven to 350°F (175°C). In a 1½-quart baking dish, stir together the soup, milk, soy sauce, green beans, and ⅔ cup of the fried onions. Add a little salt and pepper if you like.

Step 2
Bake uncovered for about 25 minutes, or until the casserole is hot and starting to bubble. Give it a quick stir to bring everything together.

Step 3
Sprinkle the remaining onions over the top and return to the oven for another 5 minutes, just until the onions turn crisp and golden.

Step 4
Let the casserole rest for a few minutes before serving so it thickens slightly and the flavors settle.

Make Ahead

Planning ahead? This casserole fits perfectly into a busy holiday schedule. You can prep it early without losing flavor or texture.

  • Assemble in advance:
    Mix the soup, milk, soy sauce, green beans, and ⅔ cup fried onions. Spread into your baking dish, cover tightly with foil or plastic wrap, and refrigerate for up to 24 hours.

  • When ready to bake:
    Remove from the fridge while preheating the oven. Bake as directed, then add the remaining onions in the last few minutes so they stay crisp and golden.

  • Alternate method:
    Prepare just the filling ahead of time, refrigerate it, and bake with the topping added fresh before serving. This keeps the flavor bright and the texture perfect.


Storage

Leftovers reheat beautifully, making this casserole just as good the next day.

  • Refrigerate:
    Let the casserole cool completely. Cover tightly or transfer to an airtight container and refrigerate for up to 3 days.

  • Reheat:
    Warm in the oven at 325°F (160°C) for 15–20 minutes until heated through. Uncover for the last few minutes to crisp the onions again.
    Tip: You can microwave individual portions if you’re short on time, though the topping won’t stay as crunchy.

  • Freeze (optional):
    For longer storage, freeze without the onion topping. Wrap well and store for up to 2 months.
    Thaw overnight in the fridge, bake at 350°F (175°C) until hot, and finish with a fresh layer of onions before serving.

Classic Green Bean Casserole Recipe 3

Frequently Asked Questions

Can I make green bean casserole ahead of time?

Yes. Assemble the casserole (without the final onion topping) up to 24 hours in advance. Cover tightly and refrigerate. When ready to bake, let it sit at room temperature while the oven preheats, then bake as directed. Add the remaining onions in the last few minutes so they stay crisp.


Can I use fresh or frozen green beans?

Both work well. If using fresh beans, blanch them in boiling water for 5–6 minutes until just tender before adding them to the casserole. Frozen beans should be thawed and drained to avoid excess moisture.


Can I use cream of celery instead of cream of mushroom soup?

Absolutely. Cream of celery adds a lighter, slightly herbaceous flavor. You can also try cream of chicken or even a homemade mushroom sauce if you prefer less processed options.


How do I keep the fried onions crispy?

Add the final layer of onions during the last 5 minutes of baking. This keeps them crunchy and golden. If reheating leftovers, uncover the dish for the last few minutes to re-crisp the topping.


Can I make this without canned soup?

Yes. You can prepare a simple homemade sauce with butter, flour, milk, and sautéed mushrooms. Use about 1½ cups of thickened sauce as a replacement.


What size baking dish should I use?

A 1½-quart baking dish works best for this amount. It allows the casserole to bake evenly and develop a slightly golden edge.


Can I freeze green bean casserole?

Yes, but it’s best to freeze it before baking and without the onion topping. Wrap tightly and store for up to 2 months. Thaw overnight in the fridge, bake until hot, and top with fresh fried onions just before serving.


How long does green bean casserole last in the fridge?

Up to 3 days when stored in an airtight container. Reheat in the oven at 325°F (160°C) until warm, uncovering for the last few minutes to restore crispiness.


Can I double this recipe?

Definitely. Use a 9×13-inch dish and double all ingredients. Baking time may increase by 5–10 minutes, so check for bubbling edges before adding the final onion layer.


What can I serve with green bean casserole?

It’s a classic pairing for holiday mains like roast turkey, baked ham, or prime rib, and complements other sides such as mashed potatoes, stuffing, or sweet potato casserole.

Sweet Potato Casserole with Pecan Crumble and Cranberries

Sweet Potato Casserole with Pecan Crumble and Cranberries

I make this sweet potato casserole every year, and it never lasts long. The sweet potatoes bake up soft and buttery, the cranberries add a little pop of tartness, and that pecan crumble turns golden and crisp on top. It’s one of those side dishes Read More

Crispy Caramelized Baked Buffalo Chicken Wings

Crispy Caramelized Baked Buffalo Chicken Wings

These crispy baked buffalo chicken wings are seasoned with Old Bay and Sazon, roasted until golden, and then brushed with a light buffalo-honey glaze that caramelizes under high heat. The result? Juicy wings with crackling skin and a glossy finish that looks as good as Read More

Rustic Italian Peperonata Recipe

Rustic Italian Peperonata Recipe

There’s nothing quite like the taste of sweet bell peppers slowly cooked down with onions and garlic. This version of Italian peperonata skips the capers and uses ripe, organic tomatoes instead of jarred passata, giving the dish a fresher, more vibrant flavor. It’s the kind of side dish that feels at home at a family table—served warm with grilled chicken or lamb, or chilled and piled onto crusty bread with a drizzle of olive oil.

Rustic Italian Peperonata Recipe 2

Ingredients

  • 1 tablespoon olive oil

  • 2 garlic cloves, diced

  • 1 medium onion, roughly chopped

  • 6 large bell peppers (mixed colors), sliced into strips

  • About 1 pound (500 g) ripe organic tomatoes, chopped

  • 1 teaspoon white wine vinegar

  • Salt and freshly ground black pepper, to taste


Instructions

  1. Sauté the aromatics
    Warm the olive oil in a wide skillet over medium heat. Add the diced garlic and roughly chopped onion. Cook for about 5 minutes, stirring often, until softened and fragrant.

  2. Cook the peppers
    Stir in the sliced bell peppers. Let them cook for a few minutes, stirring occasionally, until they begin to soften.

  3. Add the tomatoes
    Add the chopped organic tomatoes and stir everything together. Cook uncovered for about 15 minutes, or until the tomatoes have broken down into a rich, jammy sauce.

  4. Season & finish
    Season generously with salt and black pepper to taste. Add the vinegar, stir, and cook for another 5 minutes to bring all the flavors together.

  5. Serve
    Remove from the heat and serve warm or at room temperature with feta cheese and crusty bread.


I always save my favorite recipes to Pinterest so I don’t lose them — if you enjoyed this peperonata, go ahead and pin the photo below to your board so it’s waiting for you next time you’re craving it.

Rustic Italian Peperonata Recipe 3

Serving Suggestions

Peperonata is incredibly versatile and can be enjoyed warm or cold. Here are some of my favorite ways to serve it:

  • With bread and cheese: Spoon it over toasted crusty bread and add a crumble of feta or goat cheese.

  • As a side dish: Pairs beautifully with grilled chicken, lamb chops, or baked fish.

  • With pasta or polenta: Toss it through pasta or serve over creamy polenta for a comforting meal.

  • In sandwiches or wraps: Use leftovers as a flavorful filling for sandwiches or panini.

Variations & Substitutions

Make this recipe your own with a few simple tweaks:

  • Herbs: Stir in fresh basil, parsley, or oregano at the end for extra aroma.

  • Vinegar: Swap white wine vinegar with balsamic vinegar for a sweeter, deeper flavor.

  • Vegetables: Add zucchini, eggplant, or even potatoes for more variety.

  • Protein boost: Mix in cooked chickpeas or cannellini beans for a heartier dish.

  • Spice: A pinch of chili flakes adds gentle heat if you like it spicy.


Storage & Make-Ahead Tips

  • Refrigerator: Store peperonata in an airtight container in the fridge for up to 4 days. The flavors deepen and improve as it rests.

  • Freezer: Freeze in portions for up to 2 months. Thaw overnight in the fridge and reheat gently on the stovetop.

  • Meal prep: Make a big batch ahead of time — it works for quick lunches, sides, or as a topping throughout the week.

Italian Prosciutto Stromboli

Italian Prosciutto Stromboli

There’s nothing quite like the smell of fresh stromboli baking in the oven—the golden crust, the bubbling cheese, and that first slice revealing all the layers inside. This recipe brings together the best of the Italian deli counter: salty prosciutto, spicy capicola, tender slices of Read More

How to Make Swedish Meatballs – Better Than IKEA

How to Make Swedish Meatballs – Better Than IKEA

Swedish meatballs aren’t just a dinner—they’re a whole experience. You get small, soft meatballs made from both pork and beef, mixed with a hint of warm spice and onion. They’re browned in a pan, then finished in a creamy sauce that’s as good over potatoes Read More

Italian Lasagna with Honey Garlic Béchamel

Italian Lasagna with Honey Garlic Béchamel

If you’ve ever wanted to make Italian lasagna that actually stands out, this is the one to try. The secret is in the details: smoky bacon in the ragu, a creamy béchamel with roasted garlic and just a touch of honey, and plenty of melty mozzarella for that perfect finish. I picked up the honey-in-béchamel idea in a small Italian town, and it completely changed how I think about this classic dish.

It’s the kind of recipe that takes a little extra time, but you can taste the difference in every bite. Serve it for Sunday dinner or a special occasion, and don’t be surprised if people ask for the recipe before they’ve even finished their plate.

Italian Lasagna with Honey Garlic Bechamel 3

Ingredients

For the Ragu

  • 2.2 lbs (1 kg) ground beef (medium or lean)

  • 3.5 oz (100 g) pancetta or thick-cut bacon, finely diced

  • 2 ribs celery, finely chopped

  • 2 medium carrots, grated

  • 1 large white onion, finely diced

  • 3 garlic cloves, minced

  • 2 Tbsp tomato paste

  • 1 cup (250 ml) dry red wine

  • 2 cups (500 ml) tomato passata (pureed tomatoes)

  • 2 cups (500 ml) beef stock

  • 2 bay leaves

  • 1 small bunch fresh basil, chopped (about 1 oz / 30 g)

  • 1 small bunch fresh parsley, chopped (about 1 oz / 30 g)

  • 1 tsp dried oregano

  • Salt & black pepper, to taste

  • Olive oil, as needed

For the Honey Garlic Béchamel

  • 4 Tbsp (2 oz / 60 g) unsalted butter

  • 5 Tbsp (2 oz / 60 g) all-purpose flour

  • 4 cups (1 liter) whole milk, at room temperature

  • 1 head roasted garlic (or 1 tsp garlic powder)

  • 2–3 Tbsp honey (mild variety works best)

  • 1 cup (3 oz / 80 g) freshly grated Parmesan

  • ½ tsp freshly grated nutmeg

  • 2 egg-yolks
  • Salt & white pepper, to taste

For Assembly

  • 12 oz (350 g) fresh lasagna sheets (or dried, cooked until al dente)

  • 2 cups (7 oz / 200 g) mozzarella balls (bocconcini), halved or torn

  • ½ cup (1½ oz / 40 g) freshly grated Parmesan

Instructions

1. Make the Ragu

  1. Cook the Bacon:
    Heat a little olive oil in a large pot over medium heat. Add the pancetta or bacon and cook, stirring often, until the fat renders and the bacon is just starting to get crisp around the edges.
  2. Add the Onion:
    Add the finely diced onion right into the pot with the bacon. Sauté for a few minutes, letting the onion soften and pick up all that flavor.
  3. Add the Carrots and Celery:
    Stir in the grated carrots and chopped celery. Cook everything together for about 5 minutes, until the vegetables are softened and starting to caramelize a bit.
  4. Brown the Beef:
    Add the ground beef directly into the pot. Season with salt and pepper. Break it up as it cooks and let it brown, making sure everything is well combined.
  5. Add Garlic and Tomato Paste:
    Stir in the minced garlic and cook for 1 minute. Add the tomato paste and cook for another 2 minutes, stirring so it deepens in color and flavor.
  6. Deglaze with Wine:
    Pour in the red wine, scraping up any browned bits from the bottom of the pot. Let it simmer for a few minutes until the wine reduces by about half.
  7. Simmer the Sauce:
    Add the tomato passata, beef stock, bay leaves, oregano, half the basil and parsley, and a little more salt and pepper if needed. Stir to combine and bring everything to a gentle simmer.
  8. Cook Low and Slow:
    Cover and let the ragu cook on low heat for one and a half hours, stirring occasionally.
  9. Thicken and Finish:
    Uncover for the last 20–30 minutes so the sauce can thicken. Stir in the remaining basil and parsley. Taste and adjust seasoning as you like.
    Remove the bay leaves and let the ragu rest for about 20 minutes before assembling your lasagna.

2. Make the Honey Garlic Béchamel

  1. Roast the Garlic:
    Preheat oven to 350°F (180°C). Slice the top off a head of garlic, drizzle with olive oil, wrap in foil, and roast for 35–40 minutes until soft and caramelized. Squeeze out the cloves and mash into a paste.

  2. Prepare the Roux:
    In a saucepan, melt the butter over medium heat. Add the flour and whisk for 1–2 minutes, until it smells slightly nutty.

  3. Add Milk Gradually:
    Slowly pour in the milk, whisking constantly to prevent lumps. Bring to a gentle simmer and cook, stirring frequently, until the sauce thickens (about 7–10 minutes).

  4. Finish the Sauce:
    Remove from heat. Whisk in the roasted garlic paste, honey, Parmesan, nutmeg, salt, white pepper and egg yolks until smooth and creamy.

Italian Lasagna with Honey Garlic Bechamel 7

3. Assemble and Bake the Lasagna

  1. Preheat the Oven:
    Preheat your oven to 350°F (180°C) and lightly grease a 9×13 inch (22×30 cm) baking dish.

  2. Layer the Lasagna:

    • Spread a thin layer of ragu over the bottom of the dish.

    • Add a layer of lasagna sheets.

    • Spoon over a layer of honey garlic béchamel.

    • Add another layer of lasagna sheets.

    • Spread more ragu, then top with mozzarella balls and a sprinkle of Parmesan, plus some extra parsley and basil if you like.

    • Repeat the layers until you run out of ingredients, finishing with a layer of pasta, the rest of the béchamel, mozzarella, and a generous amount of Parmesan on top.

  3. Bake:
    Cover the lasagna with aluminum foil and bake for 20 minutes. Remove the foil and bake uncovered for another 15–20 minutes, until the top is golden and bubbling.

  4. Rest and Serve:
    Remove from the oven and let the lasagna rest for about 20 minutes before slicing. This helps it set and makes for cleaner slices. Garnish with extra basil or parsley if desired.

If this lasagna made your mouth water, why not save it for later or share it with friends? Just pin the image below to your Pinterest board so you can always find it when you’re craving something extra special. Spread the love—good recipes are meant to be shared!

Italian Lasagna with Honey Garlic Bechamel 4

Italian Lasagna with Honey Garlic Béchamel Video Recipe

Tips & Tricks for the Best Lasagna

  • Don’t rush the ragu: Letting the sauce simmer slowly is what gives it real depth and that classic Italian flavor.

  • Roast your garlic: Roasting the garlic for the béchamel softens the sharpness and brings out a natural sweetness that pairs beautifully with the honey.

  • Use fresh lasagna sheets if you can: They soak up the sauce better and give the dish a great texture.

  • Let it rest before slicing: Giving the lasagna twenty minutes to rest makes it much easier to cut clean pieces (even if it’s hard to wait).

  • Taste as you go: Don’t be shy about checking for salt, pepper, and a little extra honey or herbs to suit your taste.

  • Make it ahead: Lasagna is one of those dishes that’s somehow even better the next day. Leftovers reheat beautifully.

  • Go heavy on the cheese: Don’t skimp on mozzarella or parmesan—those golden, bubbly corners are always the first to go.

Greek Moussaka with Beef, Bacon & Creamy Pecorino Béchamel

Greek Moussaka with Beef, Bacon & Creamy Pecorino Béchamel

If you think lasagna is the ultimate comfort food, wait until you try Greek moussaka. At first glance they seem similar — hearty layers baked until golden — but moussaka takes things further. Instead of pasta, you get tender, buttery potatoes that soak up all Read More