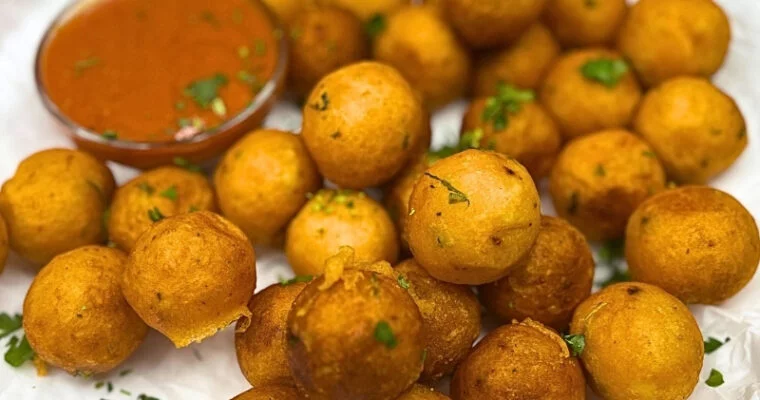
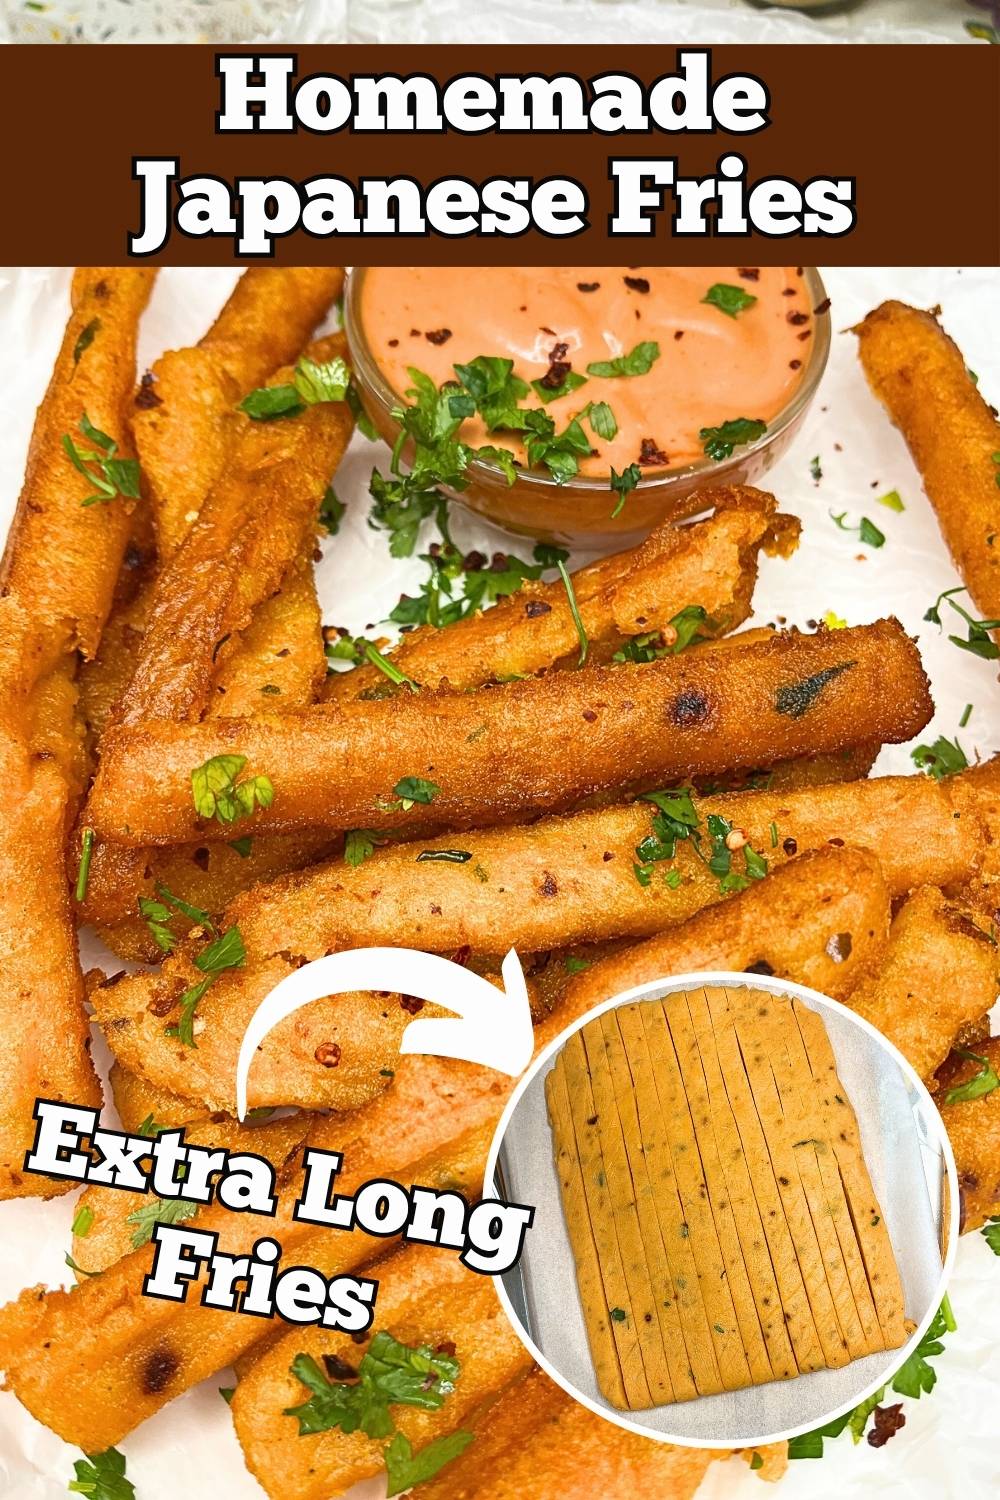
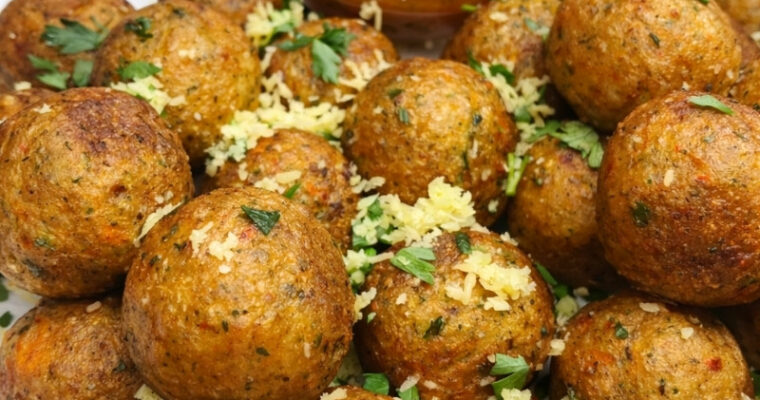
Easy and Delicious Recipes

Author: Sarah Berthold

Air Fryer Pork Tenderloin with Honey & Dijon

Air Fryer Pork Tenderloin with Honey & Dijon

If you’ve got 25 minutes and one piece of meat, you’ve got dinner. That’s the whole pitch of this air fryer pork tenderloin. You whisk a quick honey-Dijon rub, coat the pork, and let the air fryer handle the rest while you deal with literally Read More

Sticky Mango Jalapeño Chicken

Sticky Mango Jalapeño Chicken

Some chicken recipes are good… and then there are the ones you make once and suddenly your whole week starts revolving around leftovers. This mango jalapeño chicken is firmly in that second category. You get tender, golden-seared chicken pieces coated in a sticky soy-garlic glaze, Read More

Fermented Mango Jalapeño Hot Sauce

Fermented Mango Jalapeño Hot Sauce

Mango and jalapeño are one of those combinations that just make sense. The sweetness of ripe mango softens the heat, while fresh jalapeños keep the sauce lively without overwhelming everything else on the plate. This fermented mango jalapeño hot sauce is smooth, vibrant, and incredibly versatile — spicy enough to wake things up, but balanced enough to use generously.

Unlike heavily vinegary hot sauces, this one leans into fresh flavor. Ripe mango brings natural sweetness, lime adds brightness, and a quick blend turns everything into a silky sauce that works just as well on tacos as it does on grilled chicken, fish, eggs, or roasted vegetables. It comes together fast, keeps well in the fridge, and tastes even better after a short rest.

Jar of mango and jalapeno slices

Ingredients

Brine

  • 2 cups unchlorinated water (bottled, filtered, or spring) – 473 ml

  • 1 tablespoon kosher salt, sea salt, or pickling salt – 17 g

Fermentation Ingredients

  • 1½ cups ripe mango, peeled and cut into chunks

  • 4–5 fresh jalapeño peppers, stems removed, cut into chunks

  • 2 garlic cloves, peeled

  • 1 white onion

After Fermentation

  • 2 tablespoons white vinegar or apple cider vinegar

  • 1 tablespoon fresh lime juice

  • 1/2 teaspoon ground cumin

  • 1/2 teaspoon ground coriander


Instructions

1. Make the brine

In a jug or bowl, combine the water and salt. Whisk until the salt is fully dissolved and the liquid looks clear. Use cool or room-temperature water, not hot.

2. Pack the jar

Use a clean 1-quart (1-liter) glass jar.
Add the garlic and onion first, then pack in the mango chunks and jalapeños. Press everything down gently so it’s compact, but leave about 1–1½ inches (2.5–4 cm) of space at the top.

3. Add brine and weigh down

Pour the brine into the jar until all the solids are fully submerged.
Use a fermentation weight to keep everything under the liquid. If you don’t have one, a small clean glass or a zip-top bag filled with a bit of brine works just as well.
Tap the jar lightly on the counter to release trapped air bubbles.

4. Ferment

Close the jar with a fermenting lid or a regular lid screwed on loosely.
Place it on the counter, away from direct sunlight, and let it ferment for 3–5 days.

During fermentation:

  • Small bubbles are normal

  • The brine may turn cloudy

  • The smell should be pleasantly sour, slightly fruity, and fresh

Start tasting on day 3. When it tastes lightly tangy and balanced, it’s ready.

5. Strain and reserve the brine

Pour the contents of the jar through a fine mesh strainer set over a bowl.
Reserve the brine — you may need a little of it for blending.
Transfer the fermented mango, jalapeños, onion, and garlic to a blender.

6. Blend the hot sauce

Add the vinegar, lime juice, cumin, and coriander to the blender.
Blend until completely smooth.
If the sauce is too thick, add the reserved brine 1 tablespoon at a time until it reaches your preferred consistency.

Taste and adjust if needed:

  • More tang → a splash of vinegar or lime juice

  • More salt → a teaspoon of brine

  • More heat → blend in an extra jalapeño (fresh or fermented)

7. Bottle and store

Transfer the finished sauce to clean glass bottles or jars.
Refrigerate and use within 2–3 weeks.
The flavor usually improves after the first day in the fridge.

Enjoyed this recipe? Go ahead and share the image below to your Pinterest board so it’s easy to find again.

Fermented Mango Jalapeno Hot Sauce 3

Video Recipe

Fermented Pineapple Jalapeño Hot Sauce

Fermented Pineapple Jalapeño Hot Sauce

Fermented pineapple jalapeño hot sauce sounds a little fancy, but it’s actually one of the easiest ways to make a small-batch, homemade hot sauce with big flavor. Fresh pineapple, garlic, onion, and jalapeños sit in a simple salt brine for a few days, pick up Read More

Juicy Italian Marinated Chicken Breasts

Juicy Italian Marinated Chicken Breasts

Some nights I just want dinner to behave: no complicated steps, no long list of ingredients, just something juicy and full of flavor. That’s where this Italian marinated chicken comes in. You stir together a quick basil pesto marinade, throw in a few chicken breasts Read More

Quick Pickled Cherry Tomatoes

Quick Pickled Cherry Tomatoes

Somehow I always end up with a bowl of cherry tomatoes on the counter that all ripen at once. Instead of watching them wrinkle, I turn them into pickled cherry tomatoes – crisp, tangy little bites swimming in a simple apple cider vinegar brine with garlic, dill, and mustard seeds.

They’re the kind of thing you’ll start putting on everything: salads, sandwiches, burgers, cheese boards, even a quick snack straight from the jar. No canning, no fuss – just a few minutes of prep, a short rest in the fridge, and you’ve got a jar (or three) of bright, homemade pickles ready to go.

Quick Pickled Cherry Tomatoes 2

Ingredients

For the tomatoes

  • 3–4 pints cherry tomatoes (about 900–1200 g), rinsed and dried

  • 3–4 garlic cloves, peeled and lightly crushed

  • 3–4 fresh dill sprigs

  • 2 teaspoons yellow mustard seeds, divided between jars

For the brine

  • 2 cups apple cider vinegar (480 ml)

  • 2 cups water (480 ml)

  • 2 tablespoons kosher salt or pickling salt

  • 2 teaspoons sugar

Optional add-ins (use 1–3 of these for extra flavor):

  • 1–2 teaspoons whole black peppercorns

  • 1 teaspoon dill seed

  • 1 teaspoon coriander seed

  • ½–1 teaspoon red chili flakes

This amount of tomatoes and brine will usually fill about 3–4 pint jars (or 2 quart jars), depending on tomato size and how tightly you pack them.


Instructions

  1. Prepare the jars
    Use clean glass jars with tight-fitting lids.
    Divide the garlic cloves, dill sprigs, mustard seeds, and any optional spices (peppercorns, dill seed, coriander seed, chili flakes) evenly between the jars. Glass jar with spices and garlic

  2. Prick the tomatoes
    Using a toothpick or skewer, pierce each cherry tomato once or twice.
    This helps the brine soak all the way into the tomatoes so they pickle evenly, not just on the outside.
    Pack the pricked tomatoes into the jars, filling them snugly but without crushing the tomatoes.

  3. Make the brine
    In a small saucepan over medium heat, combine the apple cider vinegar, water, salt, and sugar.
    Stir and heat until the salt and sugar are completely dissolved and the brine looks clear.
    The mixture doesn’t need to boil; it just needs to be hot and well combined.

  4. Fill the jars
    Carefully pour the hot brine over the cherry tomatoes, making sure they are fully submerged.
    Gently tap the jars on the counter or slide a clean knife or chopstick around the inside of the jars to release any air bubbles.
    If you’re a little short on brine, quickly mix more using the same 1:1 vinegar-to-water ratio with a pinch of salt and sugar and top up the jars.

  5. Cool and refrigerate
    Wipe the rims if needed, seal the jars with lids, and let them cool to room temperature on the counter.
    Once cooled, transfer the jars to the refrigerator.

  6. Let them pickle and enjoy
    For the best flavor, let the tomatoes sit in the fridge for at least 48 hours before eating.
    They’ll be tasty the next day, but the flavor becomes brighter and more complex as they rest.

If this recipe ends up living in your fridge as much as it does in mine, don’t keep it to yourself—save it for later and share the love by pinning the image below to your Pinterest board so friends can find it too.

Colorful jars of pickled cherry tomatoes

Storage

Since these are refrigerator pickles, they always need to stay chilled. Once the jars have cooled and moved to the fridge, they’ll keep their best flavor and texture for about 2–3 weeks.

A few simple tips:

  • Always use a clean fork or spoon to scoop out the tomatoes – no fingers dipping into the brine.

  • Make sure the tomatoes stay covered with liquid; if they start peeking out, they’ll soften faster.

  • If anything smells off or the brine looks strange, it’s safer to toss the jar and start a fresh batch.

Most of the time, though, they disappear long before you need to worry about how long they last.

Video Recipe

FAQ – Quick Pickled Cherry Tomatoes

How long do these pickled cherry tomatoes last?
Kept in the refrigerator, they’re best within 2–3 weeks. They usually disappear much faster, but for ideal flavor and texture, try to enjoy them within that window.


Do I need any special canning equipment?
Nope. These are refrigerator pickles, not a shelf-stable canned recipe. You just pour the warm brine over the tomatoes, let everything cool, and store the jars in the fridge.


Can I use a different vinegar?
Yes. Apple cider vinegar gives a mild, fruity tang, but you can use white vinegar or white wine vinegar instead. Just make sure it’s around 5% acidity and avoid very dark or sweet vinegars like balsamic, which will change the flavor and color a lot.


Can I use other types of tomatoes?
Cherry and grape tomatoes work best because they stay firm and bite-sized. You can use small plum or cocktail tomatoes if you prick them well, but very large tomatoes don’t hold their shape as nicely in this quick pickle.


Will the tomatoes stay crunchy?
They’ll stay firm with a bit of bite, especially in the first week. Over time, the brine will soften them a little, but they should still be pleasant and juicy, not mushy, if kept within the recommended time.


Can I reuse the brine for another batch?
It’s tempting, but it’s better not to reuse the brine. The salt and vinegar strength changes as the tomatoes sit, so a second batch won’t pickle properly. If you love the flavor, it’s quick to whisk together a fresh pot of brine.

Beer-Braised Pork Medallions with Mushroom Onion Sauce

Beer-Braised Pork Medallions with Mushroom Onion Sauce

You know those nights when you want something that tastes like you’ve gone out to a cozy little pub, but you’re absolutely not in the mood for a complicated recipe? That’s exactly how these Beer-Braised pork medallions with creamy mushroom onion sauce were made. Juicy Read More

Raw Raspberry Coconut Cake (No-Bake, Vegan & Gluten-Free)

Raw Raspberry Coconut Cake (No-Bake, Vegan & Gluten-Free)

This raw raspberry–coconut cake is one of those desserts that looks fancy, tastes like summer, and doesn’t ask you to turn on the oven. You get a chewy almond–date crust, a bright raspberry–coconut cream layer, and a gorgeous natural color from fruit only. It’s naturally Read More

How to Make Ajvar: Roasted Red Pepper Spread (Large Yield)

How to Make Ajvar: Roasted Red Pepper Spread (Large Yield)

If you grew up anywhere near the Balkans, you know ajvar is autumn in a jar: sweet, smoky peppers, a whisper of eggplant, and a glossy finish of good oil. This version follows the classic flow—roast → peel → drain → cook—so you get deep flavor and a thick, scoopable spread that sits proudly on bread, next to grilled meats, or with cheese and olives.

How to Make Ajvar Roasted Red Pepper Spread

Ingredients

  • 22 lb red sweet peppers (10 kg), thick-fleshed

  • 6½ lb eggplant (3 kg)

  • 1/3 cup distilled white vinegar, 9% (4-5 Tbsp / 60 – 70 ml)

  • 3 Tbsp sugar (about 36 g)

  • 4 Tbsp kosher salt (about 60 g; start with 3 Tbsp if using fine salt, then adjust)

  • 1⅔ cups neutral oil (400 ml; sunflower or grapeseed)

Optional (scaled):

  • 2–4 hot red chilies, roasted with the peppers

  • 4–6 garlic cloves, roasted in skins

  • 1 tsp smoked paprika

Yield: ~14–16 cups (about 7–8 pint jars).


Instructions 

  1. Roast (bake)
    Preheat to 475°F (245°C). Line multiple sheet pans. Roast whole peppers/eggplants 25–35 min, turning, until peppers are blistered and eggplants collapsed. Expect 2–3 oven batches. roasted peppers for ajvar

  2. Steam & peel
    Pile into a big bowl, cover with a towel 15–20 min. Peel and seed peppers; scoop eggplant flesh. (Peel/seeds chilies; squeeze roasted garlic, if using.)

  3. Drain well (crucial for thickness)
    Rough-chop, then transfer to a large colander (or two) set over a bowl. Weight it (plate + cans) and drain 1–2 hours (longer = thicker). Press gently; discard liquid.

  4. Grind or pulse
    Process to mostly smooth (or grind for rustic texture).  grinded red peppers for ajvar

  5. Cook down
    Warm 1 cup (240 ml) oil in a wide, heavy pot (or two pots) over medium. Add the purée and cook, stirring often, until reduced, thick, and glossy, 60–80 min (big batch = a bit longer).
    Drizzle in the remaining ⅔ cup (160 ml) oil in a few additions to build shine and body.

  6. Season & finish
    Stir in vinegar, sugar, salt (and optional paprika). Simmer 5 min, then taste: gentle sweetness, balanced salt, bright clean finish. Adjust salt/vinegar to preference.


Jarring & Storage 

  • Heat the jars: Place clean jars (without lids) in a 225°F (110°C) oven for 10 minutes; keep them hot until filling. Simmer lids/rings in hot water (off the boil).

  • Fill hot: Ladle hot ajvar into hot jars, leaving ½ inch (1.3 cm) headspace. Wipe rims and apply hot lids.

  • Storage:

    • Keep sealed jars in a cool, dark spot (a cupboard—not near the stove or in the sun). 
    • Best by 6 months for flavor and color. 
    • Before opening, check the lid: it should be firmly concave and not flex. If anything looks or smells off, don’t taste—discard.
  • After opening use within 1-2 weeks. Always use a clean spoon so it stays fresh longer.

Save the image below Pinterest to come back when pepper season hits.

How to Make Ajvar Roasted Red Pepper Spread Large Yield 2

Video Recipe

FAQ: Ajvar (Smoky Roasted Red Pepper Spread)

What kind of peppers should I use for ajvar?
Use long, sweet red peppers—known in Serbia as roga/šilja (often sold as kapia, shepherd, bullhorn, Italian sweet/frying peppers). They’re meaty with thin skins, so they blister and peel easily and make a thicker, sweeter ajvar. If you can’t find them, use the thickest red bell peppers you can; texture will be a bit different but still great. Avoid hot peppers unless you want heat—add them sparingly.

What is ajvar?
A silky, smoky spread made from roasted red peppers with a touch of eggplant—common across the Balkans. Great on bread, with grilled meats, eggs, or cheese boards.

How do you pronounce “ajvar”?
Eye-var.”

Is ajvar spicy?
Usually mild. Add roasted hot chilies (or a pinch of cayenne) if you like heat.

Why add eggplant at all?
It adds body and silkiness without muting the pepper flavor. You can make a pepper-only version; texture will be a bit firmer.

Why roast at high heat (e.g., 450–475°F)?
High heat blisters skins fast and builds smoky flavor without drying the flesh. Finish under the broiler if you want extra char.

Do I really need to drain the roasted peppers/eggplant?
Yes—water is the enemy of thick, glossy ajvar. A good 1–2 hour drain (weighted) means less stove time and better texture.

My ajvar is too thin—how do I fix it?
Keep simmering gently and stir often until a spatula dragged through the pot leaves a line that slowly closes.

Serving ideas?
Spread on toast or flatbreads, tuck into sandwiches and burgers, spoon over grilled chicken or sausages, or pair with feta, olives, and herbs. A drizzle of olive oil and a few chili rings look great on top.

Honey Butter Chicken (Skillet, 20 Minutes)

Honey Butter Chicken (Skillet, 20 Minutes)

Honey Butter Chicken is the kind of one-pan dinner that makes weeknights feel easy again. Hot skillet, light seasoned coating, quick sear; then a buttery honey glaze that picks up a little tang from apple cider vinegar and depth from soy. It finishes glossy, not Read More